
We all chase that perfect slice, right? That one bite that reminds you why this dessert is legendary. I’m talking about a truly decadent new york cheesecake—the kind that’s impossibly rich, wonderfully dense, and smooth as velvet. After years on the road tasting the best traditional American desserts this country has to offer, I knew I had to crack the code for a home kitchen version. This recipe, The Ultimate Classic New York Cheesecake, is the result of getting every single detail locked down. We’re aiming for that tall, creamy texture that screams classic bakery style, and I promise you, this is the best cheesecake ever. If you want to see another amazing cream cheese creation, check out my creamy baked dessert recipe!
- Why This new york cheesecake Recipe Delivers That Classic Texture
- Gathering Ingredients for Your new york cheesecake
- Homemade Cheesecake Instructions: Building the new york cheesecake
- Water Bath Cheesecake Technique for a Tall Cheesecake
- The Slow Cooling Method: How to Bake Cheesecake Perfectly
- Chilling and Serving Your new york cheesecake
- Ingredient Notes and Substitutions for new york cheesecake
- Frequently Asked Questions About Classic Cheesecake Recipe
- Storing and Reheating Your Indulgent Cream Cheese Dessert
Why This new york cheesecake Recipe Delivers That Classic Texture
Listen, making a truly great New York Style Cheesecake isn’t just about throwing ingredients in a bowl. It’s about honoring the density and height that make it famous. When I set out to nail this, I focused only on the proven techniques that bakers in the Big Apple use. We aren’t guessing here; we are following a method that guarantees results.
- It delivers that sought-after Tall Cheesecake profile.
- It sets you up perfectly for that sought-after No Crack Cheesecake top.
- We use the essential water bath technique—that’s what separates the amateurs from the pros when it comes to homemade cheesecake instructions!
If you’re ready to perfect this, jump over to my full guide on how to bake cheesecake perfectly. It walks through all the fiddly bits!
Key Elements for a Rich Dessert Recipe
The secret to that luxurious mouthfeel lies entirely in the prep work. You absolutely have to use full-fat cream cheese—no substitutions, trust me! Also, don’t even think about mixing cold ingredients. Everything needs to be sitting out until it’s tempered. This ensures that beautiful, Dense Cheesecake Filling beats together without any lumps, which is key to preventing surface flaws later on.
Gathering Ingredients for Your new york cheesecake
Okay, let’s get our supplies lined up. Good baking always starts with having every single thing measured out right where you can grab it. This is non-negotiable when we are chasing that smooth, Creamy Baked Cheesecake texture. Pull those dairy items out an hour before you even think about turning on the mixer! Trust me, room temperature ingredients are the first step to success here.
If you’re curious about another great cream cheese treat you can make without baking, I highly recommend taking a look at my snickerdoodle cheesecake recipe! It’s fantastic.
For the Graham Cracker Crust
This part is super easy, but it needs to be packed in tight! We need:
- 1 1/2 cups graham cracker crumbs
- 1/4 cup granulated sugar (just for this crust layer!)
- 6 tablespoons unsalted butter, melted
For the Creamy Baked Cheesecake Filling
This is where the magic happens. Remember: full-fat is the only way to go for that deep flavor and dense structure we love in a Classic Cheesecake Recipe. We need:
- 4 (8 ounce) packages full-fat cream cheese, softened to room temperature
- 1 1/2 cups granulated sugar (for the filling)
- 1/4 cup all-purpose flour
- 1 teaspoon vanilla extract
- 1/4 teaspoon salt
- 1 cup sour cream, room temperature
- 4 large eggs, room temperature (yes, room temperature on these too!)
Homemade Cheesecake Instructions: Building the new york cheesecake
Now that every ingredient is ready and waiting, it’s time to build this beauty. I’ve learned that for a cheesecake this involved, you’ve got to treat each step like paving a perfectly smooth road. We’re building a foundation that won’t crumble under the weight of that gorgeous, dense filling! After you master this process, check out my guide on how to make the best cheesecake ever for even more dessert inspiration.
Preparing and Pre-Baking the Crust
First things first, get that oven preheated to 350°F (175°C). Mix up those graham cracker crumbs, the crust sugar, and the melted butter until it looks like wet sand. Pack that mixture down firmly into your 9-inch springform pan—use the bottom of a measuring cup to really press it flat and about an inch up the sides. Slide that crust into the oven for 10 minutes. When it comes out, you need to let it cool completely. Don’t rush this! Trying to pour warm batter onto a warm crust spells trouble down the line.
Mixing the Dense Cheesecake Filling (Do Not Overmix)
This is the moment where people often mess up their chance at a No Crack Cheesecake. We beat that room-temperature cream cheese until it’s looking totally smooth, scraping the bowl down halfway through. Then, we gradually add the sugar, flour, vanilla, and salt. Keep the mixer on low speed! When you add the sour cream, blend it until it disappears. The absolute final step is adding the four eggs, one at a time. My biggest piece of advice here, learned the hard way, is to stop mixing the *second* the yolk vanishes. Seriously. Don’t try to make it extra smooth after the last egg goes in. Overmixing whips air into the batter, and that air expands while baking, leading straight to cracks. For the best results, make sure you scrape the sides and bottom *before* adding the eggs to make sure everything is incorporated.
For a deeper dive on why texture matters in baking, peek at this great article on tall and creamy New York Cheesecake for more background!
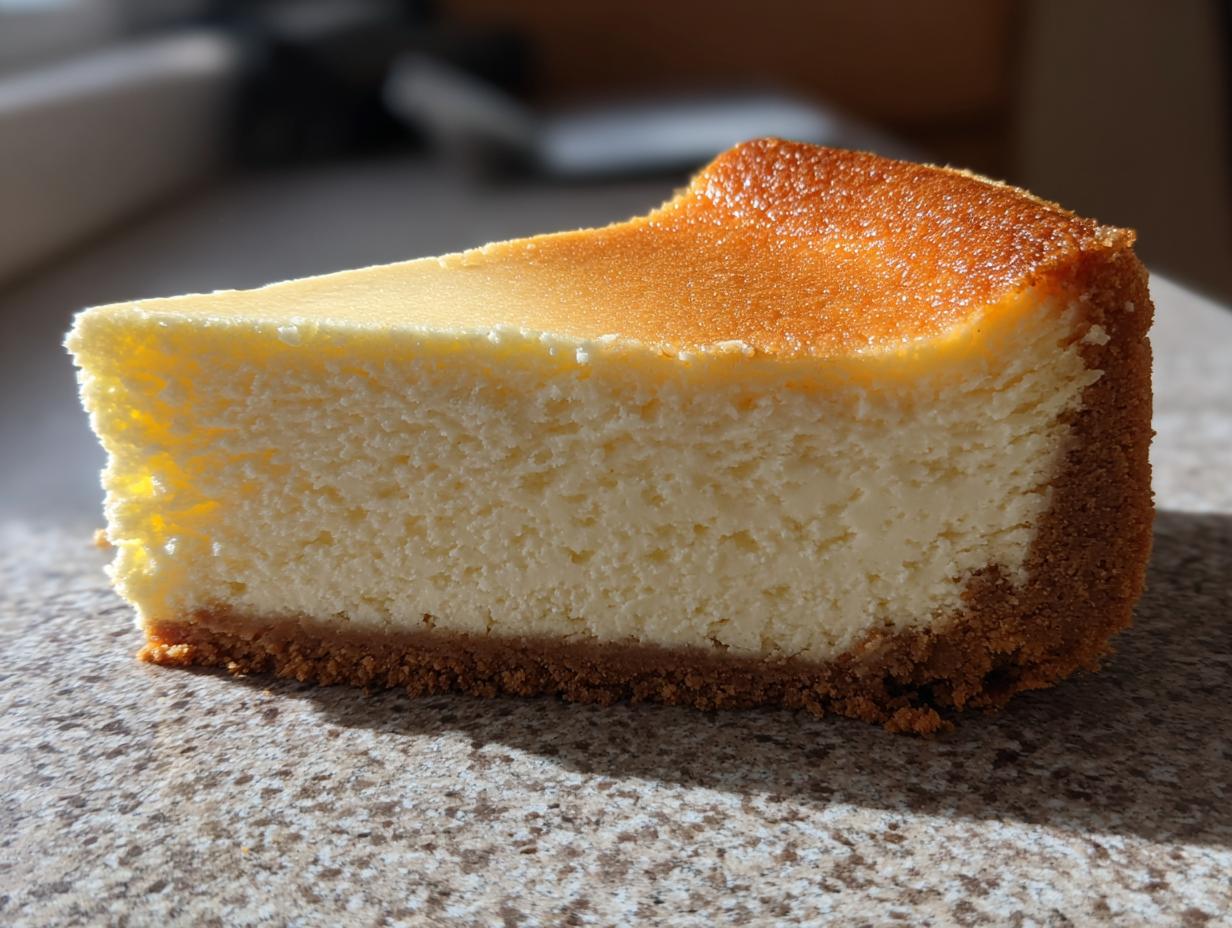
Water Bath Cheesecake Technique for a Tall Cheesecake
Okay, this next step is why we don’t just have any dessert; we have a true, stunning new york cheesecake. I’m talking about the water bath, or the *bain-marie*. I know it sounds fancy, but it’s the non-negotiable secret weapon for achieving that flawless surface and that beautiful height, making it a true Tall Cheesecake.
Why do we do this? Simple: steam equals moisture. The water bath insulates the sides of the cheesecake, preventing them from cooking too fast and seizing up before the middle is done. This gentle, even heat is what keeps the top smooth and crack-free. When I first tried making one without it, the edges looked like dried-out sand dunes. Never again!
Before anything goes near the water, you’ve got to protect that springform pan. Grab some heavy-duty aluminum foil—I mean the thick stuff—and wrap the bottom and all the way up the sides of your pan. You want two or three layers. If any water sneaks in there, that beautiful Graham Cracker Crust turns into soggy sadness. Check out how perfectly I wrap mine over at my post about homemade pita bread puffs—the concept for sealing moisture out is the same!
Baking and Temperature Adjustments
Once your foil-wrapped pan is nestled inside a larger roasting pan (this is where the boiling water goes!), we bake. We start hot and then we immediately slow things down. Set your oven to 350°F (175°C) and bake the cheesecake for the first 15 minutes. That initial blast helps set the structure.
Then, here is the most important moment for controlling texture: reduce the oven temperature way down to 250°F (120°C). Let it bake there for another 60 to 75 minutes. How do you know when it’s done? You’re not looking for a hard, firm center. When you gently nudge the side of the roasting pan, the very middle—maybe a two-inch circle—should still have a slight, gentle jiggle. It should look set on the outside but wobbly in the middle. That slight give is the sign of perfection!
The Slow Cooling Method: How to Bake Cheesecake Perfectly
Okay, you’ve baked this incredible, Rich Dessert Recipe using the water bath—don’t get cocky yet! We’ve prevented the major disaster, but we still have to handle the cooldown sequence like brain surgeons. The number one cause of cracks, even with a water bath stabilizing things, is shocking the cheesecake with cold air too soon. It shrinks too fast, and boom, you get a surface fracture.
This is what I do, and honestly, it’s the only way I trust my finished product. Once that 75-minute bake time is up and you see that gentle jiggle in the center, you turn the oven OFF. Completely off! Don’t even peek or think about opening the door for a solid hour. I mean it. If your oven has a pilot light or a very low residual warmth, that’s fine, but the heat source itself needs to be killed.
After that hour of resting inside the turned-off oven, now you can finally crack the door open about two inches. You can use a wooden spoon handle or a rubber spatula wedged in the door to keep it propped open slightly. Let it sit there, cooling down slowly, for another hour. This gradual temperature drop is vital because it lets the cheesecake contract gently instead of snapping. This slow, deliberate cool-down builds the confidence you need that you’ve made a truly perfect dessert. For ideas on what to serve alongside that amazing slice, check out my favorite make-ahead baked oatmeal for breakfast the next day!
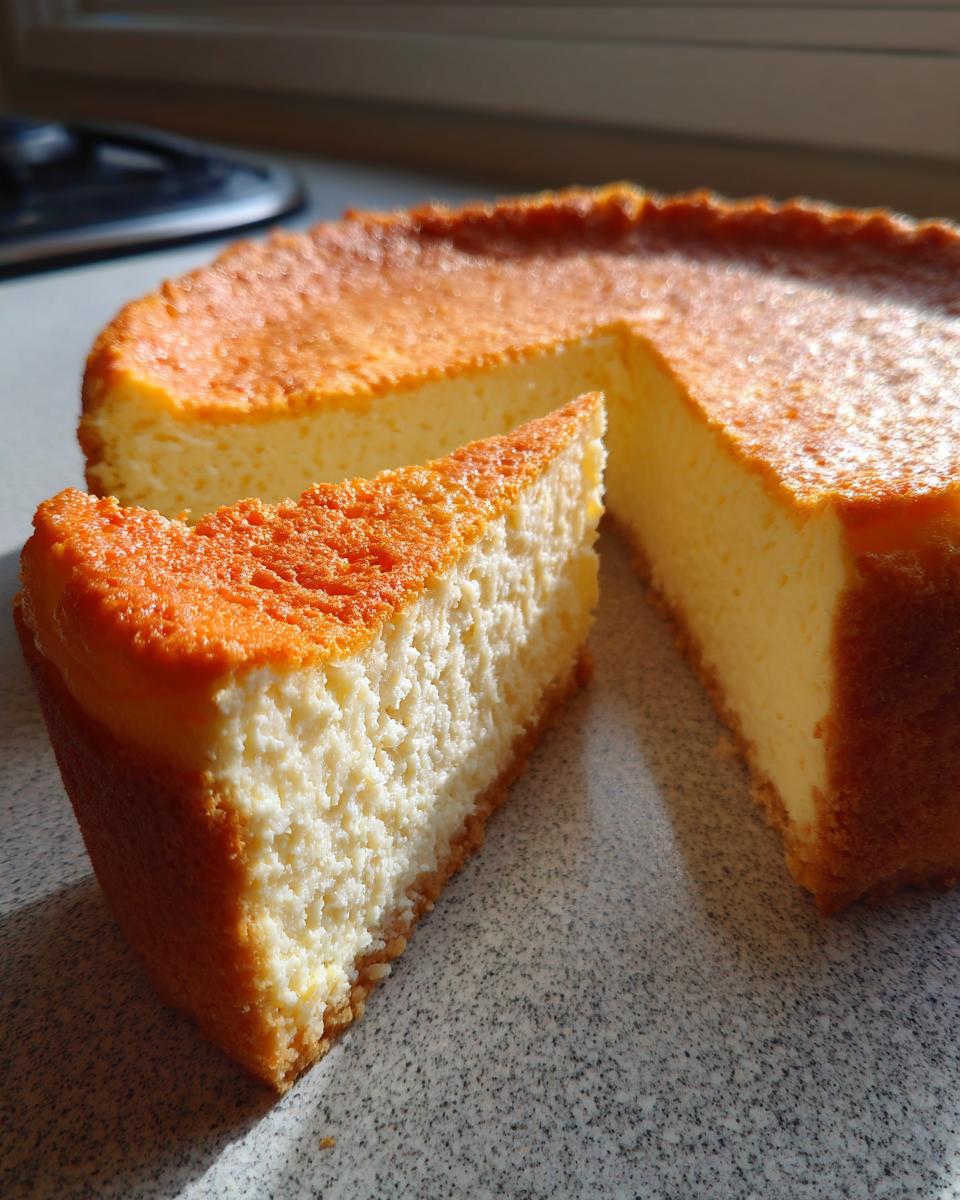
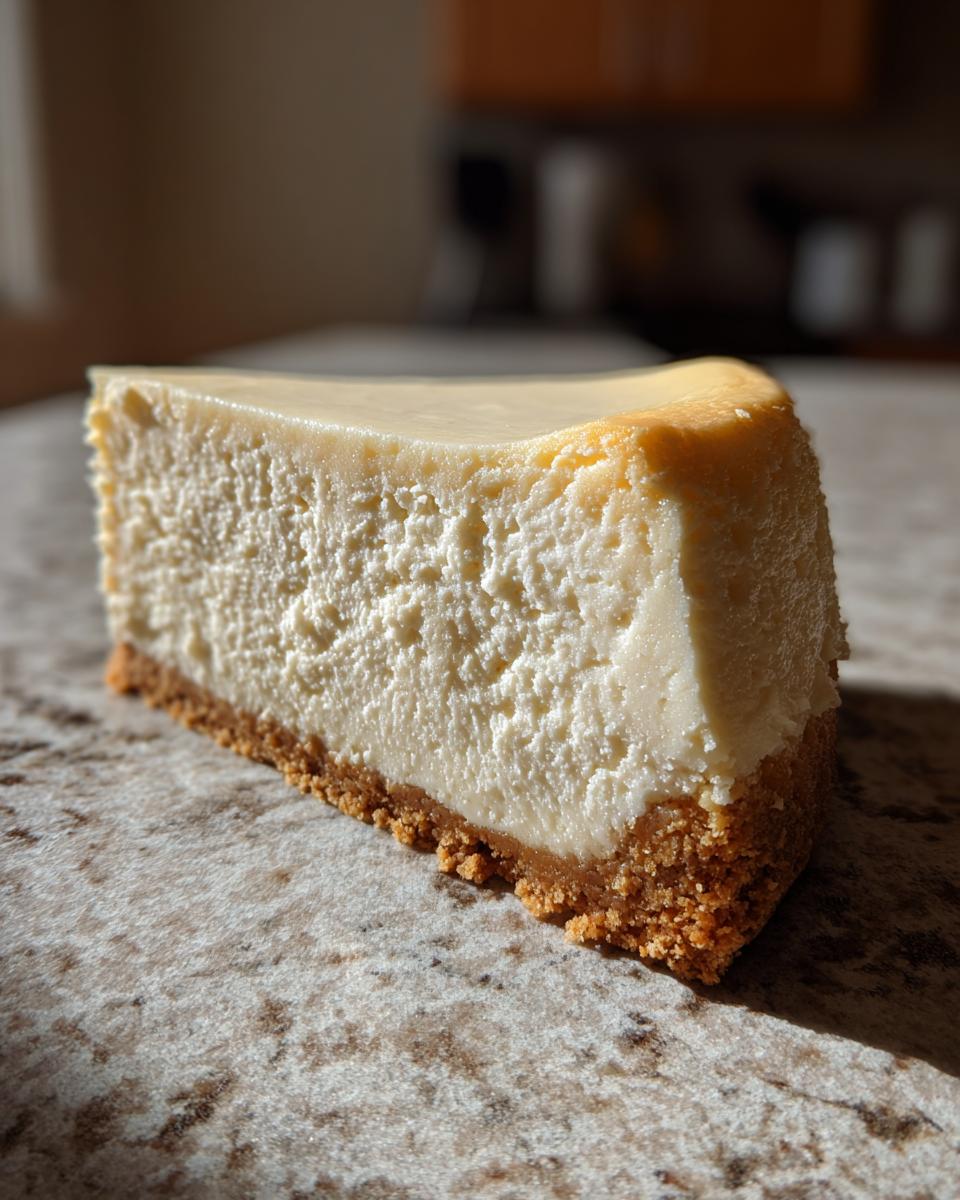
Chilling and Serving Your new york cheesecake
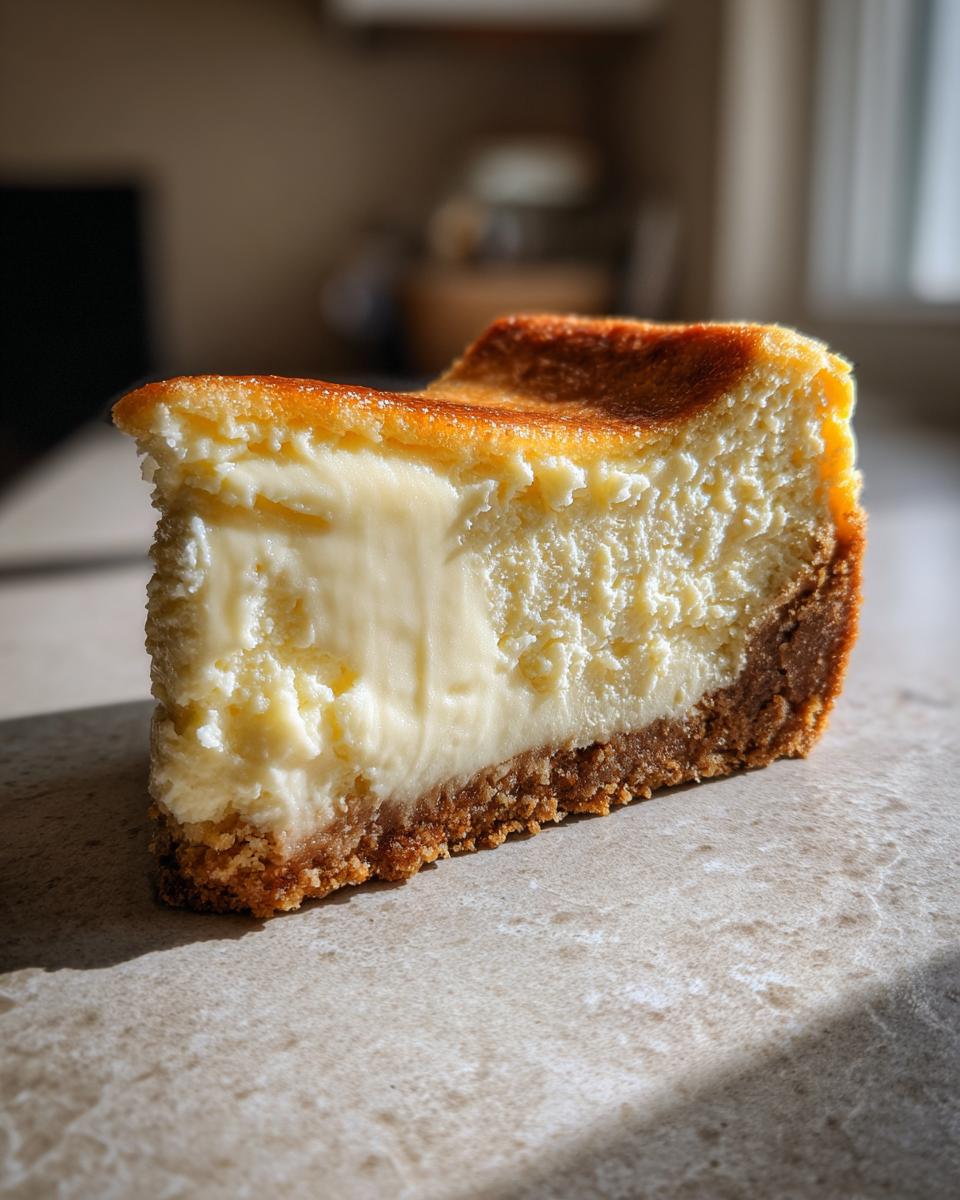
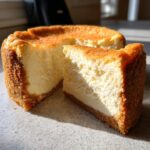
We’re almost there! The hardest part of this whole process—the baking—is done. But if you cut into this beautiful new york cheesecake now, it’ll weep and collapse on you. Patience, friend, is the final, greatest ingredient in any Classic Cheesecake Recipe.
You must chill this dessert. I mean it. Six hours is the absolute minimum if you want that proper structure, but frankly, if you want the unparalleled flavor and that truly dense texture that separates a good cheesecake from a phenomenal one, you need to let it hang out in the fridge overnight. It really deepens the flavor profile and firms up everything beautifully.
When the moment finally comes to slice this beauty, especially if you want those sharp, clean edges that look like they came straight from a Classic Bakery Style Desserts case, I have a trick my mentor on the road taught me. You need a very sharp, smooth knife. Dip that knife tip deep into a tall mug of piping hot water. Wipe the blade completely dry with a clean towel immediately. Then, make your cut, pull the knife out, and repeat the hot water/wipe down before the *next* cut.
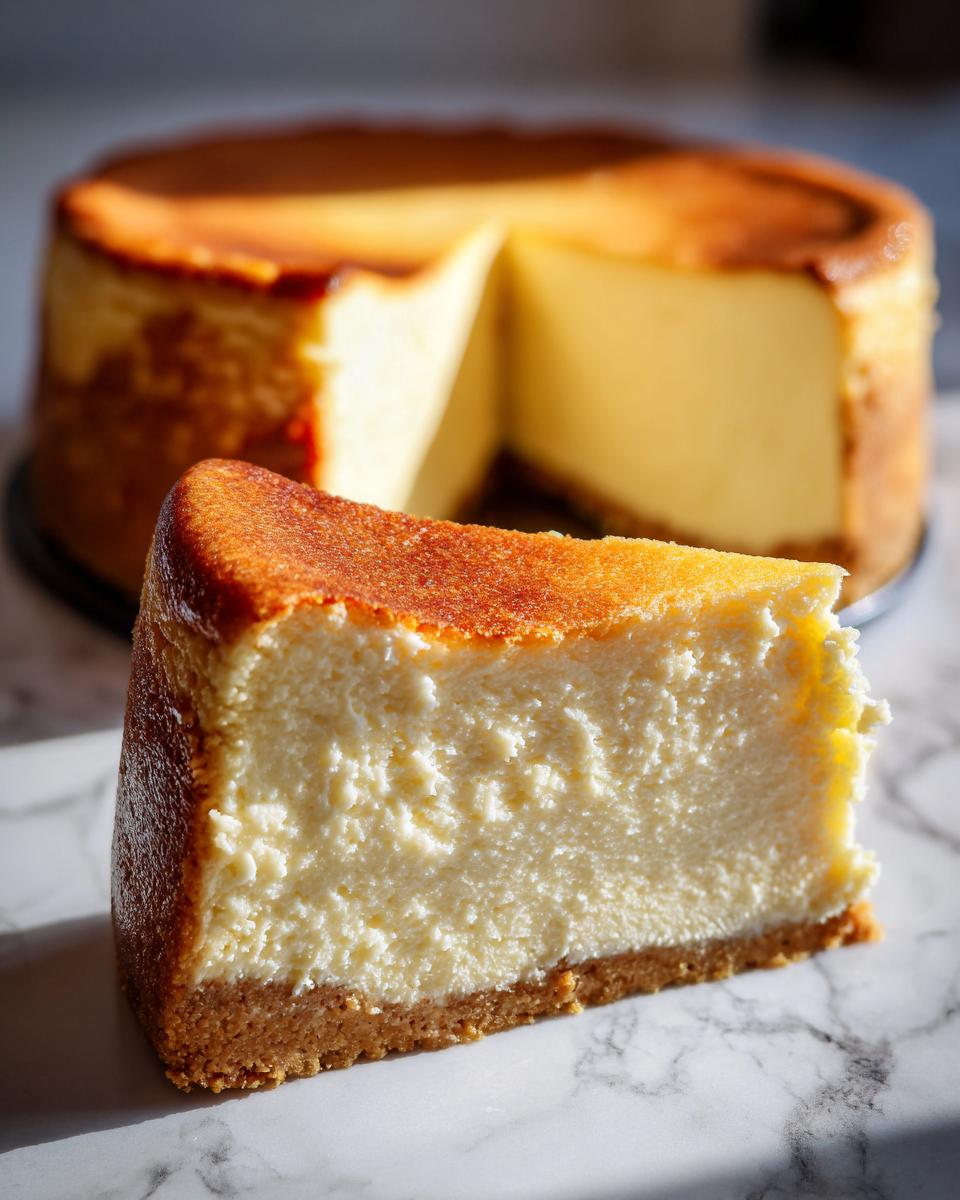
It sounds fussy, I know! But that hot, clean blade glides through the cold, rich filling, melting the little bit of fat it touches just enough to leave a perfect line. I use this same technique when I’m slicing up my creamy honey butter skillet corn when serving it warm, just to keep the presentation clean! If you follow this slicing tip, you’ll seriously impress everyone showing off your gorgeous slice.
If you are looking for more inspiration on truly classic desserts, stop by and check out the timeless recipes over at Juicy Table!
Ingredient Notes and Substitutions for new york cheesecake
I get so many questions about what happens if you try to fudge the ingredients in this recipe. Look, mastering the new york cheesecake is about dedication to quality, especially when it comes to the base ingredients. For this particular classic dessert, we just can’t compromise on a few things if we want that rich, amazing flavor!
Let’s talk cream cheese first. You *must* use full-fat cream cheese. I know the low-fat stuff exists—maybe use that for a less indulgent cream cheese topping for bagels—but for this amazing indulgent cream cheese dessert, the higher fat content is what gives us that dense, tight, velvety texture we’re after. Anything less than full-fat changes the structural integrity, and frankly, it just won’t taste right.
Now, let’s look at the base. While the recipe calls for that perfect Graham Cracker Crust, I know sometimes you run out or just want a different flavor note. A perfectly fine swap if you’re in a pinch are vanilla sandwich cookies—you know, the ones with the white cream filling! Just pop out the cream filling first, crush the wafers, and substitute them cup-for-cup for the graham crumbs. It gives you a slightly sweeter, deeper crust that works beautifully with our tangy filling. Try whipping up my creamy deviled eggs sometime if you ever need another crowd-pleasing, rich appetizer!
Frequently Asked Questions About Classic Cheesecake Recipe
I totally get it—when you take the time to bake something this major, you want zero surprises. I’ve gathered up the questions I hear most often about getting that legendary texture and handling leftovers. It’s all about mastering the small details, and honestly, after mastering this, you’ll feel like you can tackle anything! If you need another rich dip for your next gathering, try my creamy crockpot Reuben dip recipe.
Can I skip the water bath for this new york cheesecake?
Oh, you *could* skip it, but I really, really wouldn’t recommend it if you’re aiming for that perfect slice. The water bath (or bain-marie) introduces necessary steam into the oven environment. Without that steam circulating gently around the pan, the air in your oven gets excessively dry. This dries out the edges of your cheesecake filling first, causing them to set too fast and shrink away from the center. That rapid shrinking is what causes those ugly surface cracks, ruining the look of your beautiful, creamy baked cheesecake. For that classic, edge-to-edge perfection, the water bath is your insurance policy.
What is the best way to store leftover creamy baked cheesecake?
Storing this rich dessert recipe correctly is just as important as baking it right! Once the cheesecake is fully chilled (and remember, that’s at least six hours, preferably overnight), you need to cover it. Don’t just slap plastic wrap directly onto the top, though, because it might stick to that perfect surface! Instead, take a large piece of plastic wrap or foil, drape it loosely over the top, and let it rest gently against the sides. If you’re not eating it immediately, move it to an airtight container after the initial chilling. It stays fantastic in the fridge for about 4 to 5 days. If you need to keep it longer, wrap the entire cooled, unsliced cheesecake tightly in plastic wrap, then another layer of foil, and flash freeze it.
Storing and Reheating Your Indulgent Cream Cheese Dessert
You’ve made it! You’ve conquered the water bath, you’ve waited patiently through the chilling process, and now you have this gorgeous, towering slice of pure decadence in front of you. But the job isn’t quite done until we talk about how to keep this amazing new york cheesecake tasting just as incredible tomorrow as it does today—or next week!
Good news: This is one of those desserts that actually improves over the first day because all those flavors get a chance to really meld together in the cold. In the refrigerator, kept covered—and remember that trick about loosely tenting the plastic wrap so it doesn’t touch that perfect top—it will stay absolutely phenomenal for about 4 to 5 days. If you try to serve it on day four, you’ll swear it tastes even better than day one!
If you have leftovers that you just can’t get to in the next few days, freezing is an option, but you have to be gentle with it. Let the whole cheesecake cool completely first, then wrap it up tightly. I mean like, wrap it in plastic wrap, then wrap it again in heavy-duty foil. Think of it as tucking it into a cozy sleeping bag for a trip to the freezer. It freezes beautifully for up to a month.
Now, about reheating? Honestly, cheesecake is not really a reheated dessert. It’s meant to be eaten cold or at cool room temperature. If you pull a slice out of the freezer, the best way to handle it is just to unwrap it and let it thaw slowly in the fridge overnight, or just leave it on the counter for an hour or two until it reaches that cool, creamy stage again. Don’t try to microwave it, seriously, the texture will turn gummy and sad on you! For more great make-ahead treats, check out my refrigerator cake recipe—that one actually *likes* being cold!
If you are looking for more inspiration on truly classic desserts, stop by and check out the timeless recipes over at Juicy Table!
PrintThe Ultimate Classic New York Cheesecake: Rich, Creamy, and Perfectly Crack-Free
You can make a truly rich, dense, and creamy New York Style Cheesecake right in your home kitchen. This recipe focuses on the essential water bath technique to give you that flawless, tall, and crack-free top that defines the best cheesecake ever.
- Prep Time: 30 min
- Cook Time: 90 min
- Total Time: 10 hours 0 min
- Yield: 12 servings 1x
- Category: Dessert
- Method: Baking
- Cuisine: American
- Diet: Vegetarian
Ingredients
- 1 1/2 cups graham cracker crumbs
- 1/4 cup granulated sugar (for crust)
- 6 tablespoons unsalted butter, melted
- 4 (8 ounce) packages full-fat cream cheese, softened to room temperature
- 1 1/2 cups granulated sugar (for filling)
- 1/4 cup all-purpose flour
- 1 teaspoon vanilla extract
- 1/4 teaspoon salt
- 1 cup sour cream, room temperature
- 4 large eggs, room temperature
Instructions
- Prepare the crust: Preheat your oven to 350°F (175°C). Mix graham cracker crumbs, 1/4 cup sugar, and melted butter. Press the mixture firmly into the bottom and about 1 inch up the sides of a 9-inch springform pan. Bake the crust for 10 minutes. Remove and let it cool completely.
- Prepare the water bath: Wrap the outside bottom and sides of the springform pan tightly with heavy-duty aluminum foil to prevent water from leaking in. Place the foil-wrapped pan inside a larger roasting pan.
- Make the filling: In a large bowl, beat the softened cream cheese with an electric mixer until completely smooth. Scrape down the sides.
- Gradually beat in 1 1/2 cups sugar, flour, vanilla extract, and salt until just combined. Do not overmix.
- Beat in the sour cream until smooth. Add the eggs one at a time, mixing on low speed after each addition only until the yolk disappears. Stop mixing as soon as the last egg is incorporated. Overmixing adds air, which causes cracks.
- Pour the filling over the cooled crust.
- Bake using the water bath: Carefully place the roasting pan with the cheesecake into the oven. Pour boiling water into the roasting pan until the water reaches about halfway up the sides of the springform pan.
- Bake at 350°F (175°C) for 15 minutes. Then, reduce the oven temperature to 250°F (120°C) and continue baking for 60 to 75 minutes more, or until the edges are set but the center still has a slight jiggle when gently nudged.
- Cool slowly: Turn off the oven. Prop the oven door open slightly (about 2 inches) and let the cheesecake cool inside the oven for 1 hour. This slow cooling prevents cracking.
- Remove the cheesecake from the water bath and foil. Let it cool completely on a wire rack at room temperature.
- Chill: Cover the cheesecake loosely and refrigerate for at least 6 hours, but preferably overnight, before slicing and serving.
Notes
- Room temperature ingredients are crucial for a smooth, dense cheesecake filling. Take cream cheese, sour cream, and eggs out at least one hour before starting.
- To achieve a tall cheesecake, ensure your cream cheese is fully softened and you mix the batter just until combined.
- When slicing, dip a long, sharp knife in hot water and wipe it dry between each cut for clean edges.
Nutrition
- Serving Size: 1 slice
- Calories: 450
- Sugar: 35g
- Sodium: 300mg
- Fat: 30g
- Saturated Fat: 18g
- Unsaturated Fat: 12g
- Trans Fat: 0.5g
- Carbohydrates: 38g
- Fiber: 1g
- Protein: 8g
- Cholesterol: 120mg