
You know those days when you’re craving something deeply, wonderfully chocolatey, but the thought of turning on the oven feels like a huge commitment? I get it. When I was out on the road driving those long hauls, the best treats were the ones that delivered maximum comfort with minimal fuss. That’s exactly what led me to perfect this **brownie refrigerator cake**. Forget complicated steps; we’re taking fudgy brownie squares, layering them with heavenly creamy fillings, and letting the magic happen overnight in the chilled peace of your fridge. This isn’t just a dessert; it’s my tribute to accessible, impressive comfort food. If you need a showstopper for a potluck that you can build tomorrow, trust me, this is it. You can find more easy dessert ideas over here! Check out our favorite desserts.
- Why This Brownie Refrigerator Cake is Your New Go-To Dessert
- Gathering Ingredients for Your Brownie Refrigerator Cake
- Step-by-Step Assembly of the Brownie Refrigerator Cake
- Tips for the Best Brownie Refrigerator Cake Success
- Variations for Your Fudgy Brownie Icebox Cake
- Serving and Storing This Decadent Chilled Desserts Masterpiece
- Frequently Asked Questions About No Bake Brownie Cake
- Nutritional Estimate for This Chilled Dessert
- Share Your Experience Making This Dessert
Why This Brownie Refrigerator Cake is Your New Go-To Dessert
When I started developing this recipe, I wanted the richness of a bakery treat without the fuss of timing an oven door. This dessert nails that because it’s all about assembly, not baking. It’s truly one of the best simple, satisfying chocolate fixes you can make.
- Zero Oven Time: The Ultimate No Oven Chocolate Desserts
Seriously, put the oven mitts away! This reigns supreme as one of the best no-bake options we have. Keeping the kitchen cool, especially in the summer, is always a win in my book.
- Perfect for Parties: Make Ahead Chocolate Cake Ready When You Are
The absolute best part? You bake (or buy!) the brownies, mix the fillings, and then leave it alone. It’s the ideal make ahead chocolate cake for when you’re entertaining. Everything sets up beautifully while you’re busy hosting.
- Incredible Texture: A Layered Chocolate Brownie Dessert Experience
It’s not just chocolate; it’s layers of texture! You get that fudgy, dense chew from the brownie, perfectly contrasted by that light, cool, creamy filling. It’s a total textural symphony in every bite.
Gathering Ingredients for Your Brownie Refrigerator Cake
Alright, let’s talk supply run! The beauty of this **Brownie Refrigerator Cake** is that, minus the brownies themselves, you’re pulling standard staples out of your pantry. I always like to have everything ready to go before I start assembling, because once that pudding starts setting up, you need to move fast! Seriously, make sure your cream cheese is fully soft—rock hard will ruin your filling, trust me.
Ingredients for the Brownie Base and Creamy Filling
Here is exactly what you’ll need to pull off this chocolate dream. You can find my tips for making homemade pudding, though honestly, instant works like a charm here for speed! If you want to make pudding from scratch, check this out. Remember, everything needs to be prepped correctly before mixing.
- 1 (18.25 ounce) box fudgy brownie mix, prepared and cooled (This is your base!)
- 1 cup cold milk (Must be cold for the pudding to set quickly!)
- 1 (3.9 ounce) package instant chocolate pudding mix
- 1 (8 ounce) package cream cheese, softened completely
- 1 cup powdered sugar
- 1 teaspoon vanilla extract
- 1 (8 ounce) container frozen whipped topping, thawed (Don’t whip it, just let it thaw!)
- 1/2 cup chocolate chips or shavings for garnish
Step-by-Step Assembly of the Brownie Refrigerator Cake
Okay, here’s where the magic—the *no-bake* magic—really happens! We need to be systematic because we are building structure here. Don’t rush the chilling time; that’s what turns this into a sliceable dream instead of a chocolate puddle. Think of it like building a cool, decadent little fortress for your tummy.
Preparing the Brownie Layer First
First things first: the base. If you’re baking from a mix like I listed, do that first earlier in the day! You need these brownies absolutely, totally cold—not even slightly warm. If you’re using store-bought fudgy brownies instead of making your own, that’s totally fine, too. Just make sure you cut them into uniform squares or slices so they fit nicely in your prepared dish.
Creating the Creamy Brownie Dessert Recipe Filling
While the brownies chill out, we make the layers! In one bowl, whisk your cold milk and instant pudding until it starts to thicken up—just a couple of minutes. In your main mixing bowl, beat that softened cream cheese with the sugar and vanilla until it’s nice and smooth. Now, gently fold that slightly set pudding into the cream cheese base. Don’t use the electric mixer for this part! When you gently fold in about half of your thawed whipped topping, you’re keeping those air bubbles intact. We want light, not strained!
Layering and Chilling the Brownie Refrigerator Cake
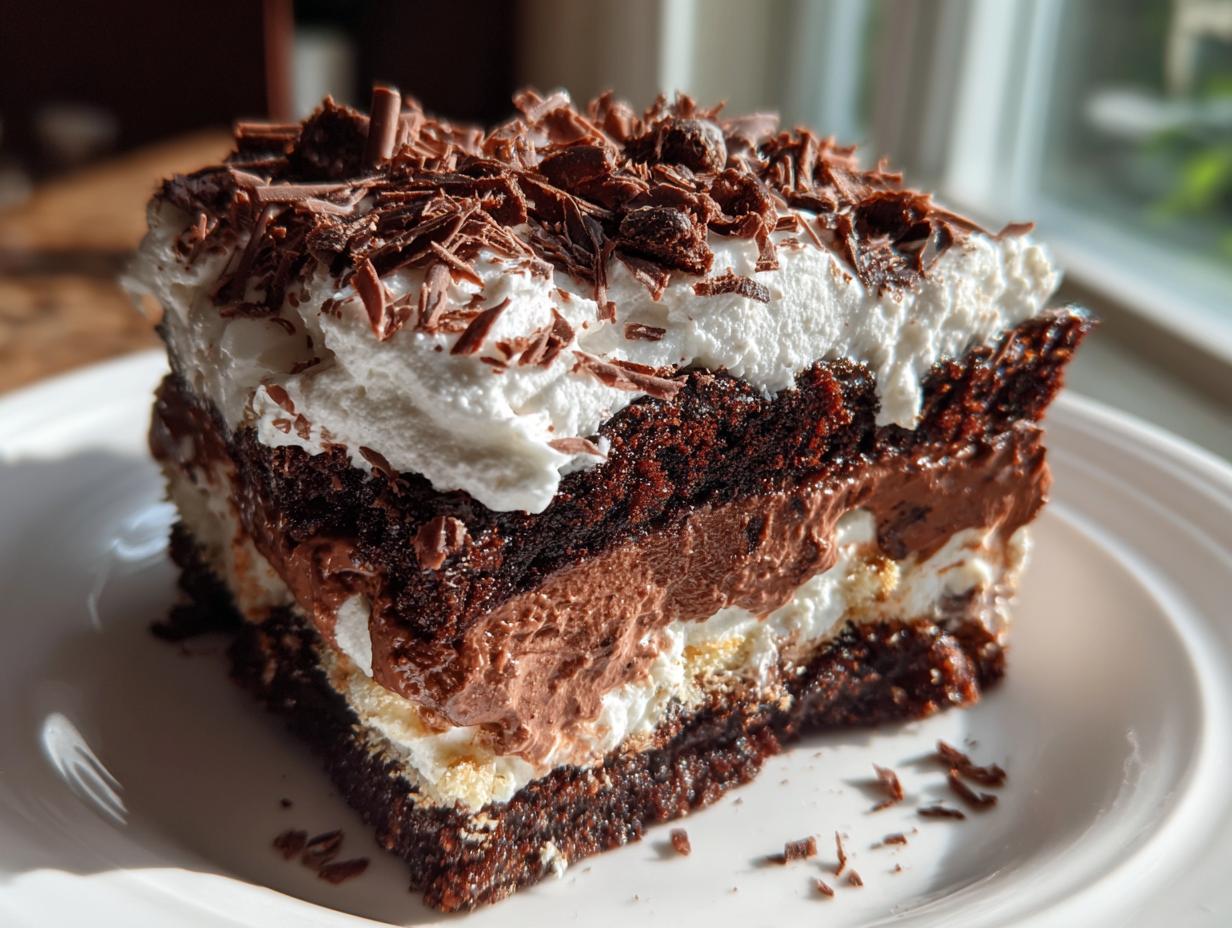
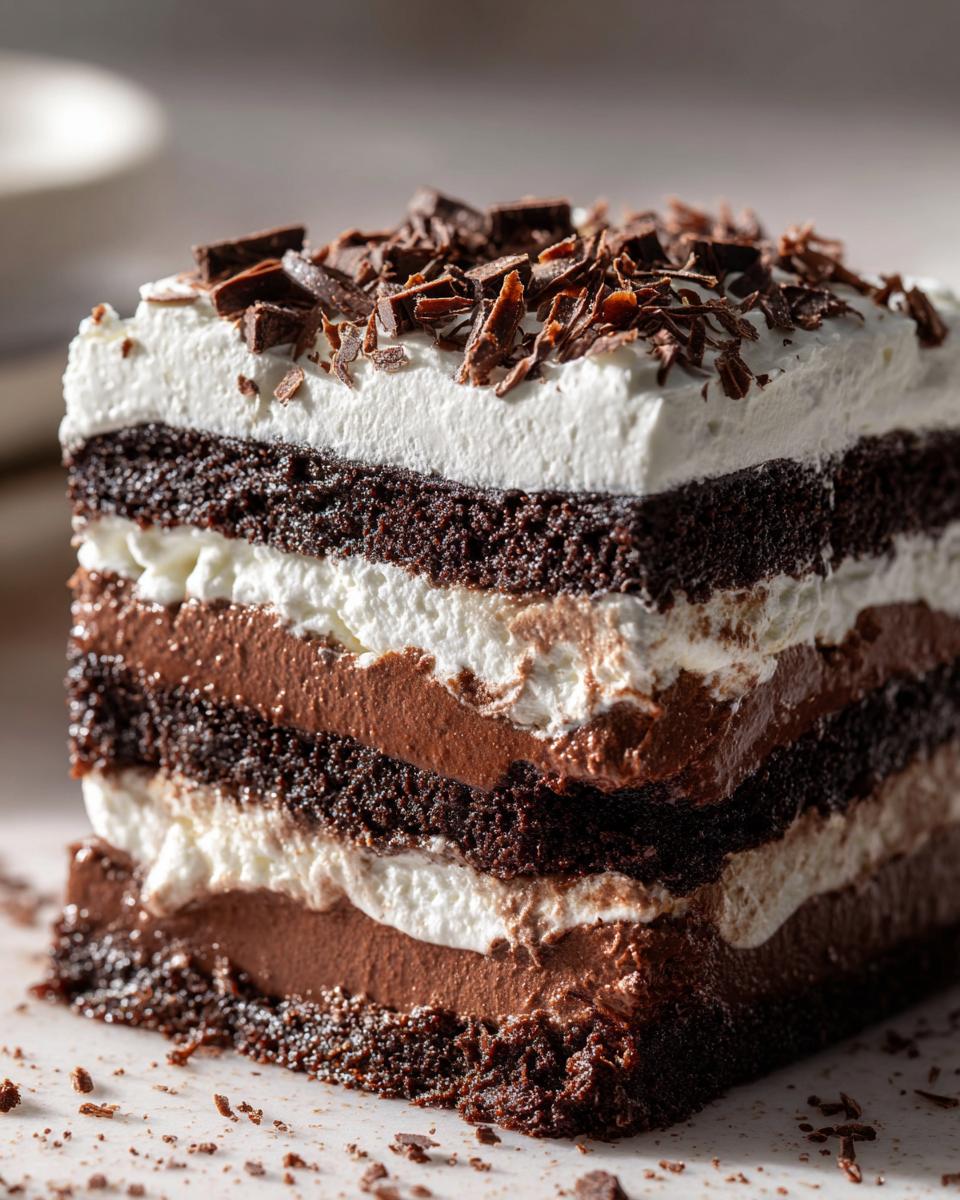
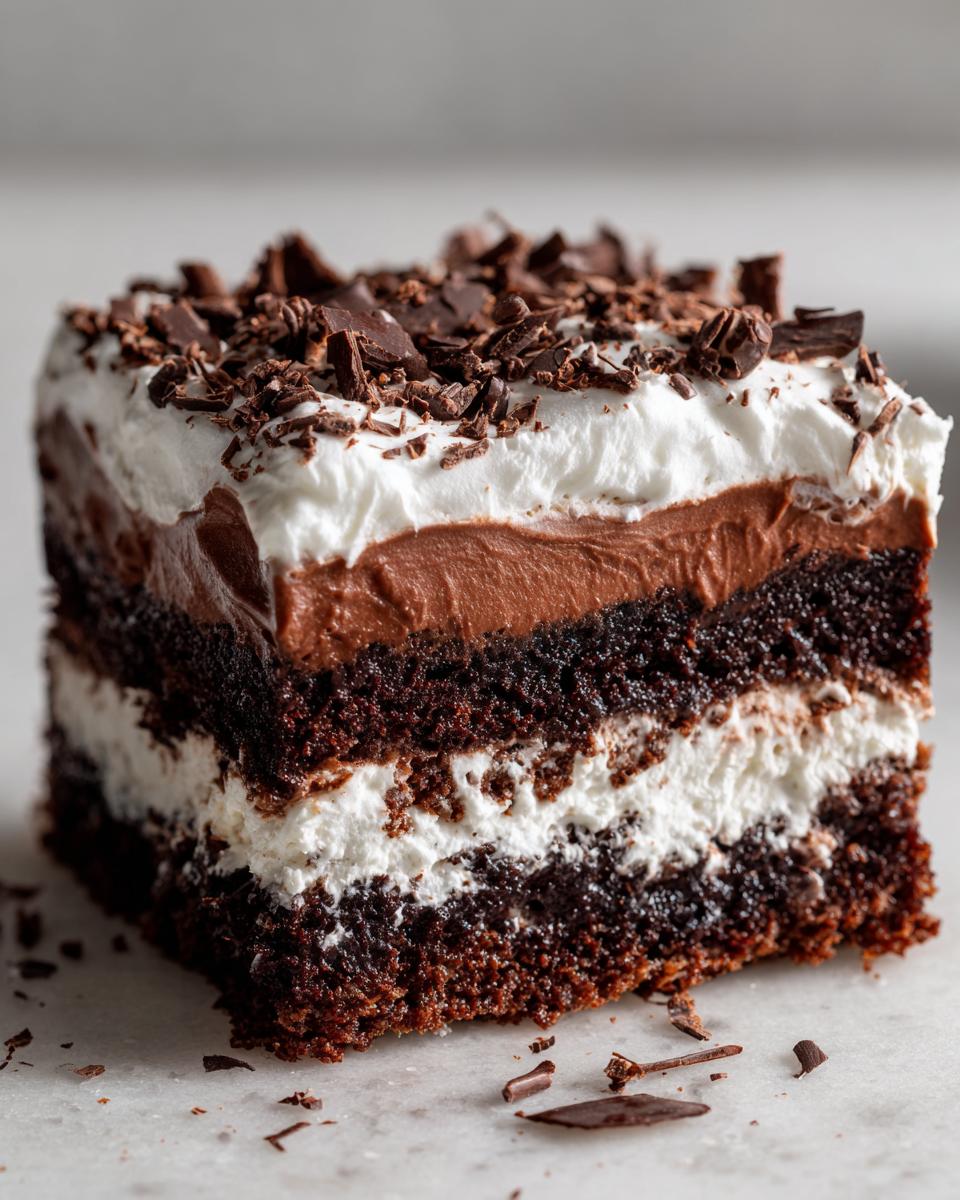
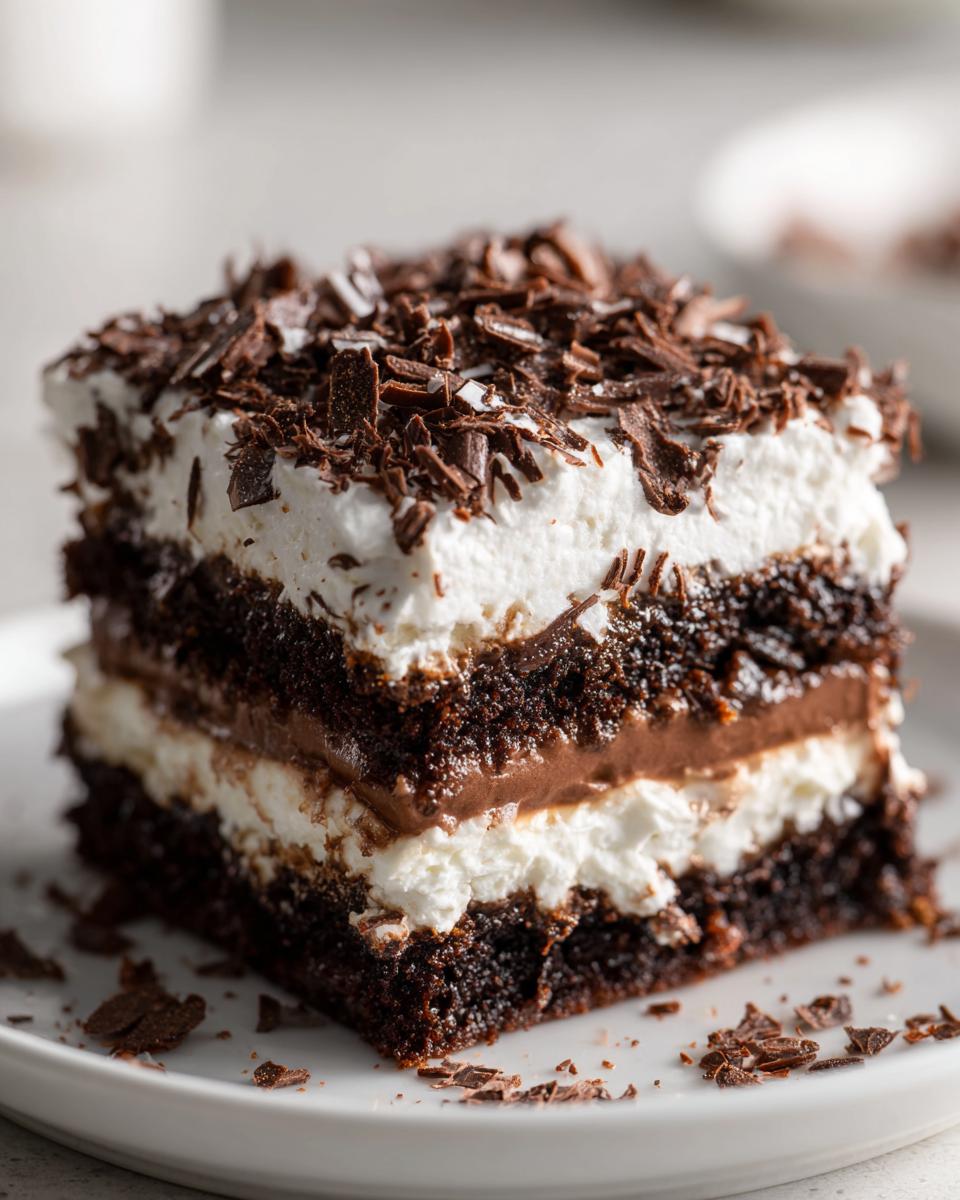
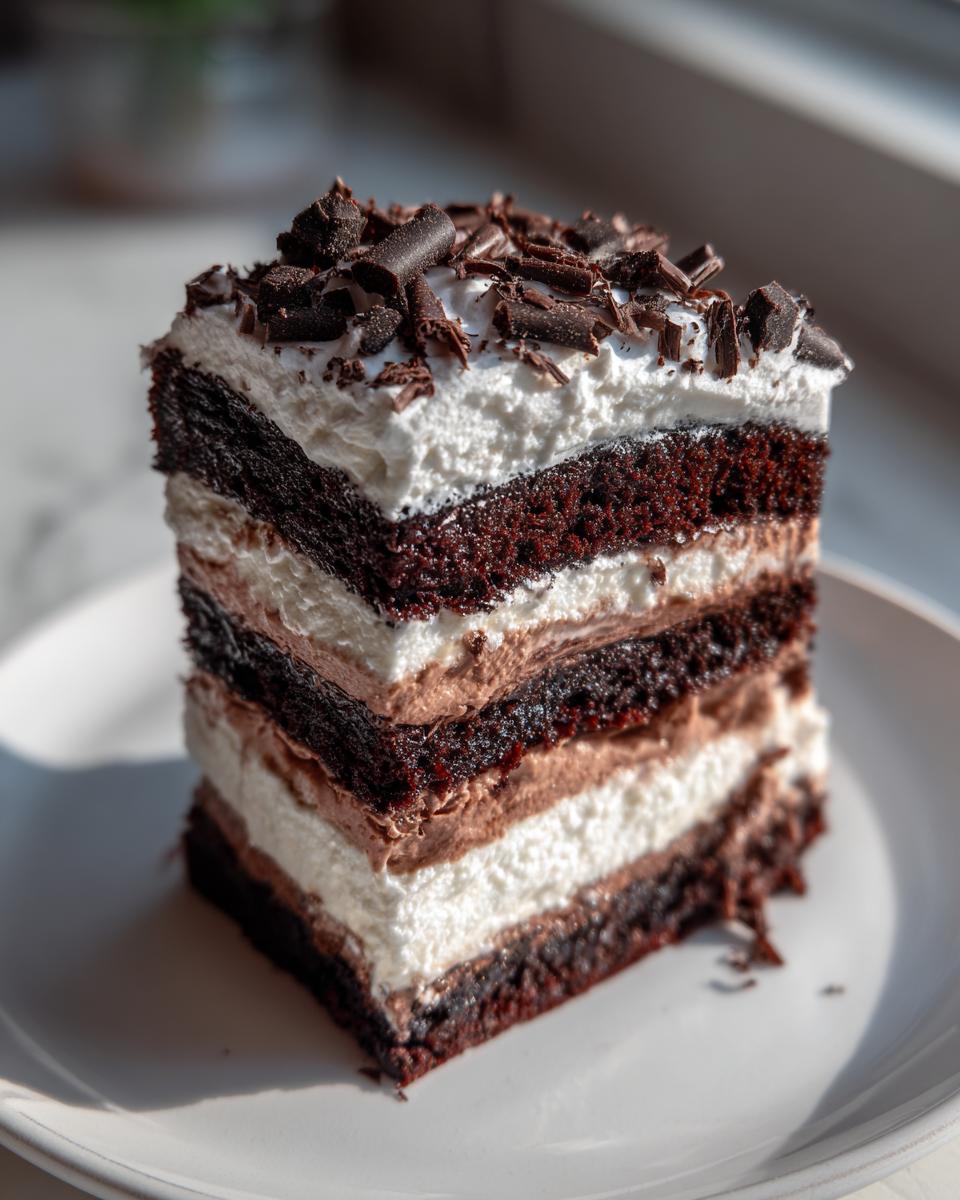
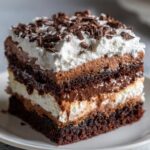
Time to build this monument! I always line my 9×13 dish with plastic wrap, leaving a big overhang on two sides—this acts as handles later so you can lift the whole thing out without messing up the sides. Lay down half your brownies, spread half the creamy filling evenly over them, then repeat with the rest of the brownies and the remaining filling. Cover it up and get it into the fridge. Seriously, aim for at least four hours, but if you can hold out until the next day, this **Brownie Refrigerator Cake** will slice like a dream. You can see how I build layered desserts like this all the time!
Tips for the Best Brownie Refrigerator Cake Success
Look, this is a chilled dessert, which means structure is everything! If you want that gorgeous, perfect slice every time you pull it out of the chilling spot, you need to treat the structure like the crucial foundation it is. I’ve learned a few tricks over the years from making so many cream cheese-based delights that I just have to share. Remember, this **Easy Refrigerator Dessert** really shines when it’s set just right.
Achieving Firm Layers in Your Simple No Bake Layered Cake
If you’re building this on a super hot day, or if your kitchen just runs warm, the plain thawed whipped topping might lean toward being a little floppy. To combat that, try stabilizing your topping! You can whisk cream cheese or melted, cooled semi-sweet chocolate right into your whipped topping before folding it in. That little bit of extra fat or stabilizer makes the difference between a soft dollop and a firm barrier between those brownie layers.
The Importance of Completely Cooled Brownies
This can’t be stressed enough: your brownies need to feel like they just came out of the freezer before you even think about putting them near the creamy filling. If you place warm—or even room temperature—brownies on that pudding mix, the residual heat melts those delicate cream cheese and pudding molecules. When that happens, they bleed into each other, you lose your distinct layers, and instead of a perfect **Simple No Bake Layered Cake**, you end up with, well, chocolate sludge. Be patient here!
Variations for Your Fudgy Brownie Icebox Cake
Now that you’ve got the blueprint for this amazing **Fudgy Brownie Icebox Cake**, you absolutely have to know that you can tweak it a little bit! Food should never feel restrictive. I love taking discoveries from the road and adapting them slightly to fit what I have on hand, and you should too. This is your base, so let’s make it your own before it even hits the fridge!
Swapping Pudding Flavors for a Different Creamy Brownie Dessert Recipe
The chocolate pudding offers that deep richness, but sometimes you want something different! If you’re craving less chocolate intensity overall, try swapping that pudding mix for instant vanilla pudding or maybe even butterscotch. The vanilla pudding really lets the cocoa flavor of the brownie shine through bright, while butterscotch adds a fascinating little twist of caramel complexity. It totally changes the vibe of the final **Creamy Brownie Dessert Recipe**.
Adding Texture: Nut and Topping Ideas
If you have roommates or family members who are serious texture hounds like I am, you’ve got to add something delightful to bite into. Don’t be shy! Toasted pecans are phenomenal alongside the chocolate layers—give them a quick toast in a dry pan first to wake up that nutty aroma. Instead of those simple chocolate chips on top, try using high-quality dark chocolate that you shave down with a veggie peeler—it melts just a tiny bit when you serve it, creating those beautiful, thin curls. If you love layering, you might also enjoy checking out how I build my triple-layer chocolate cheesecake, which uses similar concepts!
Serving and Storing This Decadent Chilled Desserts Masterpiece
We’ve gone through all the effort of crafting this amazing **Brownie Refrigerator Cake**, so the last thing we want to do is accidentally smash it when serving! Because this is such a rich, layered dessert, presentation matters. Since we made this a wonderful make ahead chocolate cake, getting it ready before the guests arrive makes everything so much easier.
How to Slice the Brownie Refrigerator Cake Neatly
This is my number one trick for slicing any layered icebox cake: the hot knife method! Once the cake is fully set from being in the fridge, take a long, sharp knife and run it under very hot water for about 30 seconds. Wipe the blade completely dry—you want it hot, not wet—and make your first downward cut. Wipe the knife clean again, reheat it, and press down for the next slice. That heat cuts cleanly through the fudgy brownies and the creamy filling without tugging or smearing the layers. It’s worth the little extra step, I promise!
Storage Guidelines for Leftover Rich Chocolate Goodness
If, by some miracle, you have any **Rich Chocolate Goodness** left over (which is rare around my house!), storage is simple. Make sure you get that remaining cake out of the main serving dish and into an airtight container. Because of the pudding and cream cheese filling, this cake stays fantastic in the refrigerator for up to four days. The longer it sits, the more the flavors seem to meld together even more deeply. It just keeps getting better!
Frequently Asked Questions About No Bake Brownie Cake
When you’re making something as amazing as this, questions always pop up! I’ve fielded a ton of inquiries about structure and substitution, especially since we aren’t dealing with heat to set things. Don’t worry, I’ve got your back on troubleshooting this **No Bake Brownie Cake** so you get that perfect slice every single time. It’s all about respecting the chill time! If you ever need a change of pace dish after all this chocolate, I have a great recipe for leftover turkey soup.
Can I use homemade brownies instead of a mix for this Easy Refrigerator Dessert?
Absolutely, you can! If you make your own, just make sure they are genuinely fudgy, not light and cakey. A denser brownie will hold up better to the fillings. And this is non-negotiable: they have to be fully chilled or totally cool to the touch. Warm brownies attacking that nice creamy filling is how you end up with soup!
How long does the Brownie Refrigerator Cake need to chill?
The official minimum is four hours. That’s just long enough for the pudding and cream cheese mixture to firm up somewhat so the layers don’t slide into each other. But honestly, for the true, picture-perfect experience where every layer is defined, you really want to let this **Layered Chocolate Brownie Dessert** set in the fridge overnight—at least eight hours. Patience pays off here, folks!
Can I freeze this Layered Chocolate Brownie Dessert?
You sure can, it doubles as a fantastic make-ahead freezer stash! If you plan on freezing it, I strongly suggest you leave that final layer of whipped topping off until you thaw it. Thawing can sometimes make whipped topping weep a little water, so covering the cake tightly with plastic wrap right after the last creamy layer sets is the safest bet. It thaws beautifully overnight in the fridge, too.
Nutritional Estimate for This Chilled Dessert
I always like to keep things real here on YumDrizzle. While this **Brownie Refrigerator Cake** is purely for indulgence and enjoying life, I know some of you are curious about what’s inside. Keep in mind these numbers are just estimates based on the standard boxed brownie mix and the ingredients we used in the filling. Since we are focusing on pure flavor here, these numbers can change based on what exact brownie mix or milk you choose!
- Serving Size: 1 slice
- Calories: 380
- Fat: 19g
- Carbohydrates: 50g
- Sugar: 35g
- Protein: 5g
Share Your Experience Making This Dessert
Whew! You’ve baked (or bought!) your brownies, you’ve mixed those decadent layers, and now your amazing **Brownie Refrigerator Cake** has set up beautifully in the cold. When you finally slice into that masterpiece, I really, truly want to hear about it. This whole site is built on sharing food joy, just like my bandmates would crowd around that hot plate on the road, eager for the next discovery.
Did it slice perfectly? Was the cream cheese layer just the right amount of tangy? Let me know! If you made any swaps—maybe you tried a different topping or used a different type of fudgy brownie—drop a comment below. If you can, give this recipe a quick star rating so other folks know what you thought of this easy refrigerator dessert.
Your feedback is what keeps this kitchen feeling like a community hub. It helps me know which recipes to revisit and perfect next. I love seeing what you create! You can read a little more about why we value community sharing over here: Learn more about YumDrizzle’s mission. Happy chilling, and happy eating!
PrintUltimate No-Bake Brownie Refrigerator Cake
You can make this rich, layered Brownie Refrigerator Cake without turning on your oven. It combines fudgy brownie layers with creamy fillings for an impressive, make-ahead dessert perfect for parties.
- Prep Time: 25 min
- Cook Time: 35 min
- Total Time: 4 hours 40 min
- Yield: 12 servings 1x
- Category: Dessert
- Method: Chilling
- Cuisine: American
- Diet: Vegetarian
Ingredients
- 1 (18.25 ounce) box fudgy brownie mix, prepared and cooled
- 1 cup cold milk
- 1 (3.9 ounce) package instant chocolate pudding mix
- 1 (8 ounce) package cream cheese, softened
- 1 cup powdered sugar
- 1 teaspoon vanilla extract
- 1 (8 ounce) container frozen whipped topping, thawed
- 1/2 cup chocolate chips or shavings for garnish
Instructions
- Prepare the brownies according to package directions using a 9×13 inch pan. Cool the brownies completely, then cut them into uniform squares or slices.
- In a medium bowl, whisk together the cold milk and instant chocolate pudding mix for two minutes until slightly thickened. Let this mixture stand for five minutes.
- In a separate large bowl, beat the softened cream cheese, powdered sugar, and vanilla extract until the mixture is smooth and creamy.
- Gently fold the prepared chocolate pudding into the cream cheese mixture until just combined.
- Fold half of the thawed whipped topping into the pudding mixture to create a lighter filling.
- To assemble the Brownie Refrigerator Cake, line a 9×13 inch baking dish with plastic wrap, leaving an overhang.
- Arrange half of the cooled brownie pieces in a single layer on the bottom of the prepared dish.
- Spread half of the cream cheese-pudding filling evenly over the first layer of brownies.
- Top the filling with the remaining brownie pieces, arranging them to cover the layer.
- Spread the remaining cream cheese-pudding filling over the second brownie layer.
- Cover the dish loosely with plastic wrap and chill in the refrigerator for at least four hours, or preferably overnight, to allow the layers to set.
- Before serving, spread the remaining half of the whipped topping over the top layer of the cake.
- Sprinkle the top evenly with chocolate chips or shavings. Use the plastic wrap overhang to lift the cake out of the dish before slicing and serving this easy refrigerator dessert.
Notes
- For a quicker assembly, you can use store-bought, pre-made fudgy brownies instead of baking your own.
- If you want a firmer layer, use a stabilized whipped cream or a cream cheese frosting instead of plain whipped topping.
- This make ahead chocolate cake tastes best when chilled for a full 8 hours.
Nutrition
- Serving Size: 1 slice
- Calories: 380
- Sugar: 35
- Sodium: 250
- Fat: 19
- Saturated Fat: 10
- Unsaturated Fat: 9
- Trans Fat: 0.5
- Carbohydrates: 50
- Fiber: 2
- Protein: 5
- Cholesterol: 35