
You know that moment when you bite into pastry from a little bakery, and it’s just unbelievably soft, buttery, and stuffed with rich, dark chocolate? It feels impossible to recreate that magic at home, right? Wrong! That’s what I learned road-tripping across the country—the best food secrets aren’t kept behind professional stainless steel doors; they’re just waiting for someone to share them. This chocolate babka is my answer to that challenge. It’s the ultimate weekend baking project, yes, but I broke down every single step. Trust me, you are going to achieve that impossibly soft brioche dough and those gorgeous, defined chocolate swirls without needing a culinary degree. Let’s bring that bakery flavor right into your kitchen!
- Why This Homemade Chocolate Babka Recipe Delivers Bakery Style Results
- Gathering Ingredients for Your Decadent Chocolate Pastry
- Step-by-Step Instructions for the Best Chocolate Babka Recipe
- Tips for Success When Making Homemade Chocolate Babka
- Storage and Reheating Instructions for Your Rich Chocolate Swirl Bread
- Serving Suggestions for Your Chocolate Filled Yeast Bread
- Frequently Asked Questions About This Easy Babka Recipe
- Nutritional Estimates for One Slice of Chocolate Babka Loaf
- Share Your Weekend Baking Project
Why This Homemade Chocolate Babka Recipe Delivers Bakery Style Results
I know what you’re thinking: babka dough looks intense. It’s basically a slightly sweet brioche, and people are often intimidated by yeast doughs. But my goal is always to demystify things, just like those incredible cooks I met on the road. This recipe isn’t about complicated shortcuts; it’s about doing a couple of things right so the final chocolate babka transforms into something spectacular. It’s all in the technique, not the witchcraft!
When you follow these steps, you get that incredible texture that makes you think you need a professional oven. Here’s why this method truly shines:
- It guarantees a **Bakery Style Babka at Home**. You get that professional look and mouthfeel that sets it miles apart from a simple sweet bread.
- The resulting dough is perfectly balanced—rich enough to feel decadent but sturdy enough to handle all that chocolate filling without tearing apart mid-braid.
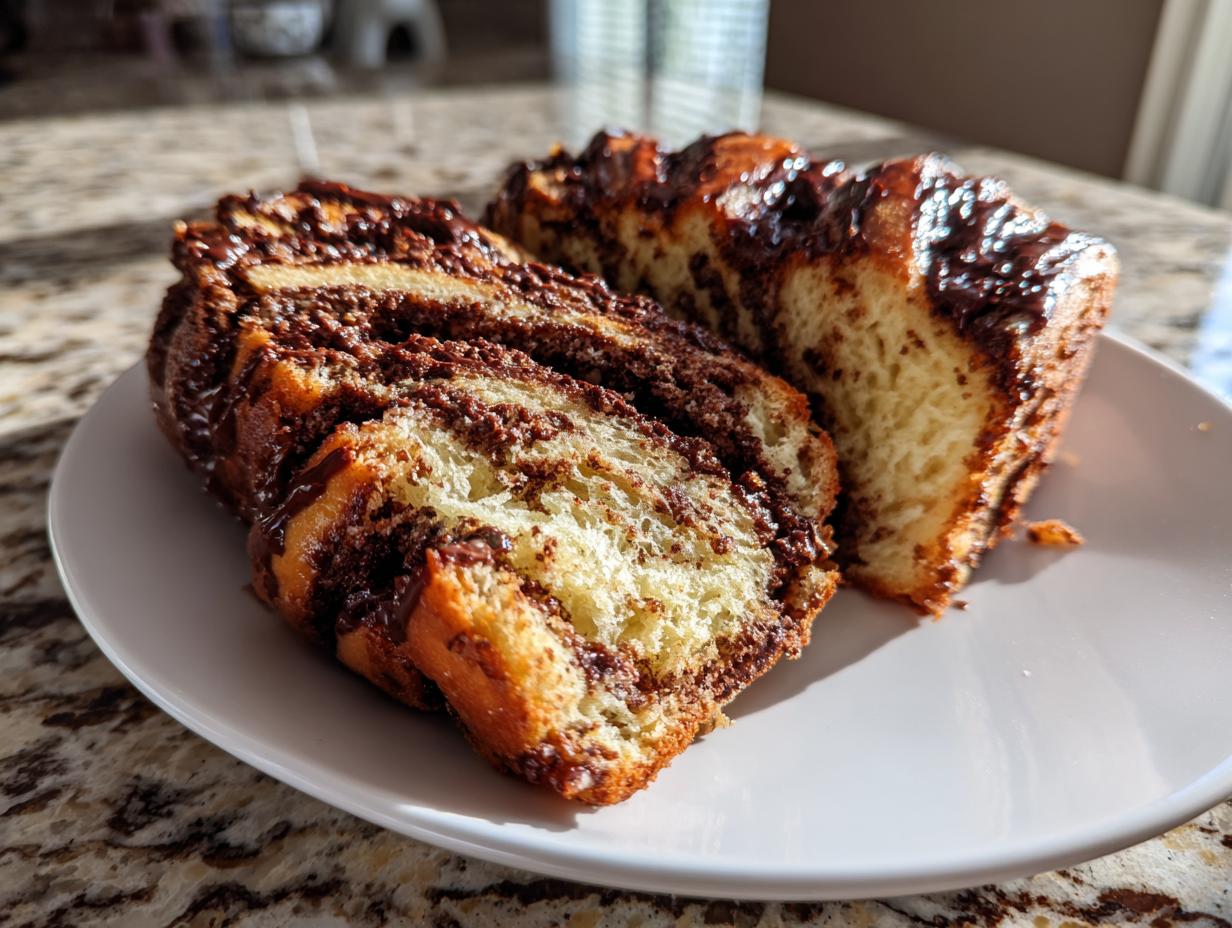
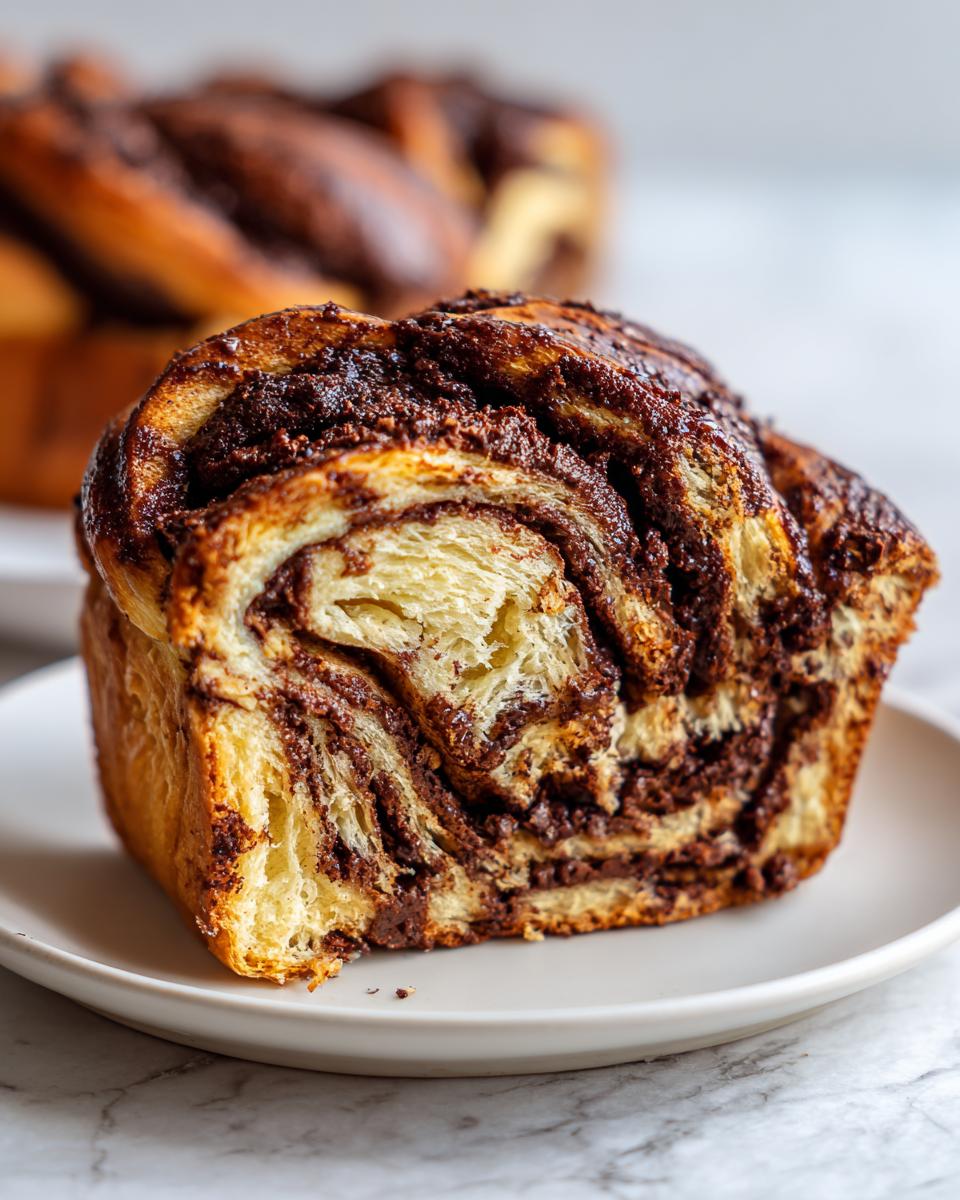
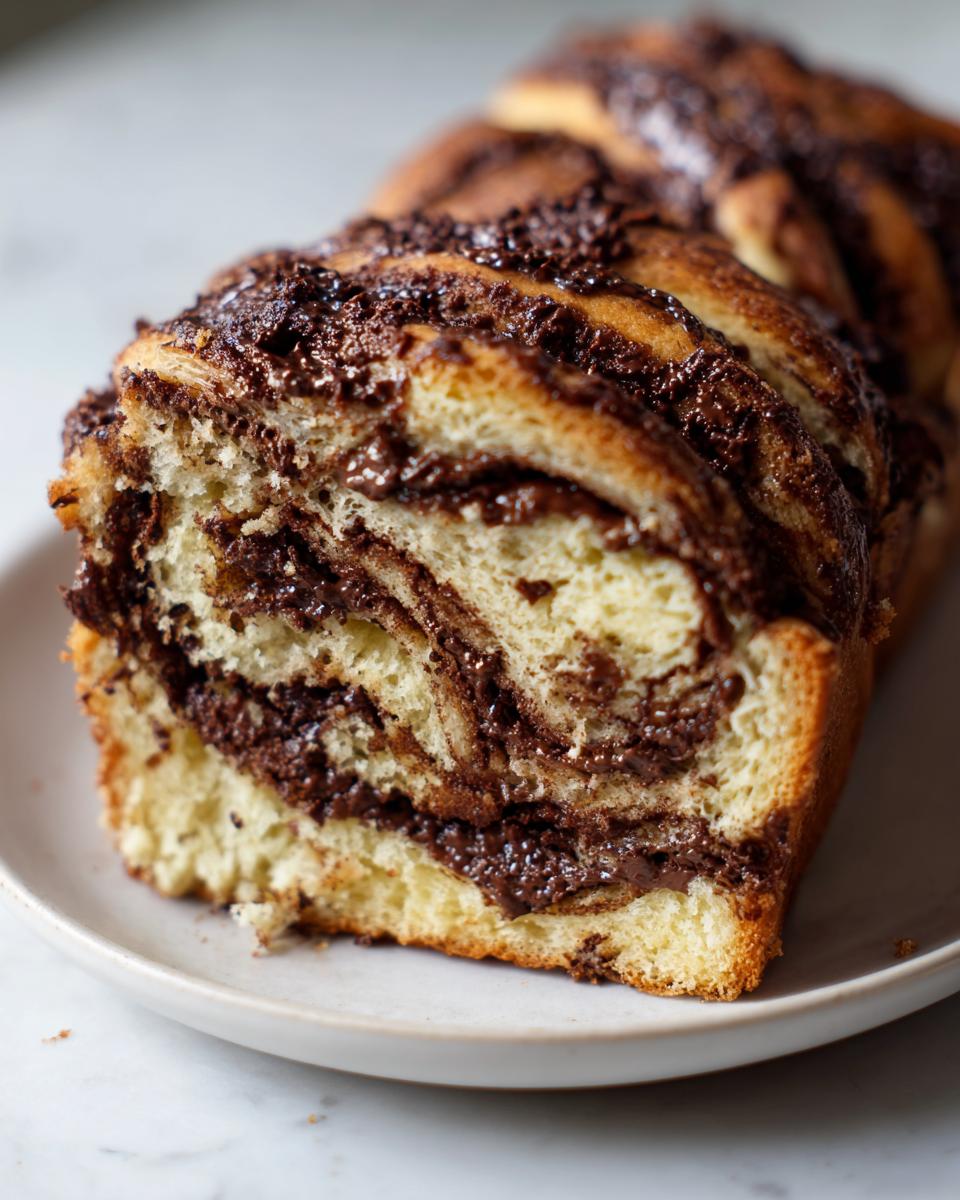
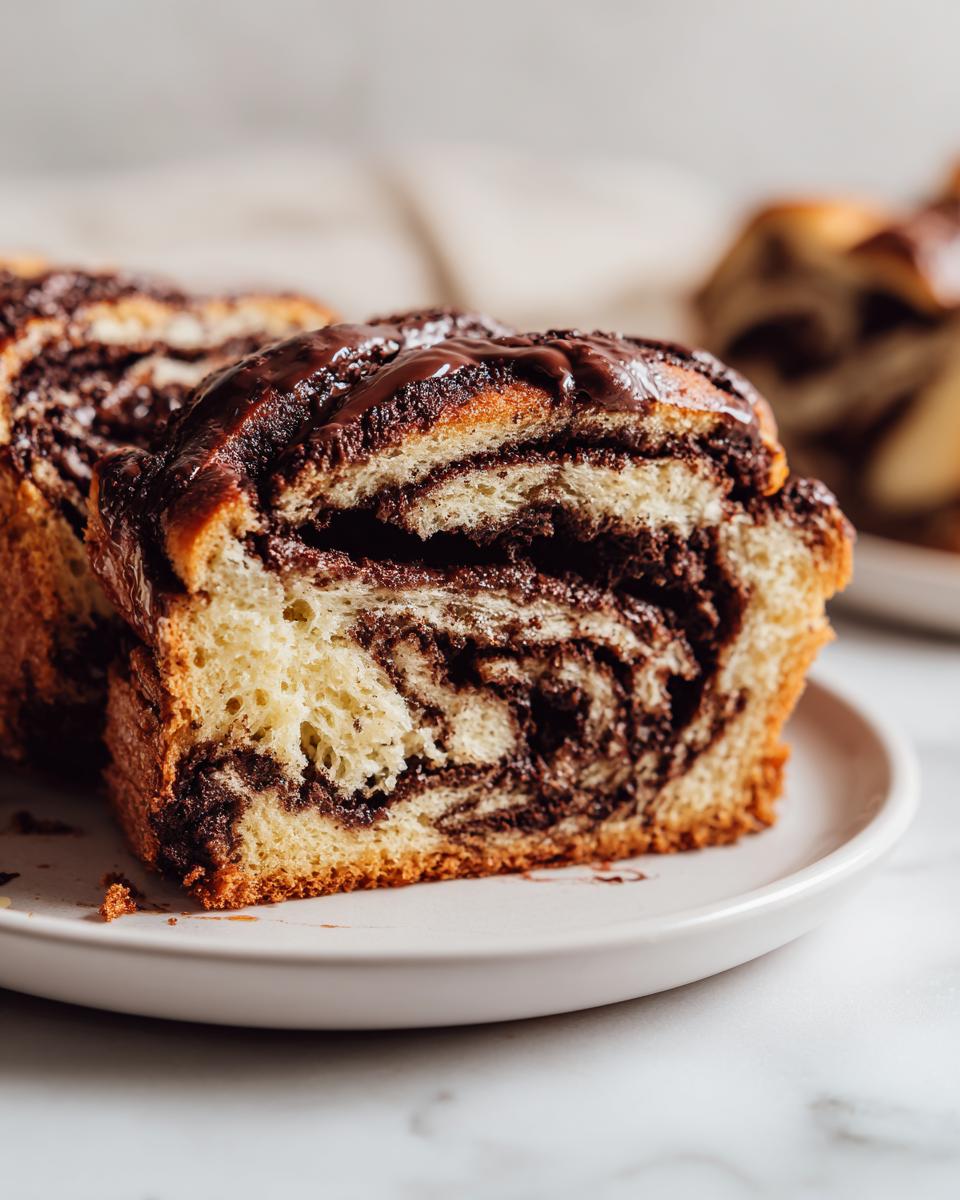
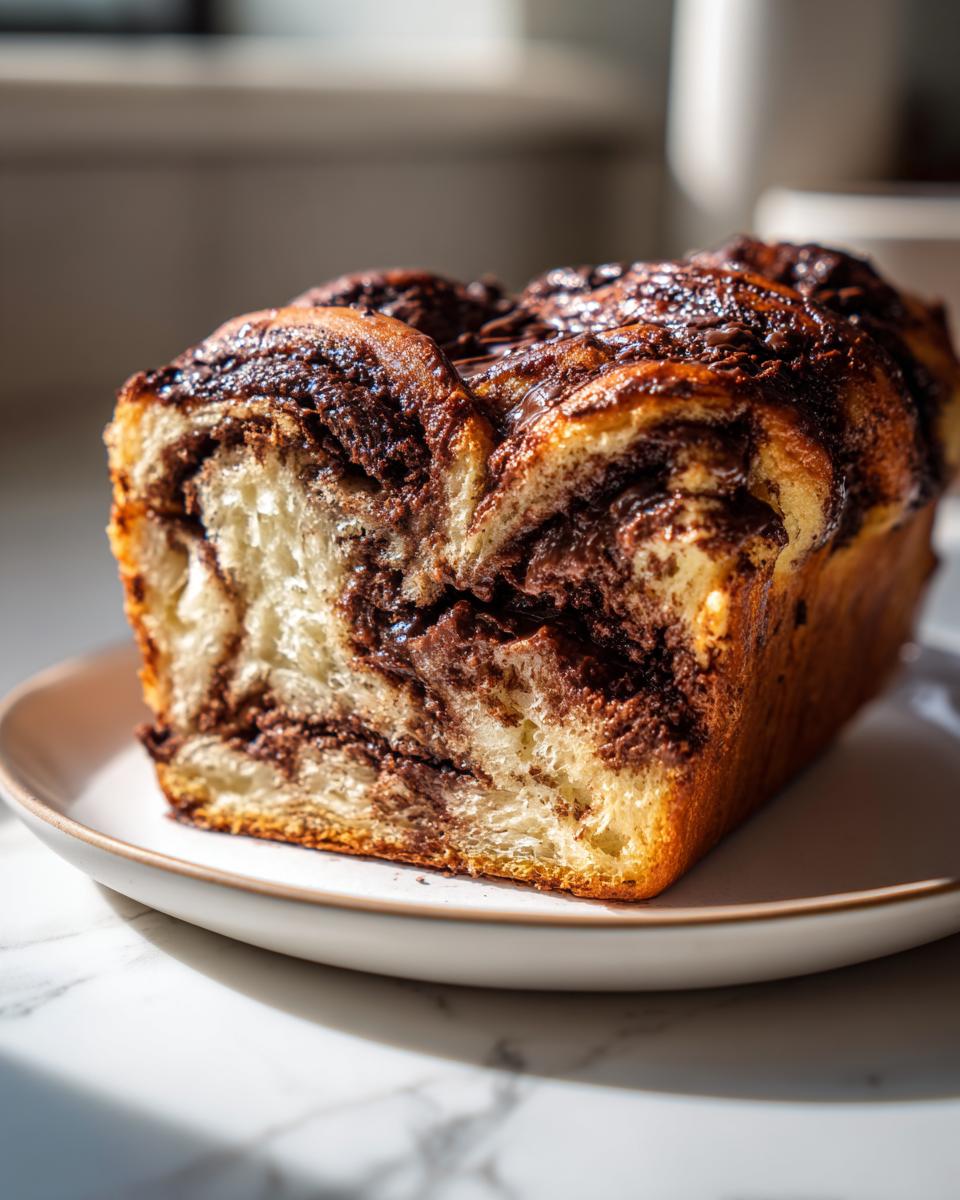
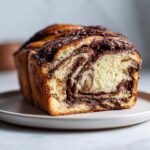
- The final product boasts beautiful, distinct ribbons. You won’t end up with a chocolate blob; you get clear, visual proof of your hard work in every slice!
Achieving the Soft Brioche Babka Dough Texture
For the softest, most tender babka dough possible, we treat the butter—and the eggs—like royalty. Seriously, don’t rush the warming process! Your milk absolutely needs to be warm enough to wake up the yeast (think bath water temperature, not scalding!), and your eggs must be at room temperature. Room temp ingredients emulsify way better, making everything smoother.
The secret sauce, though, is how we add that softened butter in Step 3 of the kneading process. You add it slowly, piece by piece, only after the flour has started gluten development. This allows the fat to weave itself into the dough structure gradually. This slow incorporation is what makes the dough feel almost silky by the time it’s done kneading, setting you up perfectly for that light, beautiful rise.
The Rich Chocolate Swirl Technique for Your Chocolate Babka Loaf
Getting those amazing swirls is all about contrast between the dough and the filling, and then how you manipulate them before the second proof. Our filling is designed to stay thick enough to coat but soft enough to separate when twisted. Remember, after you roll out the dough with the filling spread on top, you slice that entire cylinder right down the middle.
This exposing of the layers—the dough, the gorgeous chocolate, the dough again—is your blueprint for the final look. When you twist those two halves together, you are intentionally stacking those rich chocolate layers on top of each other. It’s the easiest way to ensure everyone gets that fantastic, gooey chocolate experience in their slice of **chocolate babka loaf**.
Gathering Ingredients for Your Decadent Chocolate Pastry
Okay, let’s talk ingredients. This is where we move from ‘good bread’ to ‘the **best homemade chocolate babka** you’ve ever made.’ Because this dough is rich—it’s a brioche, after all—we need the right players in the game. Don’t substitute the butter for anything else; fat is flavor and texture here! I’ve broken this down so you can easily pull everything for the dough, the filling, and the finishing syrup.
Look closely at the ingredient list here; those little notes matter, especially when dealing with yeast. If you want that beautiful separation and moist crumb, stick close to these measurements!
For the Tender Babka Dough
This is the foundation. The dough is what gives you that airy, soft quality that stores just can’t nail. Remember, the milk needs to be right around 110°F—just warm to the touch, like a nice warm bath for your yeast, but definitely not hot!
- 1 cup whole milk, warm (about 110°F—test it on your wrist!)
- 2 1/4 teaspoons active dry yeast
- 1/2 cup granulated sugar, divided (we use some for the yeast!)
- 3 large eggs, room temperature (this is super important for incorporation!)
- 1 teaspoon vanilla extract
- 1 teaspoon salt
- 4 1/2 cups all-purpose flour, plus more for dusting
- 1/2 cup (1 stick) unsalted butter, softened and cut into small pieces (You’ll integrate this slowly later!)
For the Rich Chocolate Filling and Syrup
This filling is intense. We use high-quality bittersweet chocolate to cut through the sweetness of the dough and the syrup. Pro tip: Make sure that 1/4 cup of butter for the syrup is ready to go!
- 1 cup powdered sugar
- 1/2 cup unsweetened cocoa powder
- 1/2 cup heavy cream
- 8 ounces bittersweet chocolate, finely chopped
- 1/4 cup unsalted butter, melted (for brushing)
- 1/4 cup granulated sugar (for syrup)
- 1/4 cup water (for syrup)
I know that looks like a lot of parts, but once everything is measured out, assembly is actually quite fun, especially when you get to the swirling stage. If you’re looking for other decadent chocolate recipes once you finish this, check out my chocolate mousse pie; it’s just as satisfying but requires zero yeast time!
Step-by-Step Instructions for the Best Chocolate Babka Recipe
Alright, this is where we go from knowing the ingredients to actually creating that showstopper. Making a stunning chocolate babka isn’t about speed; it’s about trusting the dough and getting the layering just right. We’re going to walk through this slowly. Don’t panic about the time commitment; most of it is just waiting for the dough to do its thing while you enjoy a coffee! If you ever got intimidated by my French bread recipe, this yeast process is far more rewarding!
Making and Rising the Soft Brioche Dough
First things first: we wake up the yeast. You’ll mix that warm milk, your yeast, and a tablespoon of sugar. Don’t guess the temperature! If it’s too cold, nothing happens. If it’s too hot, you kill the flavor makers. Wait about five to ten minutes until it looks foamy on top—that’s your signal that the yeast is happy and ready to go. This is less science and more handshake between you and the yeast, you know?
Next, we get everything else into the bowl: the rest of the sugar, your room-temperature eggs, vanilla, salt, and all that flour. Mix it on low speed until it just comes together into a shaggy mass. Now comes the fun, slightly messy part: adding the butter. You have to add it piece by piece. Wait for the previous chunk to completely disappear into the dough before adding the next one. This takes patience—probably five minutes—but it’s what builds that beautiful, stretchy structure we need for a light brioche texture. Keep kneading until it’s truly smooth and elastic, maybe another 8 to 10 minutes on medium-low. Place that soft dough in a lightly oiled bowl, cover it tight, and let it chill out in a warm spot for an hour to an hour and a half until it’s doubled up. Seriously, find the warmest, draft-free spot in your kitchen!
Preparing the Chocolate Filling and Assembling the Chocolate Swirl Technique
While your dough is puffing up, let’s make magic for the inside. We’re melting the chocolate, cocoa powder, heavy cream, and powdered sugar together over low heat. Keep stirring! You want it totally smooth—no gritty sugar spots, please. Once it’s silky, get it off the heat and let it cool down while the dough finishes rising. If it’s too hot when you spread it, it will melt right through your lovely dough layers! This is almost as delicate as getting perfectly poached eggs!
Once the dough has grown, punch the air out gently and roll it into that big 12×18 inch rectangle on a lightly floured surface. Now, take that slightly cooled filling and spread it evenly, but leave about an inch bare on one of the long sides—this is your seal! Tightly roll the dough up, starting from the side *with* the filling, creating a log. Here’s the move that wins you the prettiest **chocolate babka** trophy: Take a sharp knife and slice that log straight down the middle, lengthwise. You’ll see the layers! Turn those cut sides up, and gently cross the two halves over each other, making sure those gorgeous chocolate insides are always facing up so they show off when baked. Carefully pinch the ends together and tuck it into your greased loaf pan. Cover it loosely and let it proof again for about an hour while you preheat that oven to 350°F (175°C) for the last 15 minutes of rising time.
Baking and Glazing Your Chocolate Babka Loaf
Pop that beautiful, puffy loaf into the 350°F oven for 35 to 45 minutes. Keep an eye on it after 30 minutes. If the top starts getting too dark, just throw a piece of foil over it gently. We want golden brown, not burnt!
While it’s baking, quickly whip up the simple syrup: just dissolve that last bit of sugar and water on the stove. As soon as the babka comes out of the oven—seriously, no delay!—take a pastry brush and drench the top with that warm syrup. This step is non-negotiable for that signature moist crust. You should check out the full technique shared by folks like Sophie over at Sophie’s Kitchen if you want more details on the overall process. Finally, let it chill in the pan for about 15 minutes to set up before you wrestle it out onto a cooling rack to cool completely. You deserve a break after all that twisting!
Tips for Success When Making Homemade Chocolate Babka
Okay, you’ve made it through the kneading and the twisting—that’s the hard part! But trust me, a few little tricks I picked up can ensure your final loaf of chocolate babka looks and tastes like you bought it fresh this morning. Baking isn’t just about following the steps; it’s about knowing the little nudges that make the dough *sing*. These tips are straight from my notes; they help you control the rise and get that gorgeous, bakery-level finish.
Dough Proofing Options for a Finer Crumb
The first rise is crucial, right? If you’re in a rush, the one-hour rise in a warm spot works great. But if you really want to step up the tender factor and get a flavor profile that’s deeper and more complex, I highly recommend slowing things down. If you have the time, let that dough do its initial rise overnight in the refrigerator.
Putting the dough in the fridge slows the yeast way down, which lets those complex flavors develop in the butter and flour. Pop it in a lightly oiled bowl, cover it tightly, and let it chill for 8 to 24 hours. It will still double, just much slower! This slow proof results in an unbelievably fine crumb that just melts in your mouth. It’s worth the planning, especially if you’re making this for a big brunch.
Achieving a Shiny Crust on Your Chocolate Babka
We already brushed it with that sugar syrup right out of the oven, which keeps the exterior deliciously sticky and moist. But if you want that high-gloss, professional shine—the kind that looks like it just came out of a display case—you need one extra little coat right before it goes into the oven. Don’t worry if it seems fussy; this small step pays off huge!
Whisk one egg white really well, just enough to break up the structure. Then, lightly brush the *unbaked* babka on the top surface with it. This little bit of protein sets up beautifully in the oven heat, giving you that beautiful sheen after the bake. Paired with the syrup glaze later on, your **chocolate babka** will look absolutely stunning. If you’re looking for other ways to add richness to your bakes, you might enjoy my recipe for creamy vegan pumpkin curry—it teaches some great layering concepts, just in a savory way!
Storage and Reheating Instructions for Your Rich Chocolate Swirl Bread
This rich chocolate swirl bread is heavenly fresh, but let’s be real—sometimes you can’t finish the whole loaf in one sitting! The good news is that because we used that wonderful sugar syrup glaze, this pastry is built to last a few days longer than your average sweet bread. We want to maintain that soft, tender crumb; nobody wants dry babka!
For short-term storage, I always keep leftovers covered tightly at room temperature. Seriously, wrap that leftover babka loaf in plastic wrap, and then maybe wrap it in foil again if your kitchen is dry. It should stay perfectly good and moist for about three days.
If you need to keep it longer, or if you’re making this for a holiday and need to prep ahead, freezing is the way to go. Just make sure the entire loaf is completely cool—and I mean *stone cold*—before you wrap it. Wrap it tightly first in plastic wrap, then wrap it again in aluminum foil. This double layer is key to preventing freezer burn on your beautiful swirls. It freezes like a dream for up to three months. If you’re looking for other ways to utilize leftovers, my moist carrot cake muffins recipe shows you how to repurpose baked goods!
Bringing Those Chocolate Swirls Back to Life
When you pull a slice from the fridge or freezer and it feels a little stiff, don’t just microwave it! That heat blast dries out bread fast. We want to gently coax the moisture back in.
If you’re reheating a slice, forget the microwave completely. Wrap the slice snuggly in foil and pop it into a low oven—say, 300°F (150°C)—for about 8 to 10 minutes. That gentle heat warms the dough evenly and melts that chocolate just slightly, making it taste freshly baked again. For a whole frozen loaf, let it thaw on the counter overnight first, then wrap it in foil and warm it at 325°F (160°C) until it’s warm throughout. You can find great tips on preserving your pastries just like professionals do over at Tastes Better From Scratch!
Serving Suggestions for Your Chocolate Filled Yeast Bread
Now that you’ve successfully navigated the dough and mastered the twist, it’s time for the best part: eating it! This chocolate filled yeast bread is so rich that it truly stands on its own, but pairing it correctly can elevate it from a home bake to a true centerpiece. The richness of the chocolate and the slight tang from the buttery brioche dough means you don’t need much fuss to serve it.
Honestly, this babka is amazing piping hot, straight out of the oven after it’s sat for those first 15 minutes of cooling. But the best time to serve it, in my humble opinion, is the next morning with a hot cup of coffee. Here are a few ways I love to serve mine up, whether it’s for a casual brunch or a holiday dessert.
If you’ve ever made my spiced cinnamon sugar French toast muffins, you know I like simple flavors to really shine through. The babka follows that same rule!
The Perfect Morning Pairing
For a weekend wake-up call, forget the toast. A thick slice of this babka is all you need. The density of the loaf pairs perfectly with strong, simple beverages. Black coffee is number one—the slight bitterness really grounds the sweetness of the chocolate and the syrup glaze. If you prefer tea, go for something earthy like a robust English Breakfast or an Earl Grey.
If you want a little something extra on the side, skip the heavy jams. A small dollop of fresh, lightly sweetened whipped cream on the side of the plate works perfectly, letting you scoop up just enough cream with each bite. It complements the buttery dough without overpowering the chocolate.
Elevating It for Dessert
When presenting this as a dessert after dinner, you need a slightly more elegant touch. You can serve it slightly warmed up, maybe with a small scoop of vanilla bean ice cream melting right next to it. The contrast between the warm, rich bread and the cold cream is just heavenly.
For a true showstopper, check out my coffee cake cookies recipe; they have a similar warm-spice profile that works beautifully alongside the chocolate. If you’re looking for inspiration on how other bakers present their loaves, I always check out sites like Topp In Kitchen for presentation ideas!
Frequently Asked Questions About This Easy Babka Recipe
I get so many questions about this recipe after people conquer the dough—which, by the way, is easier than you think! Since this is a yeast bread dessert, people often have questions about the rise or the specific layering technique. Don’t feel shy about asking! Having answers ready helps ensure your first attempt at this easy babka recipe is a smashing success.
Can I skip the braiding step in this chocolate babka recipe?
Yes, you totally can! Look, mastering the twist is fun, but if you’re short on time or just nervous about handling the dough after slicing it open, you can skip that twist entirely. When you get to step 9, don’t slice the log open. Just roll it up tightly like a regular cinnamon roll and tuck it into the pan.
However, be warned: you’ll lose the distinct visual appeal. The whole point of that slicing and crossing is to show off those gorgeous ribbons of filling. If you skip it, you’ll still have a delicious, rich chocolate loaf, but it will look more like a standard sweet bread rather than that iconic, swirling **chocolate babka** you see everywhere. It’s a texture trade-off!
What kind of chocolate works best for the rich chocolate swirl?
This is critical for cutting through the sweetness of the dough and the final syrup glaze. I highly recommend using high-quality bittersweet or semi-sweet chocolate for the chopped pieces in the filling. If you use milk chocolate, the filling will become too runny when hot, and the final flavor will be overly sweet and lack that deep, dark chocolate punch we’re looking for.
Bittersweet (usually around 60-70% cocoa) is fantastic because it contrasts beautifully with the buttery brioche dough. You want that hint of pleasant bitterness in your rich chocolate swirl bread. It keeps the entire loaf feeling decadent rather than cloying. Honestly, using good chocolate here elevates this from a home bake to something seriously special.
If you use leftover ingredients from this bake and want to try another fun dough project, I have a great Mexican buuelos recipe that uses simple pantry staples too!
Nutritional Estimates for One Slice of Chocolate Babka Loaf
Now, I always say that when you’re making something this decadent, like this incredible **chocolate babka loaf**, you aren’t exactly aiming for diet food, right? This is a celebration bake! But since folks often ask, I pulled the numbers straight from the recipe breakdown. Please remember, because this recipe makes one big loaf, and the richness of the brioche dough means those slices can be thick or thin, these numbers are very much estimates based on dividing the whole bake into one serving size.
When you commit to a rich, buttery yeast bread dessert, you know you’re indulging a little, and that’s perfectly okay! Every bite of that chocolate swirl is worth it. Here’s a general look at what you can expect in one slice, assuming you cut it into 12 roughly even pieces:
- Calories: Around 450
- Fat: Roughly 25 grams (remember, most of that is from the tasty butter!)
- Carbohydrates: About 50 grams
- Sugar: This clocks in around 35 grams, thanks to the dough, the filling, and that beautiful syrup glaze we brush on top.
- Protein: About 8 grams
This is a fantastic treat for a holiday brunch or a weekend baking project, not an everyday staple! If you’re curious about balancing out your week with some heartier, more legume-based flavors after you finish this sweet bread, you might want to check out my recipe for creamy Southern black-eyed peas. It reminds you that good food comes in all shapes and flavors!
Share Your Weekend Baking Project
Look at what you did! You took a dough that needed patience, you wrestled with melting chocolate, and you successfully braided this stunning **chocolate babka**. Seriously, take a minute to be proud of yourself. This is exactly what YumDrizzle is all about—taking those recipes that seem too complex or too ‘bakery-only’ and proving you can absolutely crush them in your own kitchen. This rich chocolate swirl bread is perfect for sharing, which is the heart of great cooking.
I always say, if a recipe works for me after a long week on the road, it’ll work for you juggling work and family life. So, once you see those beautiful chocolate layers peeking out of your loaf pan, don’t keep that magic to yourself!
When you finish this, I would absolutely love to know how it turned out! Did the brioche dough feel just right when you kneaded it? Did those swirls pop like you hoped? Don’t be shy—leave a rating for this recipe below and tell me how many stars it earned in your house. Even better, snap a picture of your finished **chocolate babka** and tag us on social media! Seeing your creations makes all the recipe testing worth it.
If you want to dive deeper into how we approach making accessible, flavorful cooking a part of everyday life, check out my philosophy over at the About Us page. Now go grab a knife, slice into that loaf, and enjoy the sweet payoff of your hard work. And if you’re looking for another amazing deep-dive recipe, check out the techniques shared over at Yellow Thyme!
PrintThe Best Homemade Chocolate Babka Recipe: Soft, Rich Swirls, and Easy Braiding Guide
Bake a decadent chocolate babka that tastes better than store bought. This recipe gives you a soft, tender brioche dough and rich chocolate filling with beautiful, distinct swirls. Follow our simple steps to master the braiding technique for a bakery-style sweet bread at home.
- Prep Time: 45 min
- Cook Time: 45 min
- Total Time: 3 hours 15 min
- Yield: 1 loaf 1x
- Category: Dessert
- Method: Baking
- Cuisine: Eastern European
- Diet: Vegetarian
Ingredients
- 1 cup whole milk, warm (about 110°F)
- 2 1/4 teaspoons active dry yeast
- 1/2 cup granulated sugar, divided
- 3 large eggs, room temperature
- 1 teaspoon vanilla extract
- 1 teaspoon salt
- 4 1/2 cups all-purpose flour, plus more for dusting
- 1/2 cup (1 stick) unsalted butter, softened and cut into pieces
- 1 cup powdered sugar
- 1/2 cup unsweetened cocoa powder
- 1/2 cup heavy cream
- 8 ounces bittersweet chocolate, finely chopped
- 1/4 cup unsalted butter, melted (for brushing)
- 1/4 cup granulated sugar (for syrup)
- 1/4 cup water (for syrup)
Instructions
- Activate the yeast: In a large bowl, combine the warm milk, yeast, and 1 tablespoon of the sugar. Let stand for 5 to 10 minutes until foamy.
- Make the dough: Add the remaining sugar, eggs, vanilla, salt, and flour to the yeast mixture. Mix with a stand mixer on low speed until a shaggy dough forms.
- Knead the dough: Increase the speed to medium-low and knead for 5 minutes. Add the softened butter, one piece at a time, waiting until each piece is incorporated before adding the next. Continue kneading for 8 to 10 minutes until the dough is smooth and elastic.
- First rise: Place the dough in a lightly oiled bowl, turning to coat. Cover and let rise in a warm place for 1 to 1.5 hours, or until doubled in size.
- Prepare the filling: While the dough rises, combine the powdered sugar, cocoa powder, heavy cream, and chopped chocolate in a small saucepan over low heat. Stir constantly until the chocolate is melted and the mixture is smooth. Remove from heat and let cool slightly.
- Roll the dough: Punch down the risen dough and turn it out onto a lightly floured surface. Roll the dough into a large rectangle, about 12×18 inches.
- Spread the filling: Spread the cooled chocolate filling evenly over the dough, leaving a 1-inch border on one long edge.
- Roll and slice: Starting from the long edge opposite the border, tightly roll the dough into a log. Use a sharp knife to slice the log lengthwise down the center, exposing the layers.
- Braid the babka: Turn the cut sides up. Cross the two halves over each other, keeping the cut sides facing up to show the swirl. Twist the two strands together gently, maintaining the swirl pattern. Pinch the ends together to seal.
- Shape and second rise: Carefully transfer the twisted dough to a greased 9×5 inch loaf pan. Cover loosely and let rise again in a warm place for 45 to 60 minutes, or until puffy. Preheat your oven to 350°F (175°C) during the last 15 minutes of the rise.
- Bake: Bake for 35 to 45 minutes, or until golden brown. If the top browns too quickly, loosely tent it with foil.
- Make the syrup: While the babka bakes, combine the 1/4 cup sugar and 1/4 cup water in a small saucepan. Bring to a simmer until the sugar dissolves.
- Glaze: Immediately upon removing the babka from the oven, brush the hot syrup generously over the top of the loaf. Let the babka cool in the pan for 15 minutes before transferring it to a wire rack to cool completely.
Notes
- For a softer crumb, you can let the dough complete its first rise slowly in the refrigerator overnight.
- If you want a shinier crust, brush the top of the unbaked babka with one whisked egg white before baking.
- This rich chocolate swirl bread freezes well once completely cooled; wrap tightly in plastic wrap and foil.
Nutrition
- Serving Size: 1 slice
- Calories: 450
- Sugar: 35g
- Sodium: 250mg
- Fat: 25g
- Saturated Fat: 15g
- Unsaturated Fat: 10g
- Trans Fat: 0g
- Carbohydrates: 50g
- Fiber: 3g
- Protein: 8g
- Cholesterol: 75mg