
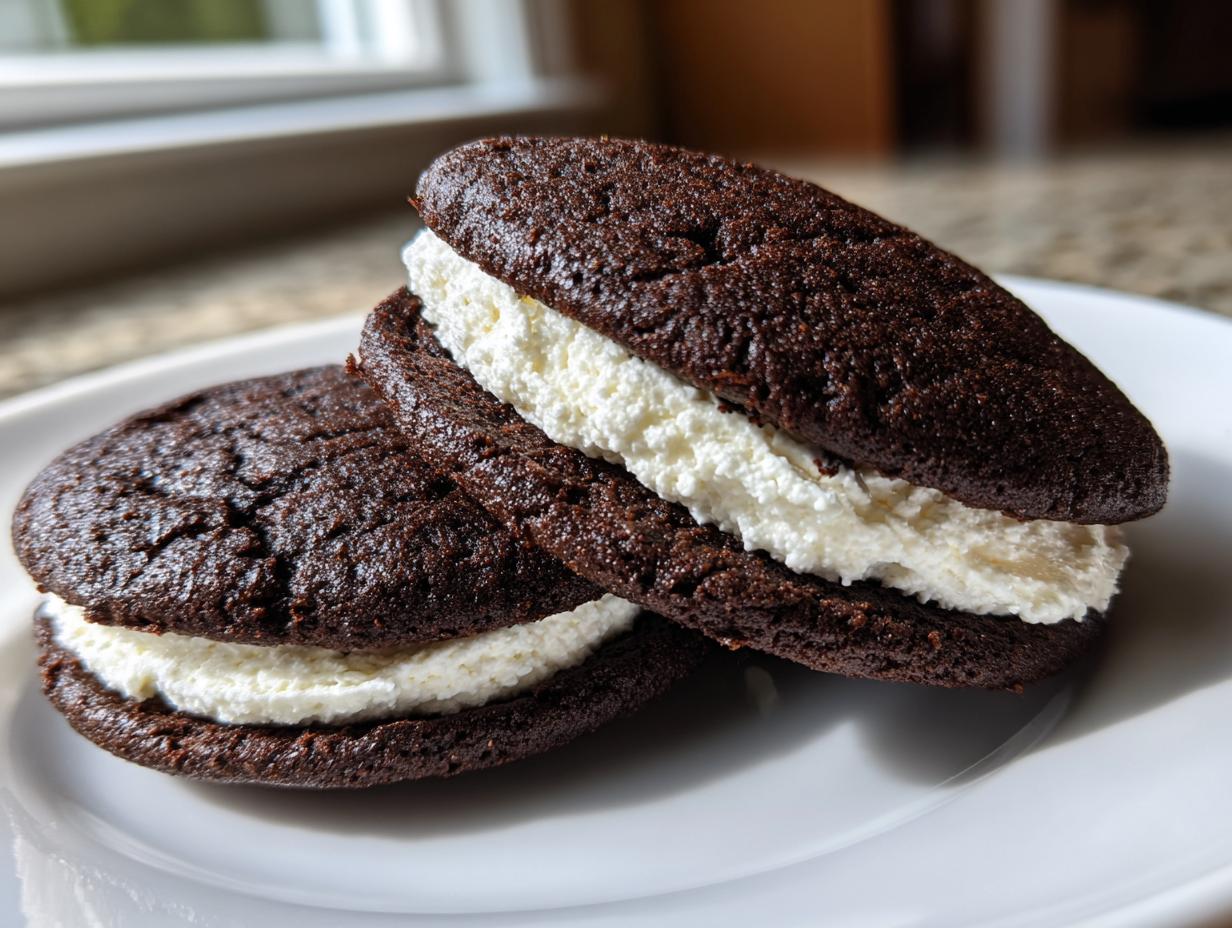
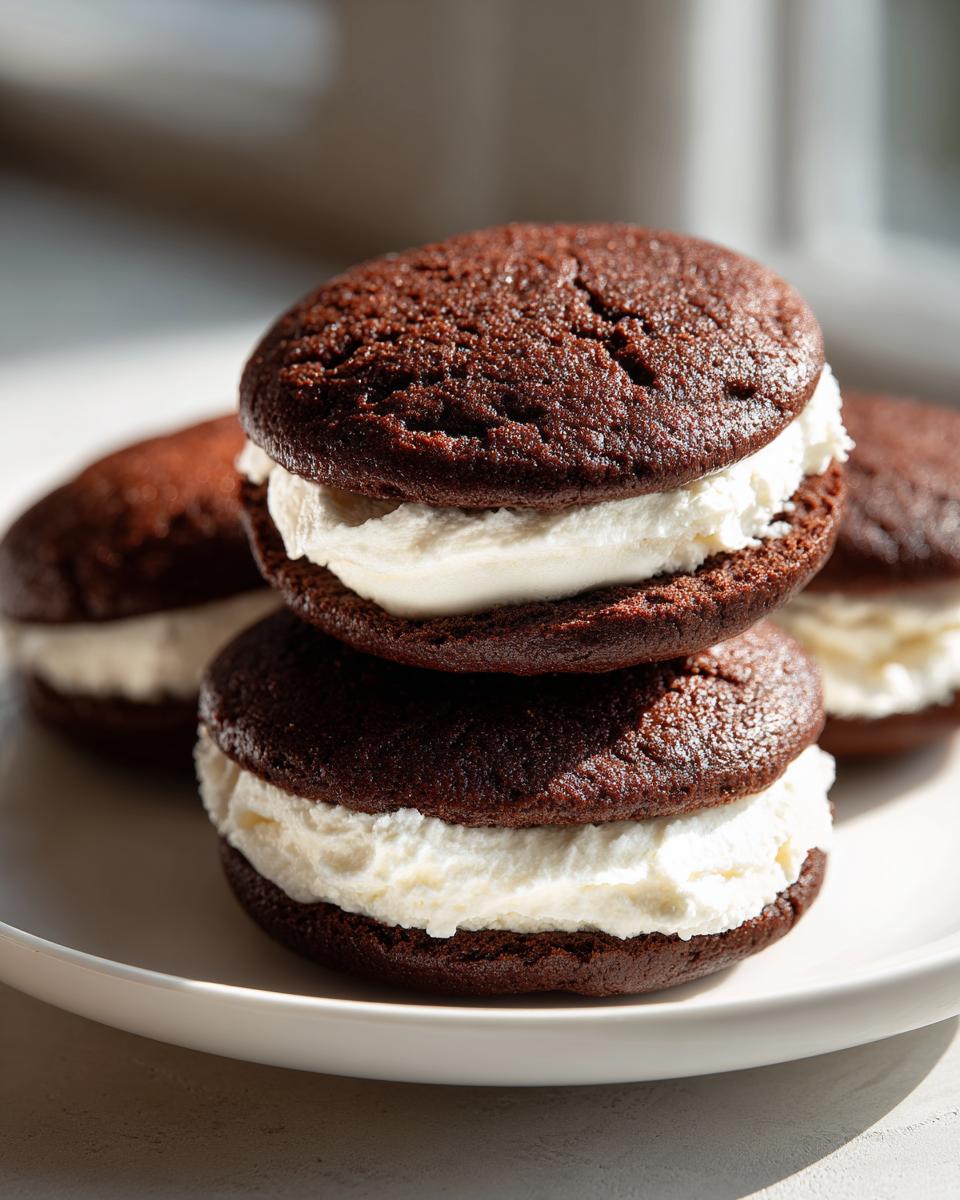
There are some desserts that just bring you right back to childhood, aren’t there? The smell of rich cocoa and sweet vanilla instantly whisks you away. For me, nothing hits that spot quite like a proper **whoopie pie**—those perfectly soft, cakey halves sandwiching a cloud of fluffy filling. When I started YumDrizzle, I wanted us to focus on food that felt real, the kind of flavor I chased down smoky diners and legendary food trucks across the country on tour. This recipe isn’t complicated; it’s built on that foundational belief that amazing food should be accessible, not intimidating. Trust me, this classic chocolate version is the ultimate, time-tested way to get that authentic, delicious treat right in your own kitchen. Ready to bake? If you want to know more about the journey that brought these honest recipes to life, check out our story over at YumDrizzle.
- Why These Are the Best Whoopie Pies You Will Ever Make
- Gathering Ingredients for Authentic Whoopie Pies
- Step-by-Step Instructions for Whoopie Pies from Scratch
- Tips for Perfect Whoopie Pies Success
- Storage and Make-Ahead Tips for Your Whoopie Pies
- Variations on Classic Whoopie Pies
- Frequently Asked Questions About Whoopie Pies
- Nutritional Snapshot of Classic Chocolate Whoopie Pies
- Share Your Whoopie Pies Creations
Why These Are the Best Whoopie Pies You Will Ever Make
We aren’t just talking about any sandwich cookie here, folks. This recipe is the one that works. I chased down the best versions of this nostalgic dessert—the real New England whoopie pies—to make sure what you get is everything you hope for. They are wonderfully rich yet incredibly light.
- They deliver those unbelievably **soft chocolate whoopie pies** the first time you try them.
- The texture is genuinely cakey sandwich cookies, not dense or crumbly at all.
- This recipe is built for flavor payoff without needing hours of fuss.
Achieving That Perfect Soft, Cakey Texture
The secret sauce for that tender crumb is using buttermilk; it reacts perfectly with the baking soda, giving the cakes a lift. Plus, a gentle mixing method means we don’t wake up that gluten—keeping everything soft!
Fluffy Marshmallow Cream Filling vs. Cream Cheese Frosting Whoopie Pies
While you absolutely can use cream cheese frosting (and I list how to do it later!), the true classic relies on that amazing, light, pure nostalgia of the **marshmallow cream filling**. It’s sweet, cloud-like, and the perfect contrast to the dark chocolate cake. You can find a great guide for other favorites over at my creamy egg salad recipe, but trust me, stick to the fluff here!
Gathering Ingredients for Authentic Whoopie Pies
Okay, we’ve established these need to be the best, which means we absolutely cannot skimp or cheat on ingredients. When you’re making something this nostalgic, precision matters. I learned this making things on the road—if you eyeball the leavening or use cold butter, you end up with dense pucks, not beautiful, puffy cakes! For these whoopie pies, we keep it straightforward, hitting those key notes of rich chocolate and sweet fluff. Every measurement below is important, so grab your measuring cups. We’re separating the ingredients right now so you can shop smart: the cake rounds first, then the filling.
For the Chocolate Cake Rounds
- 2 cups all-purpose flour
- 1 teaspoon baking soda
- 1/2 teaspoon salt
- 1/2 cup unsalted butter, softened
- 1 cup granulated sugar
- 2 large eggs
- 1 teaspoon vanilla extract
- 1 cup buttermilk
- 1/2 cup unsweetened cocoa powder
For the Fluffy Marshmallow Cream Filling
This is where we build that legendary center. Don’t worry, it comes together fast! You can tweak this filling later if you try my vanilla buttercream, but for now, stick to the classic.
- 1 teaspoon marshmallow creme (just a touch for flavor structure!)
- 1 cup confectioners’ sugar
- 1/2 cup unsalted butter, softened
- 1/4 cup milk
Step-by-Step Instructions for Whoopie Pies from Scratch
Alright, time to roll up those sleeves! Baking these whoopie pies from scratch is incredibly rewarding, and it really separates the good ones from the *great* ones. We’re going to tackle the cakes first, then the dreamy filling. Don’t rush the cooling—that’s where patience pays off!
Mixing the Soft Chocolate Whoopie Pies Batter
First things first, always get your machinery warmed up. Preheat your oven to 350°F (175°C) and get those baking sheets lined with parchment paper. This prevents drama later, trust me.
- Whisk your dry stuff—flour, baking soda, and salt—in a medium bowl. Set it aside.
- In a big bowl, use your mixer to beat that softened butter and granulated sugar until it looks light and fluffy. This is crucial for texture!
- Beat in your eggs one at a time, mixing well after each one, then stir in the vanilla.
- In a separate little bowl, whisk the buttermilk and cocoa powder until it’s totally smooth. No lumps allowed!
- Now, we alternate! Gently add the dry ingredients to the wet, alternating with the cocoa-buttermilk mixture. Start and end with the dry ingredients.
- This is your expert tip moment: mix until *just* combined. If you see a little flour streaking, that’s fine. Overmixing is the enemy of soft cakes!
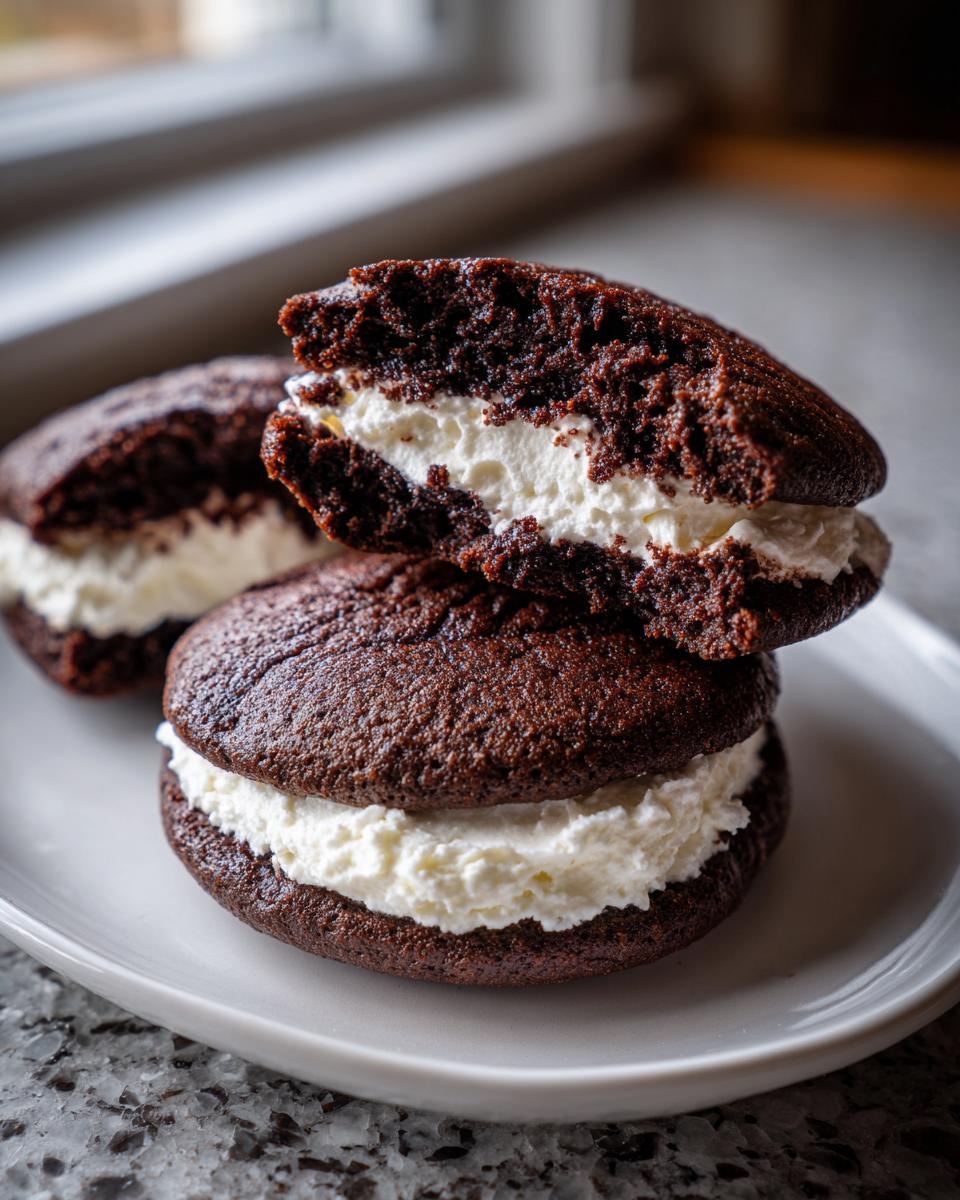
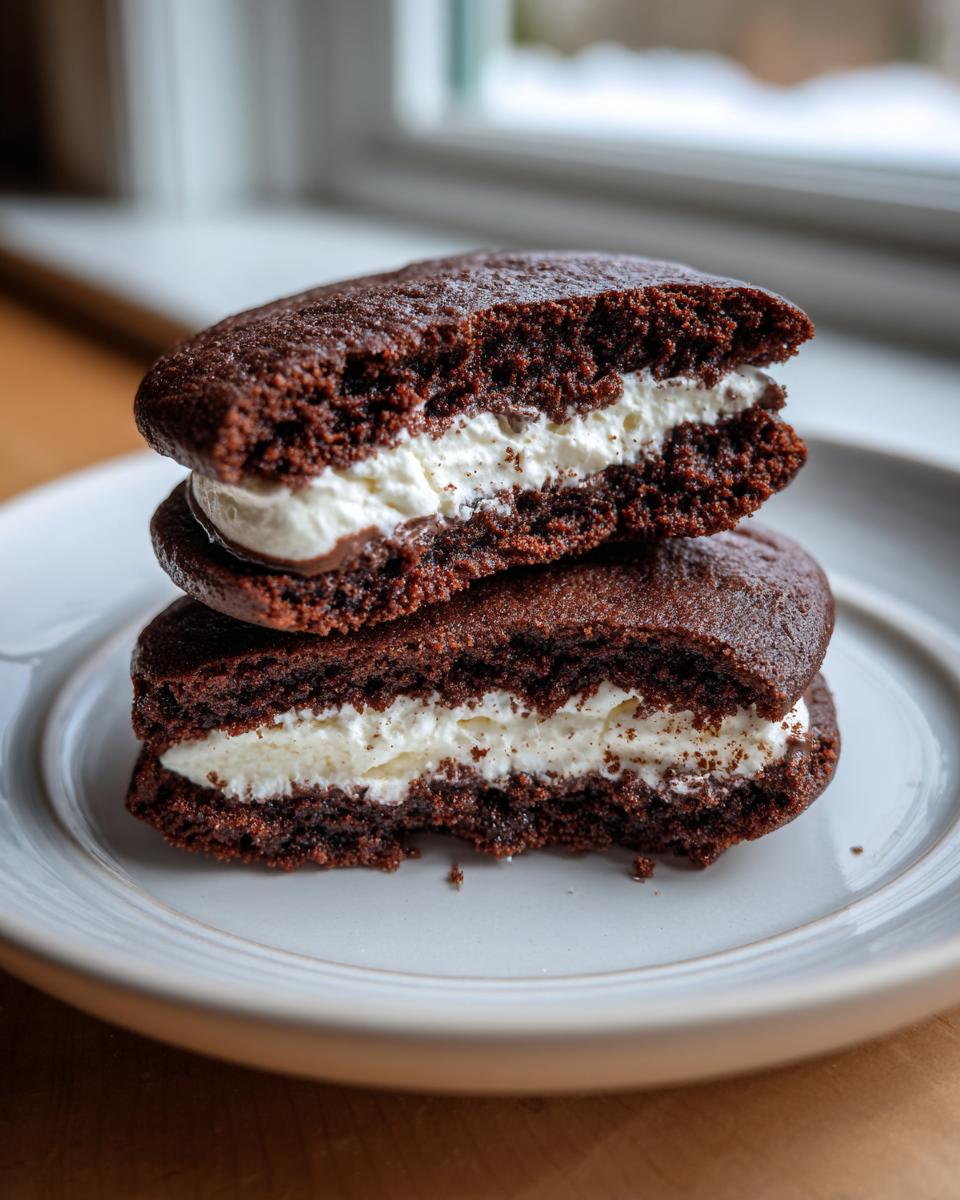
Baking and Cooling the Cakey Sandwich Cookies
Time for the oven! Drop rounded tablespoons of that batter onto your parchment-lined sheets, spacing them about two inches apart so they have room to be happy little domes. Bake them for 10 to 12 minutes. You’ll know they’re done when a toothpick comes out clean. Let these gorgeous rounds cool on the sheet for about 5 minutes—they are tender when they first come out! Then, move them gently to a wire rack to cool completely. Seriously, completely cool. If you try to fill a warm whoopie pie, you’ll end up with chocolate soup.
Creating the Marshmallow Cream Whoopie Pie Filling Ideas
While those cakes chill out, we make the filling. Grab your mixer again. Beat the softened butter and confectioners’ sugar until it looks smooth. Now, beat in the tiny bit of marshmallow creme (it gives it that classic note!) and the milk until everything smooths out and looks light and super fluffy. You want it airy enough to pipe, but stable enough to stay put.
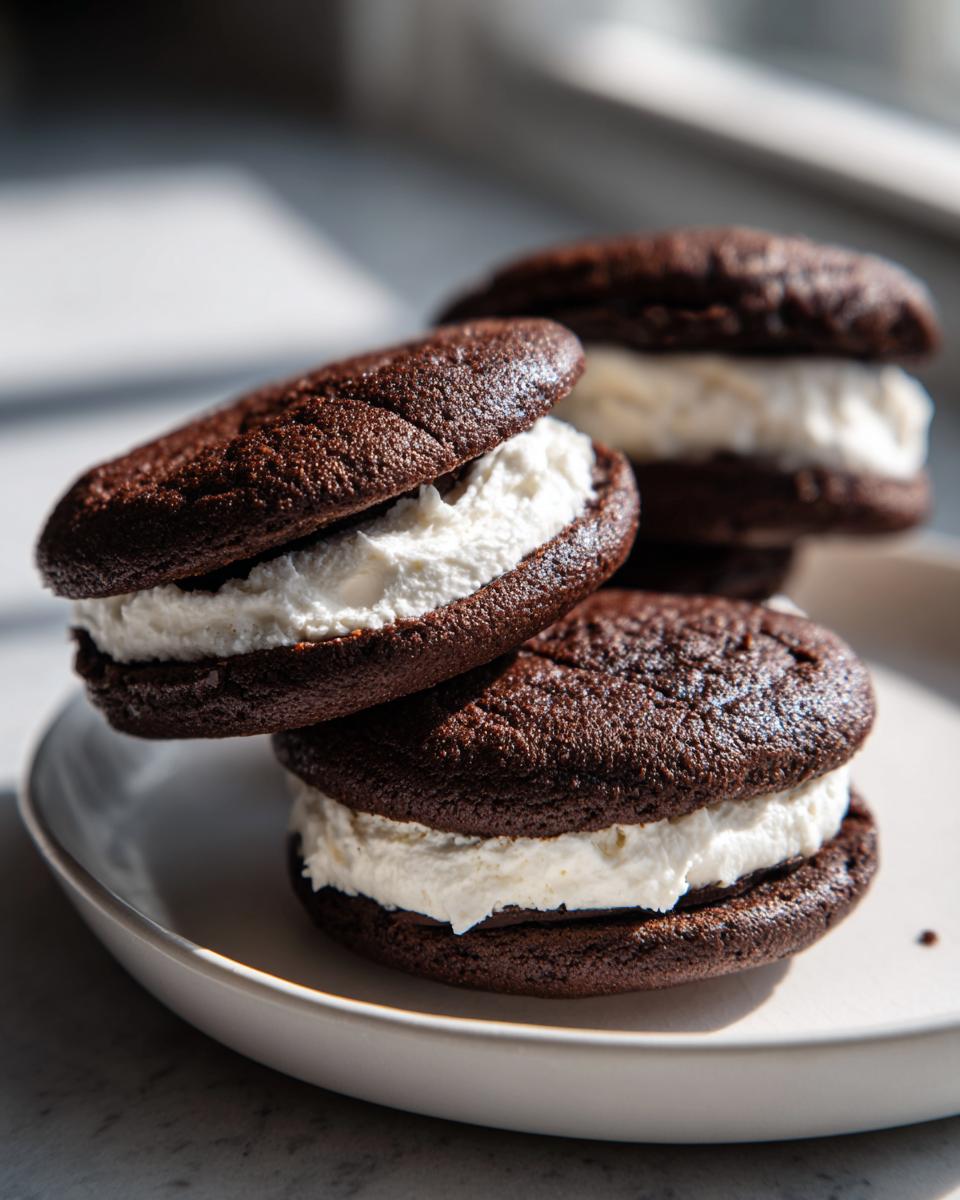
Assembling Your Homemade Whoopie Pies
This is the fun part! Take two of your completely cooled chocolate cakes. Grab a knife or a small offset spatula and spread a generous dollop of that fluffy filling onto the flat side of one cookie. Don’t be shy! Then, take the second cookie and gently press it on top. You just want to sandwich the filling nicely—no need to mash down that beautiful soft cake.
If you’re looking for side dishes that are just as easy and delicious for your next party, you might enjoy my guide on homemade tartar sauce, which goes great with picnic food!
Tips for Perfect Whoopie Pies Success
I know baking can sometimes feel like chemistry, but it doesn’t have to be stressful, especially with these whoopie pies. After all the road trips sourcing the best dessert hacks, I’ve nailed down a few tricks from the recipe notes that make sure you get that bakery style without even trying too hard. Following these little pointers just ensures you get that delicious, nostalgic result every single time.
Ingredient Notes and Substitutions for Whoopie Pies
Let’s talk substitutions, because who always has buttermilk on hand? If you run out, don’t panic! Just take 1 cup of regular milk and stir in 1 tablespoon of white vinegar or lemon juice. Let it sit for about five minutes until it curdles slightly—that’s buttermilk enough for us. It gives you that necessary tang!
Now, remember I mentioned the cream cheese frosting? If you absolutely must swap out the marshmallow cream filling, which I recommend you don’t for the first try, here is the substitute filling mix: just beat 8 ounces of softened cream cheese, 1/2 cup softened butter, 3 cups confectioners’ sugar, and 1 teaspoon of vanilla until it’s perfectly smooth. It’s a totally different vibe, but it works great!
Also, for the cake, please measure your flour right. Don’t just scoop directly from the bag with your cup; that packs it in too tight! For the softest cakes, you need to spoon the flour into your measuring cup and then level it off. It makes a huge difference for these whoopie pies.
Baking Guide for Bakery Style Whoopie Pies
Getting those perfect rounds is key for a beautiful finished sandwich cookie. The easiest way is to use a cookie scoop if you have one—it keeps everything uniform, which means they bake evenly. If you don’t have a scoop, just use two spoons to make a neat mound of batter onto the sheet.
Here’s an expert tip, especially if your kitchen runs warm: If your batter seems a little too soupy or looks like it’s spreading too much when you drop it, pop the whole tray into the fridge for 10 minutes. Chilling the batter just slightly helps those cakes hold their shape better when they hit the heat. For extra help with baking amazing things like our 3-ingredient butter cookies, you just need good technique and patience!
Storage and Make-Ahead Tips for Your Whoopie Pies
One of the best things about these whoopie pies is that they are totally make-ahead friendly! This is a lifesaver when you’re planning a big party or just want a quick treat later in the week. You can store the chocolate cake rounds unfitted in an airtight container at room temperature for about three days. They actually get even softer as they sit!
If you’re really planning ahead, the recipe notes confirm they freeze beautifully before you even add the filling. Just pop those cooled, unfilled cakes into a freezer-safe, airtight container for up to three months. When you need them, just pull what you want out and thaw them on the counter while you whip up a fresh batch of that irresistible marshmallow cream filling. If you want to see how I store things like homemade fillings, check out my guide on cookie butter cheesecake cups!
Variations on Classic Whoopie Pies
Listen, once you nail down this classic chocolate base, your mind is going to start racing. That’s the fun part about baking, right? It’s all about taking that perfect structure—the soft cake, the right amount of filling—and remixing it into something new. The demand for different flavors is huge, which is why you see things like **pumpkin whoopie pies** and lemon ones popping up everywhere this time of year. I love exploring these twists!
Trying Red Velvet Whoopie Pies
If you want to dip your toes into flavor variations, this is the easiest one to start with. Essentially, you’re taking our base chocolate cake recipe, but you’re reducing the cocoa powder down *way* low—maybe just a tablespoon or two for color, or just skip it completely if you want a plain vanilla base—and then you add your vibrant red food coloring until it’s deep and gorgeous. And here’s the key change: you absolutely have to ditch the marshmallow filling for this one and swap it out for a tangy cream cheese frosting. That slight sourness of the cream cheese perfectly cuts through the sweetness of the red cake. If you’re into coloring food fun, you can look at my tips for making red velvet cake pops for more color ideas!
Seasonal Flavor Swaps for Whoopie Pies
Once you get comfortable making the cakes from scratch, the batter is your playground. Think seasons! For fall, the easiest switch is going for **pumpkin whoopie pies**. Just take out about a half-cup of the flour and substitute it with canned pumpkin puree and a whole teaspoon of pumpkin pie spice in your dry mix. Amazing!
Then there’s spring. If you’re craving something bright, try making **lemon whoopie pies**. You skip the cocoa entirely and add the zest of two lemons into your butter/sugar mixture, and then use lemon juice in place of some of your milk or buttermilk in the recipe. It transforms the whole vibe into something totally zesty and light. See? It’s just about getting that *cakey* texture right; then you can flavor it however you want!
Frequently Asked Questions About Whoopie Pies
What is the difference between whoopie pies and cookies?
That’s a great question, because they look kind of like giant cookies glued together, right? The difference is all in the texture! Traditional cookies are usually chewy, crisp, or dense. These **whoopie pies**, though, are designed to be soft and pillowy—they are technically closer to a drop cake than a cookie. When you bite into one, it should crumble slightly like a cupcake top.
Are whoopie pies the same as Amish whoopie pies recipe?
For all intents and purposes, yes, they are! The term **Amish whoopie pies recipe** often refers to the original style, which is typically the chocolate cake with a basic marshmallow fluff filling, mostly associated with Pennsylvania and New England. My recipe follows that time-tested New England tradition for that authentic taste.
Can I use cake mix to make an easy whoopie pie recipe?
Oh, I see those cake mix recipes floating around, and they are definitely *easy*! But if you read my philosophy, you know I preach texture. Using a scratch recipe like this one gives you far superior control over moisture and crumb structure. You get that truly soft, cakey result you’re looking for when you mix from scratch; cake mix versions often come out a little too dense for my liking.
If you are looking for other quick ideas we’ve developed for busy mornings, you can check out some of the easy breakfast recipes on the site!
Nutritional Snapshot of Classic Chocolate Whoopie Pies
I always feel a little guilty sharing amazing comfort food like these chocolate **whoopie pies**, so here’s a snapshot of what you’re looking at per serving. Just remember, these numbers are estimates based on my recipe, and if you use, say, full-fat cream cheese frosting instead of my fluffy marshmallow filling, those numbers are going to shift! But hey, we bake for joy, not for spreadsheets, right? If you want to see what I do when I need a truly zesty, yet still manageable, dessert, take a peek at my lemon brownies recipe!
- Serving Size: 1 whoopie pie
- Calories: Approximately 350
- Sugar: Around 35g
- Fat: About 16g
- Protein: 3g
Share Your Whoopie Pies Creations
Now that you’ve gone through the whole process—from creaming the butter to finally stacking those dreamy chocolate layers—I really want to see what you made! Don’t just leave them hanging out on your cooling rack!
Did they come out perfectly cakey? Did the marshmallow cream ooze just right? I love hearing about your own baking adventures with this classic recipe. Please hit the rating stars below so other folks know how much you loved these amazing **whoopie pies**.
And if you snapped a picture of your perfect little sandwich cookies, tag us! If you have questions or want to share a childhood memory inspired by this dessert, head over to the contact page. Let’s celebrate this truly great American treat together!
PrintClassic Chocolate Whoopie Pies with Fluffy Marshmallow Filling

Make soft, cakey chocolate sandwich cookies with a sweet, fluffy marshmallow cream filling. This recipe delivers the nostalgic taste of authentic New England whoopie pies.
- Prep Time: 20 min
- Cook Time: 12 min
- Total Time: 32 min
- Yield: 12 servings 1x
- Category: Dessert
- Method: Baking
- Cuisine: American
- Diet: Vegetarian
Ingredients
- 2 cups all-purpose flour
- 1 teaspoon baking soda
- 1/2 teaspoon salt
- 1/2 cup unsalted butter, softened
- 1 cup granulated sugar
- 2 large eggs
- 1 teaspoon vanilla extract
- 1 cup buttermilk
- 1/2 cup unsweetened cocoa powder
- 1 teaspoon marshmallow creme (for filling)
- 1 cup confectioners’ sugar (for filling)
- 1/2 cup unsalted butter, softened (for filling)
- 1/4 cup milk (for filling)
Instructions
- Preheat your oven to 350°F (175°C). Line baking sheets with parchment paper.
- In a medium bowl, whisk together the flour, baking soda, and salt. Set this dry mixture aside.
- In a large bowl, beat the softened butter and granulated sugar with an electric mixer until the mixture is light and fluffy. This step builds the cake texture.
- Beat in the eggs one at a time, mixing well after each addition. Stir in the vanilla extract.
- In a separate bowl, whisk together the buttermilk and cocoa powder until smooth.
- Gradually add the dry ingredients to the wet ingredients, alternating with the buttermilk mixture, beginning and ending with the dry ingredients. Mix until just combined; do not overmix.
- Drop rounded tablespoons of batter onto the prepared baking sheets, spacing them about 2 inches apart. You should get about 24 cookies.
- Bake for 10 to 12 minutes, or until a toothpick inserted into the center comes out clean. Let the cookies cool on the baking sheet for 5 minutes before transferring them to a wire rack to cool completely.
- Prepare the filling: In a large bowl, beat the softened butter and confectioners’ sugar until smooth.
- Add the marshmallow creme and milk. Beat on medium speed until the filling is light, fluffy, and well combined.
- To assemble, take two cooled chocolate cookies and spread a generous layer of marshmallow filling on the flat side of one cookie. Top with the second cookie, pressing gently to sandwich the filling.
Notes
- For the softest cakes, measure your flour by spooning it into the measuring cup and leveling it off.
- If you prefer a cream cheese frosting over marshmallow filling, substitute the filling ingredients with 8 ounces of softened cream cheese, 1/2 cup softened butter, 3 cups confectioners’ sugar, and 1 teaspoon vanilla extract.
- These sandwich cookies freeze well before filling. Store the cooled cakes in an airtight container for up to three months.
Nutrition
- Serving Size: 1 whoopie pie
- Calories: 350
- Sugar: 35
- Sodium: 250
- Fat: 16
- Saturated Fat: 9
- Unsaturated Fat: 7
- Trans Fat: 0
- Carbohydrates: 50
- Fiber: 1
- Protein: 3
- Cholesterol: 45