
Nothing—and I mean *nothing*—hits that nostalgic sweet spot quite like a perfectly creamy cookies and cream combination. When I was driving around the country years ago, living off gas station snacks and microwaved meals, I realized what people really crave isn’t complicated; it’s comfort fast. That’s why I’m obsessed with this ultimate No Bake Oreo Pie. Forget turning on the oven; this recipe delivers that dreamy experience with zero fuss. It’s the quickest way to get an indulgent, silky chocolate dessert onto your table, making it the *Best Oreo Pie* you’ll want to make week after week. If you want to know more about why we value accessible flavors like this, check out our story over at the YumDrizzle philosophy page.
- Why This No Bake Oreo Pie is Your New Favorite Easy Oreo Pie Recipe
- Gathering Ingredients for Your Perfect Oreo Pie
- Step-by-Step Instructions for the Quick Oreo Pie
- Tips for the Best Oreo Pie Success
- Serving Suggestions for Your Party Favorite Pie
- Storing Leftovers of Your Quick Oreo Pie
- Frequently Asked Questions About This oreo pie
- Nutritional Estimates for This Indulgent Creamy Pie
- Share Your Experience Making This oreo pie
Why This No Bake Oreo Pie is Your New Favorite Easy Oreo Pie Recipe
Let’s be real: sometimes you need a showstopper without the sweat. That’s exactly what this Easy Oreo Pie Recipe is. It’s pure magic, proving you don’t need hours of work or fancy techniques to achieve something truly amazing. This is my go-to when I need a Quick Oreo Pie ready for unexpected guests. We focus on simple supermarket hauls that translate into serious flavor. If you’re looking for more fast fixes for busy evenings, you can check out some of our other ideas on the weeknight dinner page.
Key Benefits of this Creamy Oreo Dessert
- It’s completely No Bake—zero oven time means zero stress.
- It relies on just a few common ingredients, keeping it a true Minimal Ingredient Pie.
- The filling sets up beautifully, delivering a texture that truly rivals the Best Oreo Pie out there.
- It’s fast! Prep takes under 20 minutes, making it a perfect Quick Oreo Pie fix.
Gathering Ingredients for Your Perfect Oreo Pie
Jaxson here. Remember, at YumDrizzle, we believe that incredible flavor comes from the stuff you can actually find at your regular supermarket, no specialty runs needed! This oreo pie is built on those simple foundations. We’re combining crunchy Oreos with creamy layers, and I’ve listed everything you need below. Just grab these items, and you are halfway to making the best oreo pie.
- 1 1/2 cups crushed Oreo cookies (about 25 cookies)
- 1/4 cup melted unsalted butter
- 1 (8 ounce) package cream cheese, softened
- 1 cup powdered sugar
- 1 teaspoon vanilla extract
- 1 (12 ounce) container frozen whipped topping (like Cool Whip), thawed
- 1 (3.4 ounce) package instant chocolate or vanilla pudding mix
- 1 1/2 cups cold milk (use chocolate milk for richer flavor)
- 1 cup crushed Oreos, for topping
Ingredient Notes and Substitutions for this Oreo Pie
A couple of quick notes so your filling comes out perfectly silky for this Oreo Cookie Crust Pie. First, the cream cheese absolutely has to be softened—if it’s cold, you’ll get lumps, and we just don’t have time for that! Also, when you mix your instant pudding, swap out your regular cold milk for cold chocolate milk. Seriously, it makes the filling so much richer, turning this into a true Indulgent Creamy Pie experience. Finally, make absolutely sure that tub of whipped topping is fully thawed before you fold it in; we need that airy texture!
Step-by-Step Instructions for the Quick Oreo Pie
Okay, let’s get down to the fun part! Since this is a No Bake Oreo Pie, there’s no oven preheating to worry about—which is why this is such a fantastic weeknight dessert. We’re building this layer by layer, so stick with me. Every step is easy, but patience during the chilling phase is what turns these simple ingredients into that perfect, sliceable dessert everyone expects from a classic oreo pie. You can find loads of other no-fuss treats over on our main dessert recipes page, but nothing beats this one for pure crowd-pleasing power.
Creating the Crunchy Oreo Cookie Crust Pie Base
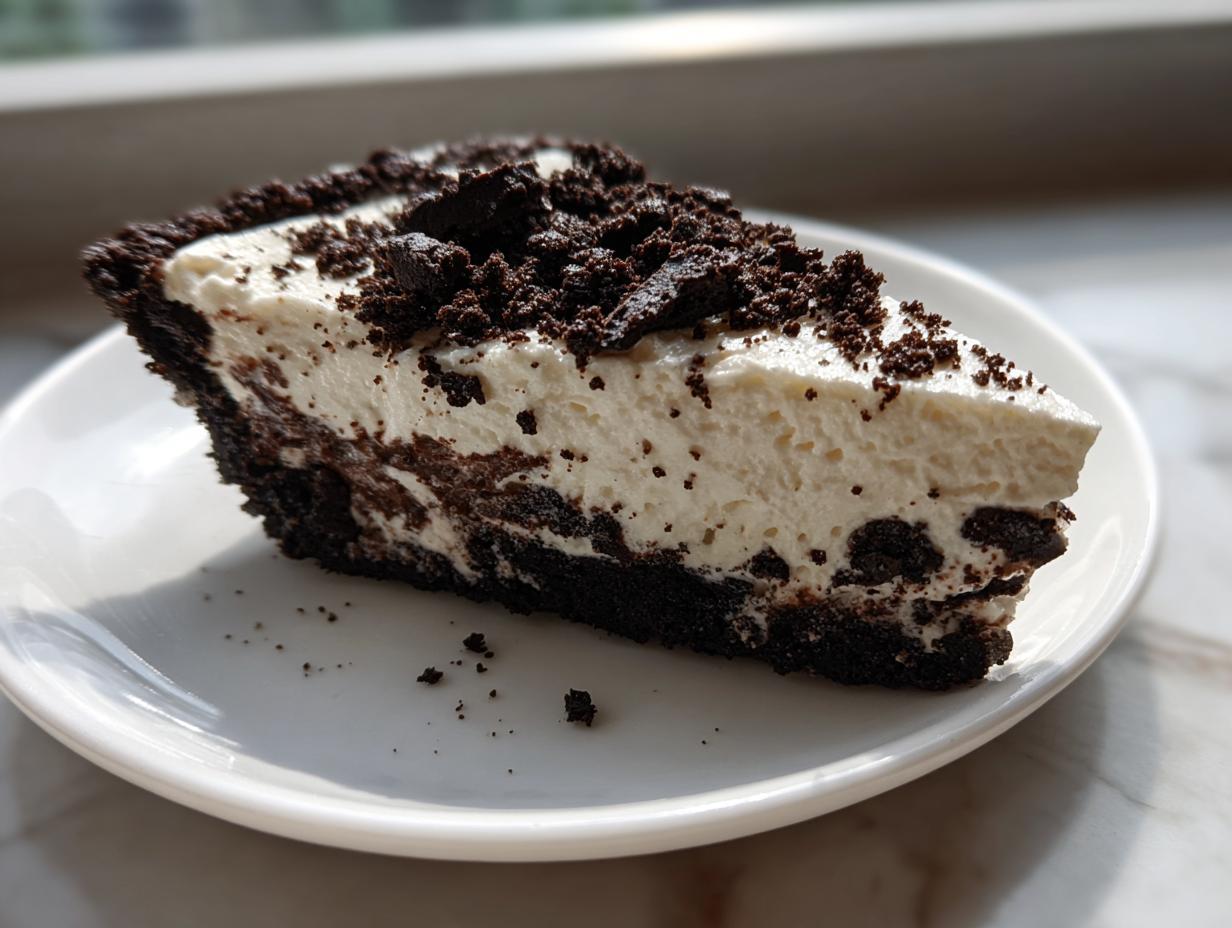
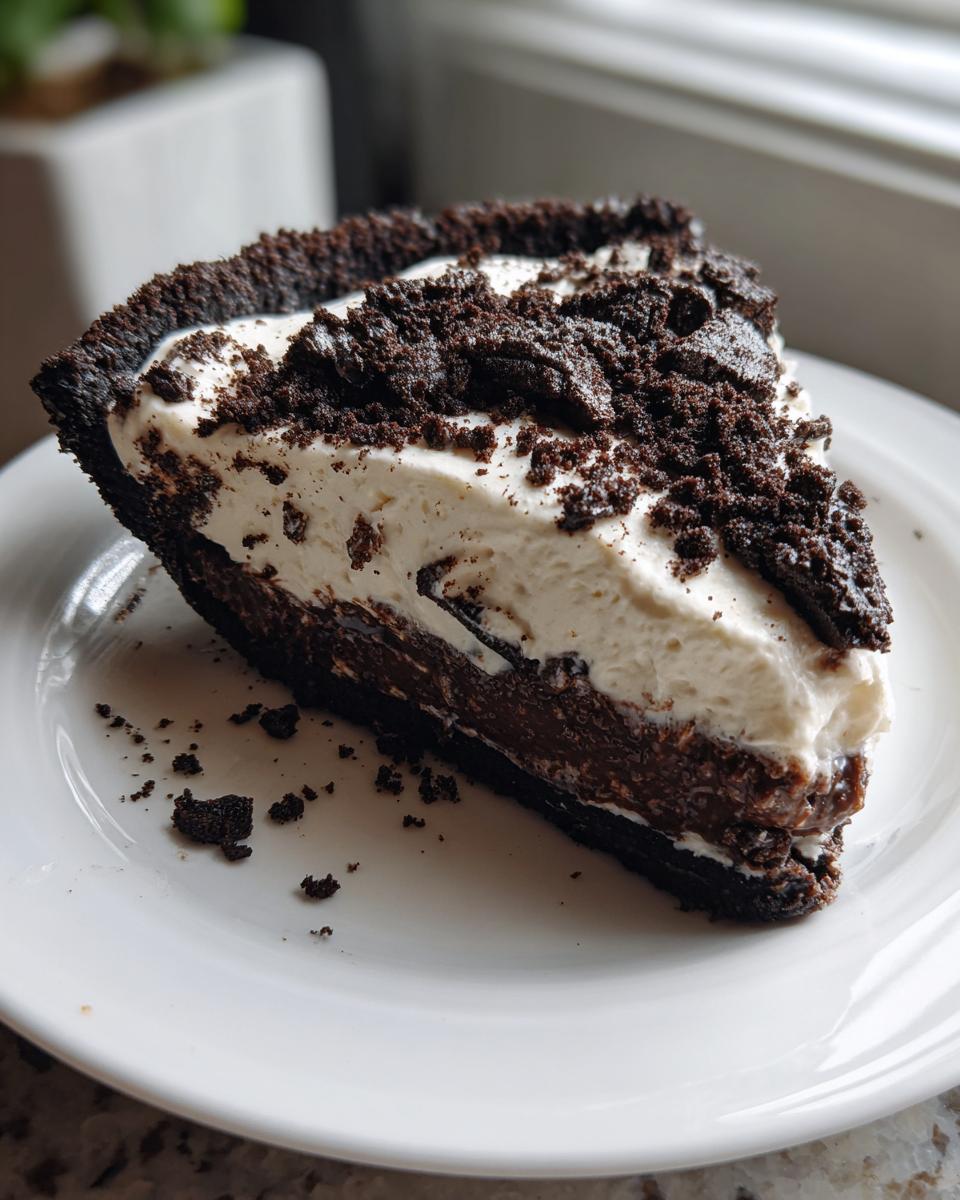
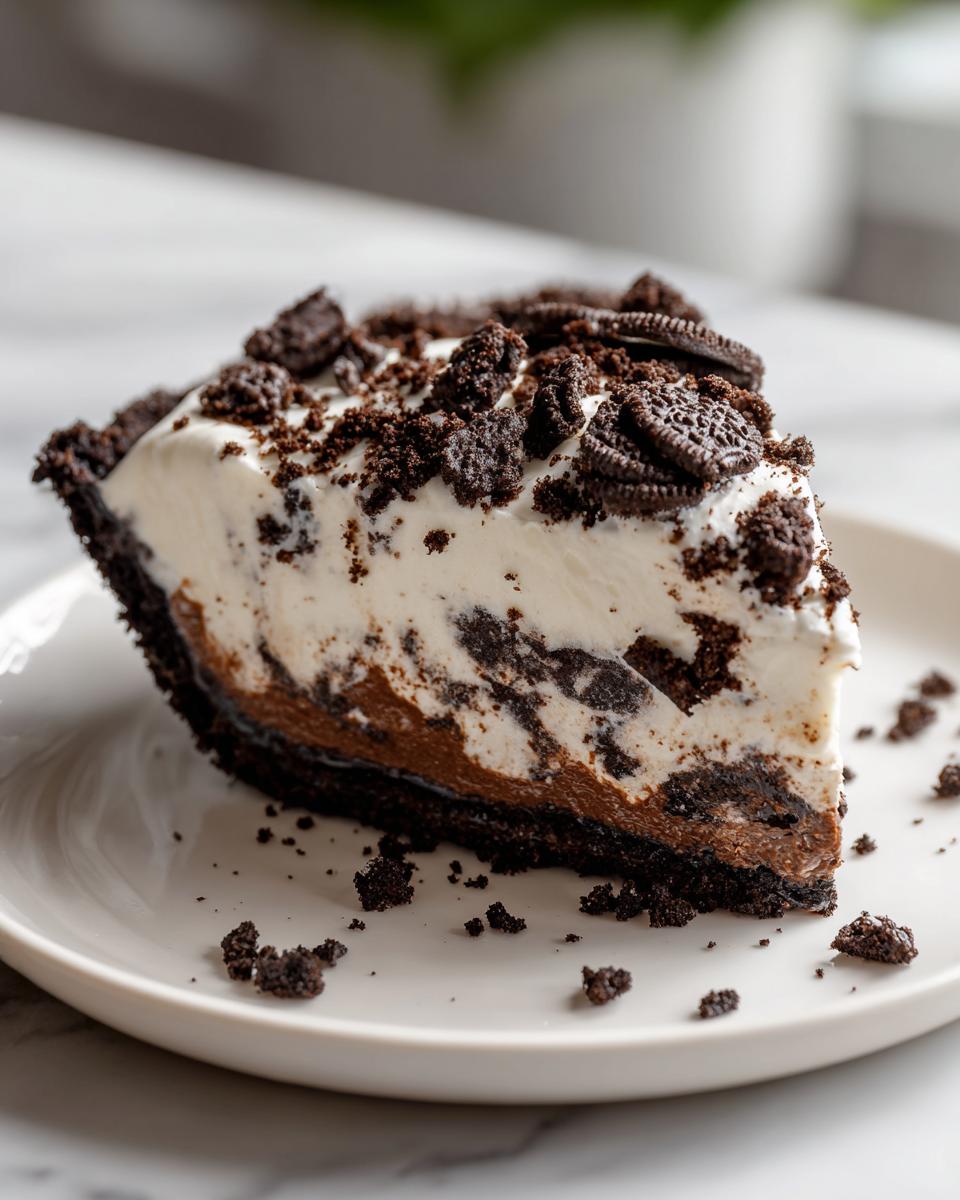
First up is that crunchy base. You just combine your crushed Oreos (and trust me, you crush them right in the food processor, no cheating!) with the melted butter. Mix it until it looks like wet sand. Now, press it firmly into your 9-inch pie plate. I mean *firmly*! Get the bottom flat and push those crumbs right up the sides evenly. Once it’s packed tight, pop that entire plate into the freezer instantly. This helps the butter set up fast so your crust doesn’t turn soupy when the filling goes on. This is key for a clean slice later on!
Assembling the Cream Cheese Layer of the oreo pie
While the crust is chilling, we start the creamy magic. Grab that softened cream cheese—remember, softened!—and beat it on its own until it’s totally lump-free. Once it’s smooth as silk, slowly beat in the powdered sugar and the vanilla. Keep mixing until it looks cohesive. Now, here’s a gentle move: take half of your thawed whipped topping and gently fold it into the cream cheese mixture. Don’t beat it, just gently fold with a spatula until it’s just combined. This keeps the layer light! Spread that layer evenly over your cold crust.
Mixing the Silky Pudding Filling for this Indulgent Creamy Pie
Time for the pudding part, which gives this recipe that *Oreo Mousse Pie* feel. In a separate bowl, whisk your instant pudding mix with the cold milk. Whisk it hard for about two minutes until it really starts to thicken up on its own. Let it sit for just five minutes while you prep the last bit of topping. Now, take the remaining thawed whipped topping and *gently* fold it into the pudding mixture. This two-step folding technique is what keeps the filling airy and creamy—we don’t want to deflate that beautiful volume we just created!
Chilling and Finishing the No Bake Oreo Pie
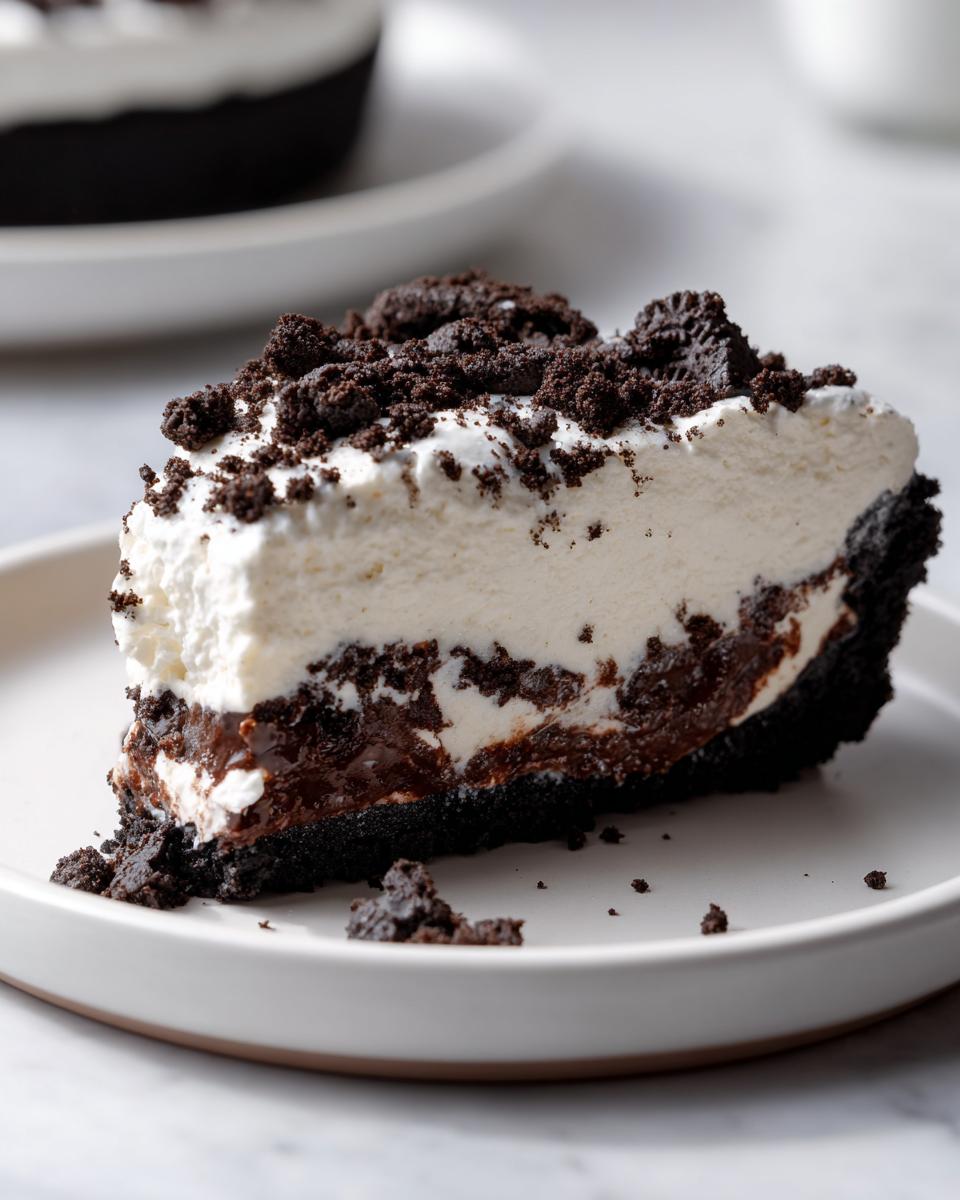
Pour that wonderful, light filling right over your cream cheese layer and smooth the top. Now comes the hardest part: waiting! You have to cover this beauty loosely and refrigerate it for a minimum of four hours. Honestly, if you can let it go overnight, it’s even better, because that chilling time is crucial for getting those perfect, sliceable slices for your No Bake Oreo Pie. Right before you serve it up—and not a moment sooner—sprinkle that final cup of crushed Oreos right over the top. That crunch finishes the whole piece!
Tips for the Best Oreo Pie Success
You’ve made it through the assembly, and now you’re just waiting on that chill time, but I have a few extra nuggets of wisdom to guarantee this oreo pie is the best dessert you’ve ever made. These little tweaks come from years of tinkering with recipes trying to find that perfect balance of sweet and crunch.
Let’s talk about boosting that flavor profile. One thing I learned on the road is that you can always take a good flavor and make it great with one small trick. For this recipe, if you’re using vanilla pudding mix, swap out your cold milk for cold chocolate milk—it deepens the chocolate notes and makes this dessert significantly richer. That’s my secret upgrade for the pudding layer!
Something worth mentioning, especially if you want that crust to truly stay put (though chilling works great!), is that you *can* bake the crust for about 10 minutes at 350 degrees Fahrenheit before you chill it. That’s an old-school trick that locks in the butter. Just be sure it cools completely before you start layering in that lovely cream cheese filling. Don’t forget, too, that you can easily turn this into an Oreo Mousse Pie variant by swapping out that instant pudding for your own favorite rich, homemade chocolate mousse batch. If you’re interested in elevating other classics, I’ve got some great advice for getting the perfect crust on the classic apple pie page, too!
Serving Suggestions for Your Party Favorite Pie
This oreo pie is already a huge hit, but how you present it really makes a difference when you’re serving a crowd! Since it’s so rich and chocolatey, it pairs beautifully with something bright to cut through all that sweetness. I always keep a batch of strong, hot coffee brewing nearby. That dark roast is the perfect counterpoint to the creamy filling. If you need something to serve alongside it that’s a little lighter, a small bowl of fresh, tart raspberries or sliced strawberries works like a charm!
And speaking of parties, if you need a drink to match the festive vibe, check out our recipe for a crowd-pleasing Thanksgiving punch. This Simple Chocolate Pie disappears fast, so have plenty of toppings ready!
Storing Leftovers of Your Quick Oreo Pie
Okay, let’s be positive here—leftovers of this Quick Oreo Pie are a wonderful bonus! But because this is a no-bake dessert packed with cream cheese and dairy fillings, how you store it matters a lot for both safety and texture. Don’t even think about leaving this masterpiece sitting out on the counter; it needs to be cold!
The best way to handle whatever slice you have left is to cover it up tightly. I use plastic wrap, but make sure it’s not pressing directly onto those beautiful crushed Oreo crumbs on top, or they’ll get soggy fast! If you only have a partial piece left, just cover the cut edge of the pie plate well. Store it immediately in the refrigerator.
How long does it last? Honestly, this creamy Oreo dessert is at its absolute peak texture within the first 24 hours, but you’ll be happy to know it holds up really well for about three to four days safely in the back of the fridge. Do not try to reheat this pie—ever! It’s designed to be served straight from the cold. Serving it colder, even after a day or two, just firms up that filling and gives you a cleaner bite!
Frequently Asked Questions About This oreo pie
I get tons of questions every time I post this recipe because it’s just one of those crowd-pleasers everyone needs in their back pocket. Asking questions is how we learn to cook better, so no question is silly here! Let’s clear up anything that’s making you hesitate about making this quick treat.
Can I make this oreo pie ahead of time?
Absolutely! In fact, I highly encourage it. While the minimum chill time is four hours, this oreo pie honestly tastes even better the next day. Giving it a full overnight chill in the fridge lets the flavors really marry together, and it guarantees that filling is firm enough for spotless slicing—perfect if you’re planning it for a big weekend dessert!
What is the difference between Oreo Pudding Pie and Oreo Mousse Pie?
That’s a smart question, as people confuse these terms all the time! A true Oreo Pudding Pie is usually denser and relies heavily on the cooked/set pudding for body. Our recipe sits right in the sweet spot! Because we fold in so much whipped topping, it lifts the pudding base, giving it a lighter, airier texture that leans heavily toward an Oreo Mousse Pie. It’s the best of both worlds—stable like pudding but fluffy like mousse!
Can I use homemade pudding instead of instant mix in this oreo pie?
You sure can give it a go, but you’ll need to treat it differently than you would the boxed instant mix. Instant pudding sets up fast because of its stabilizers, but if you make a custard-style homemade pudding, you’ll need to let it cool down completely—like, really cool—before folding in the whipped topping. That cooling time alone can add an extra hour to your prep. Stick to the instant mix if you’re aiming for that super Quick Oreo Pie timeline we talked about!
If you ever have more specific recipe questions or just want to say hello, feel free to shoot us a message over on the contact page!
Nutritional Estimates for This Indulgent Creamy Pie
When you’re whipping up something this delicious, I know you’re also curious about what’s inside! Remember that these numbers are just estimates, just like when I was guessing ingredient amounts back on the road—but this time, we have better tracking! These estimates are based on using the standard ingredients listed above, assuming 8 generous slices of this Indulgent Creamy Pie.
- Serving Size: 1 slice
- Calories: 410
- Fat: 25g (Don’t sweat the fat; the cream cheese goodness is worth it!)
- Carbohydrates: 45g
- Sugar: 35g
- Protein: 5g
- Sodium: 320mg
This is definitely a treat, not an everyday snack, so enjoy every bite of that rich chocolate flavor. If you end up using a different brand of cookies or a different kind of milk, these numbers will shift a bit, so keep that in mind! We want you to have the most fantastic, worry-free experience when you visit delicious spots like Home Kitchen Secrets.
Share Your Experience Making This oreo pie
Now that you’ve had a taste of how simple it is to pull off this amazing oreo pie, I really want to hear about it! Did you make it for a big family hang-out, or maybe just because you had a sudden craving for something sweet that needs no oven? That’s what YumDrizzle is all about—making real life a little more delicious with accessible recipes.
Did this earn a spot on your rotation of go-to Summer Dessert Recipes? Tell me! Jump down below, drop a star rating, and let me know what you thought of that creamy filling. Did you use chocolate milk in your pudding mix? Spill the beans!
We love seeing how you bring these simple ideas to life in your own kitchens. If you’re looking for more easy meals to round out your menu, take a peek at our collection of easy breakfast recipes. Happy baking—or, well, happy *no-baking*!
PrintThe Best No Bake Oreo Pie: Creamy Dessert for Any Crowd

You need this easy No Bake Oreo Pie recipe. It features a crunchy Oreo cookie crust and a silky, creamy filling that tastes like the best cookies and cream dessert. This quick recipe is perfect for parties or a simple weeknight treat.
- Prep Time: 20 min
- Cook Time: 0 min
- Total Time: 4 hr 20 min
- Yield: 8 servings 1x
- Category: Dessert
- Method: No Bake
- Cuisine: American
- Diet: Vegetarian
Ingredients
- 1 1/2 cups crushed Oreo cookies (about 25 cookies)
- 1/4 cup melted unsalted butter
- 1 (8 ounce) package cream cheese, softened
- 1 cup powdered sugar
- 1 teaspoon vanilla extract
- 1 (12 ounce) container frozen whipped topping (like Cool Whip), thawed
- 1 (3.4 ounce) package instant chocolate or vanilla pudding mix
- 1 1/2 cups cold milk (use chocolate milk for richer flavor)
- 1 cup crushed Oreos, for topping
Instructions
- Prepare the crust: Mix the 1 1/2 cups of crushed Oreos with the melted butter. Press this mixture firmly into the bottom and up the sides of a 9-inch pie plate. Place the crust in the freezer while you prepare the filling.
- Make the cream cheese layer: In a large bowl, beat the softened cream cheese until smooth. Gradually beat in the powdered sugar and vanilla extract until fully combined. Gently fold in half of the thawed whipped topping until just blended. Spread this mixture evenly over the chilled Oreo crust.
- Prepare the pudding layer: In a separate bowl, whisk together the instant pudding mix and the cold milk for about two minutes, until the mixture begins to thicken. Let it sit for five minutes.
- Combine the layers: Gently fold the remaining half of the thawed whipped topping into the thickened pudding mixture. Pour this creamy filling over the cream cheese layer in the pie crust.
- Chill the pie: Cover the pie loosely with plastic wrap and refrigerate for at least four hours, or until the filling is firm. This step is important for a clean slice.
- Finish and serve: Before serving, sprinkle the remaining 1 cup of crushed Oreos over the top of the pie. Slice and serve this easy chocolate dessert cold.
Notes
- For an even richer flavor, use chocolate milk when preparing the instant pudding mix.
- You can substitute the instant pudding with a homemade chocolate mousse for an Oreo Mousse Pie variation.
- If you want a firmer crust, bake the crust at 350 degrees Fahrenheit for 10 minutes before chilling.
Nutrition
- Serving Size: 1 slice
- Calories: 410
- Sugar: 35
- Sodium: 320
- Fat: 25
- Saturated Fat: 12
- Unsaturated Fat: 13
- Trans Fat: 0.5
- Carbohydrates: 45
- Fiber: 1
- Protein: 5
- Cholesterol: 35