

Listen, when that summer heat starts hitting, nothing beats something perfectly frozen and ridiculously cold. Forget heating up the oven! That’s why I’m sharing what I use every single time: the No-Bake Ultimate Oreo Ice Cream Pie. This isn’t some stiff, complicated dessert; this is pure, creamy, easy flavor delivered in under 15 minutes of actual effort. My time on the road taught me that the best food doesn’t need fancy equipment—it just needs heart and the right core ingredients coming together perfectly. This homemade ice cream pie proves that simple pantry staples can create the best frozen dessert ever.
- Why This No-Bake Ice Cream Pie Recipe is Your New Favorite Frozen Dessert
- Gathering Ingredients for Your Homemade Ice Cream Pie
- Step-by-Step Instructions for the No Bake Ice Cream Pie
- Tips for Success Making the Best Ice Cream Pie Ever
- Make Ahead Frozen Dessert and Storage for Your Ice Cream Pie
- Serving Suggestions for Your Ice Cream Pie for Parties
- FAQ About This Easy Ice Cream Pie Recipe
- Nutritional Estimate for One Slice of Ice Cream Pie
- Share Your Perfect Ice Cream Pie Creations
Why This No-Bake Ice Cream Pie Recipe is Your New Favorite Frozen Dessert
Look, the last thing I wanted after years of hauling gear across the country was a recipe that demanded a three-hour cooking time. This is why I swear by this particular frozen dessert pie. It delivers massive satisfaction with ridiculously low input. It’s built for real life, not for a cooking show set.
- It’s truly one of the most reliable cream ice cream dessert recipes you’ll ever find.
- It’s perfect for last-minute summer cookouts or just when a massive craving hits.
- Trust me, the combination of Oreo and creamy vanilla is a guaranteed crowd-pleaser for any party.
Quick Prep Time for the Ultimate Ice Cream Pie
We’re talking about 15 minutes of actual hands-on time here. That’s it! You spend those minutes crushing cookies and spreading ice cream, and the freezer does the rest of the heavy lifting. If you need a quick frozen pie that tastes like you spent all day on it, this is your answer.
Customizing Your Favorite Ice Cream Pie Flavors
This recipe is just the blueprint, honestly. If you’re feeling mint chocolate chip that day, go for it! Or maybe you want to try a chocolate ice cream pie base instead of vanilla. Because this whole thing is no-bake, you can completely swap out the main ice cream flavor and still get fantastic results every single time. It’s flexible, baby!
Gathering Ingredients for Your Homemade Ice Cream Pie
Okay, before we start assembling this beautiful, cold masterpiece, we need the right gear. This ultimate ice cream pie recipe keeps things super simple because I believe great ingredients don’t have to be complicated. I’ve listed out exactly what you need below. Pay close attention to the state of the ice cream—that’s important for getting that perfect layer!
- Crushed Oreo Cookies: We need two cups of those chocolatey guys.
- Unsalted Butter: Six tablespoons, melted down smooth.
- Vanilla Ice Cream: One and a half quarts, and this is key—let it soften up just a bit so you can spread it without pulling the whole crust apart.
- Heavy Cream: One cup for the topping.
- Powdered Sugar: A quarter cup to sweeten that topping nicely.
- Vanilla Extract: Just one teaspoon to boost that creamy ice cream flavor.
- Optional Goodies: Chocolate fudge sauce or some chopped peanuts if you feel like going all out.
Ingredient Notes and Substitutions for Your Ice Cream Pie with Oreo Crust
When I was experimenting, I learned that the crust is everything. You really want those Oreo cookies for that deep chocolate crunch, but hey, sometimes you’re out, or maybe you just prefer something a little lighter. If you absolutely need a swap, you can substitute about 1.5 cups of graham cracker crumbs for the Oreos. It becomes a slightly different vibe—more of a classic pie feel—but it works great for this homemade ice cream pie!
Step-by-Step Instructions for the No Bake Ice Cream Pie
I know looking at a list of steps can sometimes feel intimidating, but trust me on this: this is where the magic happens, and it’s dead simple. We’re just layering cold things! Getting the timing right on the freezing parts means you won’t end up with soup when you try to slice this no bake ice cream pie. Just follow these few steps, and you’re golden.
Creating the Perfect Ice Cream Pie with Oreo Crust
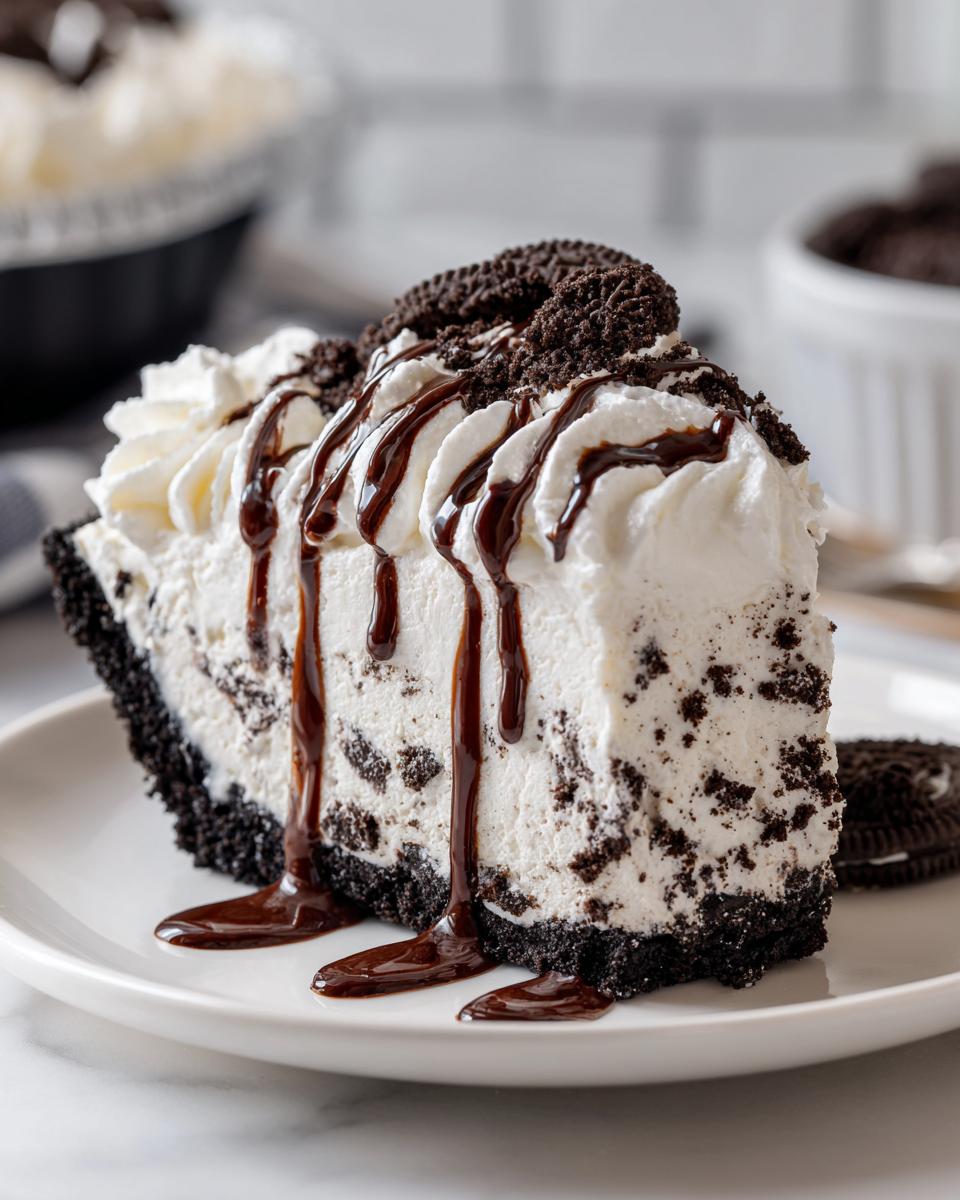
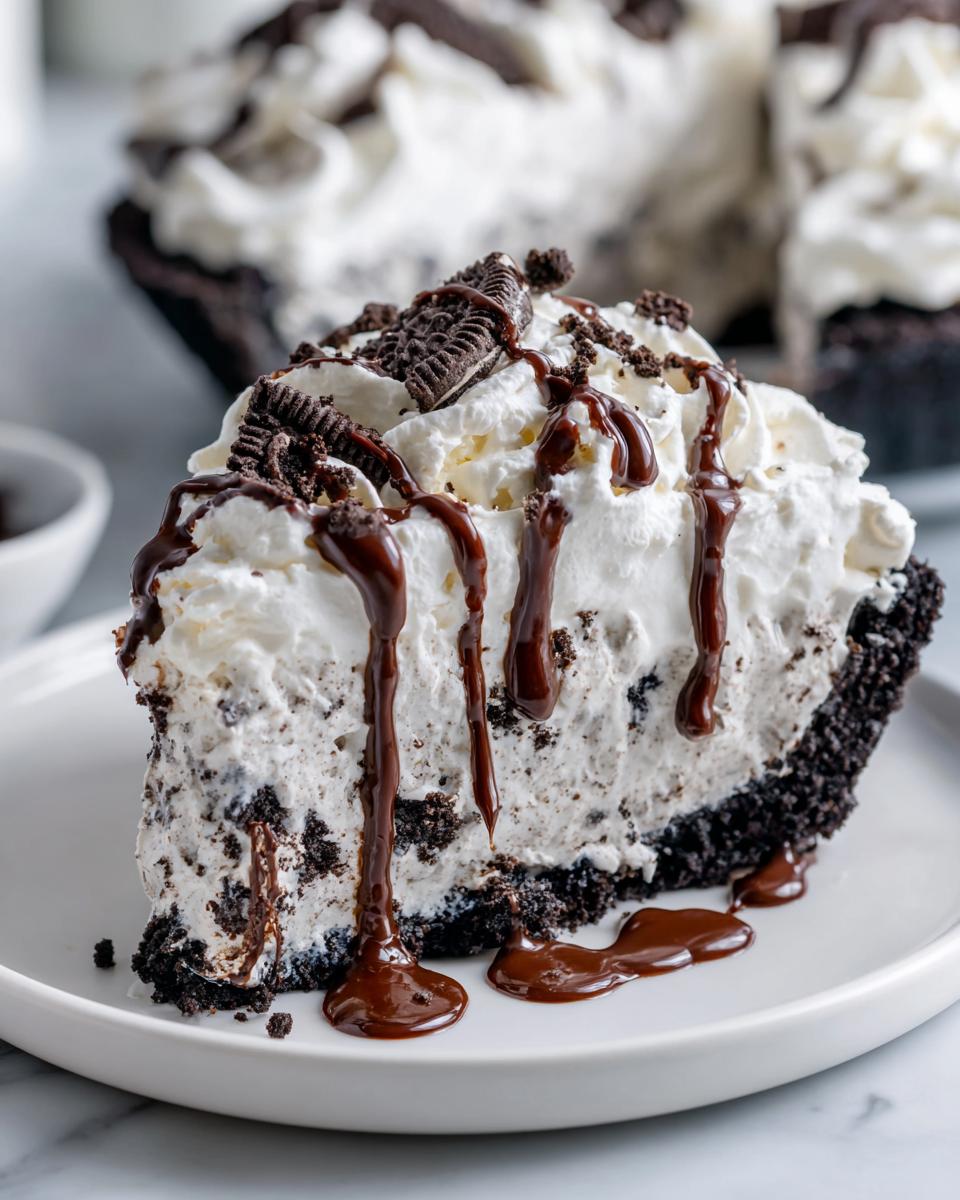
First things first, the foundation! Mix those two cups of crushed Oreos right in a bowl with your six tablespoons of melted butter. Get it all mixed up until it looks like damp sand. Then, press that goodness firmly into your 9-inch pie plate. I mean really press it—use the bottom of a glass or your knuckles. We need a strong base so it doesn’t crumble when we cut into this decadent frozen pie later. Get that crust into the freezer right away while you handle the filling.
Assembling the Layered Ice Cream Pie Filling
This is the trickiest part, and it requires patience. You let that big tub of ice cream sit out for about 10 to 15 minutes. It needs to be soft enough to spread—think creamy frosting consistency, not watery soup. Use a spatula to smooth that softened vanilla ice cream right over that chilled Oreo crust. Make it even! Once it’s looking smooth, back into the freezer it goes. You need at least two hours here—maybe more—so it sets up hard before we top it.
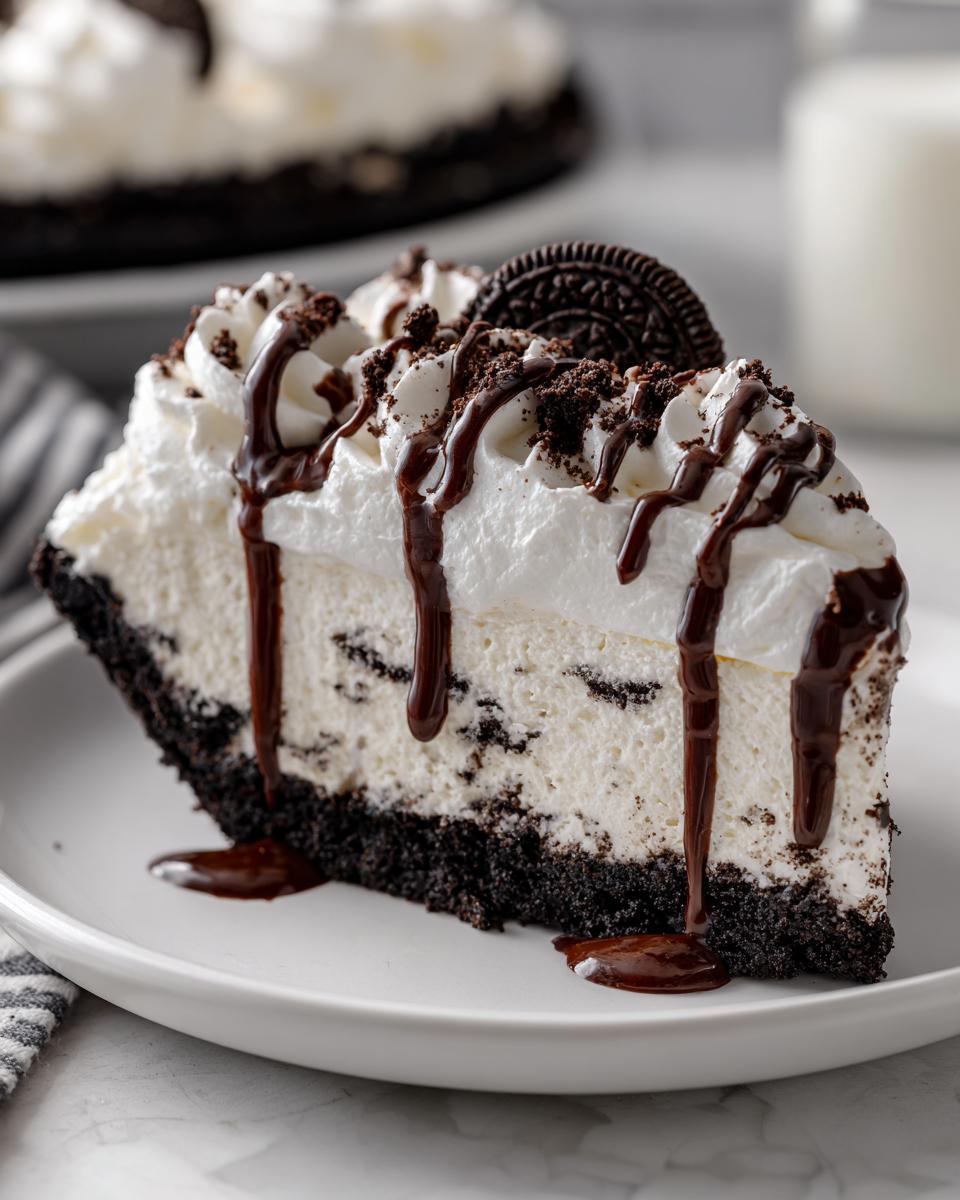
Finishing Touches: Whipped Cream and Ice Cream Pie Toppings
Right before your guests arrive, whip up that topping! Beat that heavy cream, powdered sugar, and vanilla until you get stiff peaks—you know, when the whisk stands straight up when you pull it out. Gently spread that fluffy topping over your set ice cream layer. Now, if you’re adding fudge or peanuts, do it last! If you put chocolate sauce on too early, it freezes rock solid and becomes miserable to eat. Keep things cold, top it off fresh, slice it up, and enjoy!
Tips for Success Making the Best Ice Cream Pie Ever
I’ve messed up enough ice cream pies over the years—especially when I was trying to rush them between gigs—to know exactly what trips people up. Since this is a frozen dessert pie, temperature control is everything. Don’t skip these little tricks; they are what separate a good slice from a great one!
First, when you press that Oreo crust, pack it tight! If it’s loose, it won’t hold up when you go to cut it, and you’ll end up with the crust crumbs everywhere. Seriously, use the bottom of a liquid measuring cup to really tamp it down. Also, that ice cream softener trick? Crucial. If it’s too hard, you’ll tear up the crust trying to spread it. If it’s too soft, it just melts into the crust layer, making it soggy. Aim for spreadable, not soup!
My big secret for making sure the topping stays perfect is timing. I try to make the whipped topping right before I plan to serve the pie. Keeping that topping stored separately until the last minute keeps it looking fluffy and fresh. If you want to try making an easy ice cream pie recipe that’s incredibly stable, make sure you put the whole thing back in the deep freeze for at least an hour after adding that final layer of cream.
Make Ahead Frozen Dessert and Storage for Your Ice Cream Pie
The greatest thing about this make ahead frozen dessert is knowing you can conquer dessert way before the party even starts. Honestly, this is the kind of quick frozen pie that tastes even better after it’s had a full day to firm up in the deep freeze. I almost always make mine the day before I need it because it’s just less stress later on.
You can safely store this layered ice cream pie for up to two weeks, which is amazing! The key to keeping that Oreo crust crisp and that vanilla layer from getting icy is how you wrap it. You need to seal out the freezer air, period. Once your pie is completely firm—after that final topping is on—cover it tightly with plastic wrap first. Like, wrap it really well. Then, place that wrapped pie inside an extra large zip-top freezer bag or even wrap the whole thing in aluminum foil.
When it’s time to serve your ice cream pie for parties, don’t try to slice it immediately! That’s a recipe for disaster and broken slices. You need to pull it out of the freezer about 10 to 15 minutes before you intend to serve dessert. This brief rest period lets the ice cream soften up just enough so you get that perfect, creamy texture when you cut into it, but it’s still solid enough to keep its shape beautifully.
Serving Suggestions for Your Ice Cream Pie for Parties
So, you’ve got this stunning, cold beauty sitting in your freezer, ready for the big show. Now, how do we make the presentation for your summer ice cream cake absolutely shine when you’re having people over? Since this specific ice cream pie has that rich chocolatey Oreo base and sweet vanilla center, it pairs with everything!
For visual impact at your next 4th of July bash or birthday party, put it on a gorgeous cake stand—it deserves the spotlight! You can skip the fancy plating if you’re keeping things casual, but here are a few things that just *go* with this flavor profile.
- The Sauce Drizzle: Since we saved the fudge sauce for last, take a spoon and give the whole pie a dramatic swirl right before you bring it out. Or, if you’re feeling really ambitious, try that easy chocolate fondue recipe I shared; it stays warm and gooey, offering a great temperature contrast to the frozen pie.
- Fruity Freshness: Don’t be afraid of color! A scattering of macerated raspberries or sliced strawberries around the edge cuts through the richness of the chocolate and cream beautifully. That bright red pops against the white topping!
- Coffee is Your Friend: If you’re serving this after dinner, a strong, hot cup of black coffee or an espresso shot is the perfect counterpoint to this creamy ice cream dessert. It cleans the palate and helps transition from the sugary rush.

Remember, when you’re serving an ice cream pie for parties, prepping your toppings ahead of time is key. You don’t want to be scrambling for toppings when everyone is waiting for dessert. Enjoy the look on everyone’s faces when you pull out this incredible, easy summer ice cream cake!
FAQ About This Easy Ice Cream Pie Recipe
I get a ton of questions whenever I post this recipe because everyone wants to make sure they can customize it for their situation. That’s totally fair! I’ve tried to answer the biggest things people ask me right here. Getting these details locked down means you get a perfect, sliceable, creamy ice cream dessert every single time.
Can I use a different type of cookie for the ice cream pie with oreo crust?
Absolutely you can! The Oreo crust is amazing because it’s so rich, but if you’re feeling like a lighter flavor, go right ahead. I mentioned it in the notes, but using graham cracker crumbs is a fantastic substitute. Your final product will taste more like a traditional pie, which is still delicious, but it won’t have that signature deep chocolate crunch. Shortbread cookies work in a pinch, too! Just remember to stick to about 6 tablespoons of melted butter per two cups of crumbs.
How long does the ice cream need to freeze before serving the creamy ice cream dessert?
This is where patience pays off! You need two distinct freezing periods to get that perfectly layered ice cream pie. First, the crust needs at least 30 minutes in the freezer to set up hard. Then, after you spread that softened ice cream layer in, you need a minimum of two hours—better yet, four if you can manage it—to freeze that layer solid. If you rush it, trying to top the soft layer with whipped cream just causes a mess. Give it the time it needs to become that amazing, sliceable, creamy ice cream dessert!
Is this a true no bake ice cream pie?
Yes, it is 100% a true no bake ice cream pie! You won’t turn on your oven once. We crush cookies, melt butter, mix, press, and freeze. That’s the entire sequence. It’s designed to be the ultimate low-fuss, cool-down treat, making it the perfect quick frozen pie for a hot holiday weekend when you don’t want any extra heat coming from your stove.
Nutritional Estimate for One Slice of Ice Cream Pie
Now, I know some of you are tracking macros and some of you just want pure dessert heaven, but I believe in being totally upfront about what’s going into your body. Since my recipes are based on what I could whip up quickly on the road with what was available, these numbers are just an estimate based on standard product measurements. Don’t stress too much over them, though—this is a treat, not a daily staple!
For one slice of this decadent frozen pie, here’s what the math generally looks like:
- Serving Size: 1 slice
- Calories: 450
- Sugar: 35g
- Sodium: 320mg
- Fat: 28g
- Saturated Fat: 16g
- Unsaturated Fat: 12g
- Trans Fat: 0.5g
- Carbohydrates: 45g
- Fiber: 1g
- Protein: 5g
- Cholesterol: 75mg
Remember, this is based on using standard vanilla ice cream and the Oreo crust exactly as written. If you swap in a lighter ice cream or use graham crackers instead, those numbers will shift. The point is, enjoying this easy ice cream pie recipe is totally worth it!
Share Your Perfect Ice Cream Pie Creations
Well, we’ve made it to the end, and you’ve got the blueprint for what I honestly think is the ultimate ice cream pie recipe—so simple, yet so impressive!
Now that you know the secrets to getting that perfectly creamy texture and a solid Oreo crust, I really want to see what you come up with. Down in the comments, please leave a rating for the recipe! It helps me know if this is one you’ll be hanging onto for years like I am. You can learn more about our whole philosophy over at YumDrizzle while you’re here.
I’m already thinking about my next batch. Maybe I’ll go full-on sweet and salty and try that peanut butter ice cream pie next time, or maybe I’ll try adding those cherries I saw mentioned! What variation are you trying first? Let me know if you had any luck making this the best ice cream pie ever in your own kitchen. Happy snacking!
PrintNo-Bake Ultimate Oreo Ice Cream Pie

You can make this easy ice cream pie with just a few ingredients. It uses a simple Oreo crust and creamy vanilla ice cream, making it a perfect make-ahead frozen dessert for any party or summer gathering.
- Prep Time: 15 min
- Cook Time: 0 min
- Total Time: 2 hours 15 min
- Yield: 8 servings 1x
- Category: Dessert
- Method: No Bake
- Cuisine: American
- Diet: Vegetarian
Ingredients
- 2 cups crushed Oreo cookies
- 6 tablespoons unsalted butter, melted
- 1.5 quarts (about 6 cups) vanilla ice cream, softened slightly
- 1 cup heavy cream
- 1/4 cup powdered sugar
- 1 teaspoon vanilla extract
- Optional toppings: chocolate fudge sauce, chopped peanuts
Instructions
- Prepare the crust: Mix the crushed Oreo cookies and melted butter together in a bowl until the crumbs are evenly moistened.
- Press the mixture firmly and evenly into the bottom and up the sides of a 9-inch pie plate. Place the crust in the freezer while you prepare the filling.
- Soften the ice cream: Let the vanilla ice cream sit on the counter for about 10 to 15 minutes until it is soft enough to spread but not completely melted.
- Spread the softened ice cream evenly into the frozen Oreo crust. Return the pie to the freezer and let it set for at least 2 hours, or until firm.
- Prepare the topping: In a separate bowl, beat the heavy cream, powdered sugar, and vanilla extract with an electric mixer until stiff peaks form. This creates your whipped cream topping.
- When ready to serve, spread the whipped cream over the frozen ice cream layer.
- Add your favorite toppings, like chocolate fudge sauce or chopped peanuts. Slice and serve this decadent frozen pie immediately.
Notes
- For a different flavor, use softened mint chocolate chip ice cream instead of vanilla.
- If you prefer a graham cracker crust, substitute 1.5 cups of graham cracker crumbs for the Oreos.
- This homemade ice cream pie is best made at least 4 hours ahead of time to ensure it is fully frozen.
Nutrition
- Serving Size: 1 slice
- Calories: 450
- Sugar: 35g
- Sodium: 320mg
- Fat: 28g
- Saturated Fat: 16g
- Unsaturated Fat: 12g
- Trans Fat: 0.5g
- Carbohydrates: 45g
- Fiber: 1g
- Protein: 5g
- Cholesterol: 75mg