
When you’re hosting a crowd—whether it’s for the big game or just a random Tuesday dinner—you need food that disappears fast without making you feel like you worked all day. Trust me on this! I spent years shuffling around on the road while the band ate lukewarm pizza, and I promised myself that when I cooked for people, it would be easy and amazing.
That’s why these **Ham and Cheese Sliders** are my absolute go-to recipe. Seriously, they are the ultimate crowd-pleaser. We are talking about layering soft Hawaiian rolls with salty ham and melty Swiss cheese, then drizzling this incredible, savory mustard glaze over the top. It’s the minimal effort for maximum happy faces, and they bake up into the perfect pull-apart **party sandwiches**.
You assemble them in about ten minutes, and boom—you have a hot, gooey, ridiculously tasty dish ready for anyone to grab. Forget fussy appetizers; this is the real deal for game day or any last-minute gathering!
- Why You Will Make These Ham and Cheese Sliders Again and Again
- Essential Ingredients for Perfect Ham and Cheese Sliders
- The Buttery Mustard Glaze: Key to Flavorful Ham and Cheese Sliders
- Step-by-Step Instructions for Baked Sliders
- Tips for Success with Hawaiian Roll Sliders
- Make Ahead Appetizers: Preparing Ham and Cheese Sliders Early
- Serving Suggestions for Game Day Sliders
- Frequently Asked Questions About Ham and Cheese Sliders
- Storage and Reheating Instructions for Your Ham and Cheese Sliders
- Estimated Nutritional Data
- Share Your Favorite Tailgate Food Experience
Why You Will Make These Ham and Cheese Sliders Again and Again
I know you are always looking for that magic recipe—the one that wows people but only takes minutes to assemble. That’s exactly what these **Ham and Cheese Sliders** deliver. They are fast, they stick to your ribs, and everyone loves that sweet-and-salty combo.
- They practically build themselves! Assembly is quicker than ordering takeout, for real.
- The buttery glaze soaks right down into those sweet rolls, making them unbelievably delicious.
- They travel like a dream, which is huge for busy weekends.
Perfect for Any Gathering
Listen, if you are heading out to a tailgate party or need a reliable contribution for a potluck, stop looking. These are the ultimate **party sandwiches**. Because they bake up hot and gooey, they’re fantastic right out of the oven, but honestly? They are still great even when they cool down a bit. That’s key for busy **tailgate food**!
Essential Ingredients for Perfect Ham and Cheese Sliders
When you look at the ingredient list for these **Ham and Cheese Sliders**, you might think, “That’s it?” And that’s the beauty of it! Everything you need is right at your regular grocery store. There are no fancy techniques here, just quality components assembled correctly. The secret to getting that perfect ooze is making sure your rolls are soft before you start layering everything on.
You need the full 12-count package of Hawaiian sweet rolls, obviously. Then, we go for thinly sliced deli ham (don’t get thick-cut slices—they won’t layer right!). I always go for Swiss cheese, which melts beautifully without getting greasy, but you can totally switch it up!
Ingredient Notes and Substitutions
Because this recipe is so straightforward, those few ingredients really shine through. Make sure that ham is sliced super thin, like paper-thin, so you get even coverage. If you use thick slices, the middle rolls get skimpy on meat!
If Swiss cheese isn’t your favorite, don’t panic. Provolone is a fantastic swap, especially if you like a little more stretch in your cheese. Gruyère is next-level fancy if you’re serving these for a holiday dinner and want a nuttier flavor. As for the meat, honey ham works really well if you prefer the sweeter notes of the Hawaiian rolls to come through even more!
The Buttery Mustard Glaze: Key to Flavorful Ham and Cheese Sliders
Okay, stop everything you’re doing because this is where the magic happens. If you just melt the cheese on top, you have a decent sandwich, sure. But if you add the savory, slightly tangy drizzle we make here? You have the best **Ham and Cheese Sliders** ever made! This special **buttery glaze** is the entire reason people ask me for this recipe every single time I bring it to a party.
Seriously, this mixture is pure genius. You take that whole stick of melted butter—don’t skimp!—and whisk in Dijon mustard. Dijon adds that little zing; regular yellow mustard just won’t cut it here. Then we add Worcestershire sauce for deep umami flavor and, crucially, onion powder for background savoriness. Whisk it until it looks glossy and uniform.

When you pour this glaze over the top half of the connected rolls, you want to make sure it seeps down into all those pockets and crevices. If you want to know more about the philosophy behind why simple ingredients shine, you can check out my story here: why we focus on flavor. Trust me, this glaze makes these **baked sliders** unforgettable!
Step-by-Step Instructions for Baked Sliders
Making these **Ham and Cheese Sliders** is almost ridiculously easy, which I love when I’m trying to juggle appetizers and drinks for a crowd. The key here is keeping those Hawaiian rolls connected until they are baked and melty. It just makes assembly so much cleaner and faster. Do not try to pull them apart before they hit the oven, or you’ll end up with a messy pile instead of perfect, shareable sandwiches!
First things first: preheat your oven to 350 degrees. You want that heat waiting for you! And grab a 9×13 inch baking dish—lightly grease it up. Then comes the crucial slicing trick for these **baked sliders**: take a big serrated knife and slice the entire loaf horizontally, top to bottom, making sure to keep the top 12 rolls connected to the bottom 12 rolls. Set the bottom half in your greased pan first.
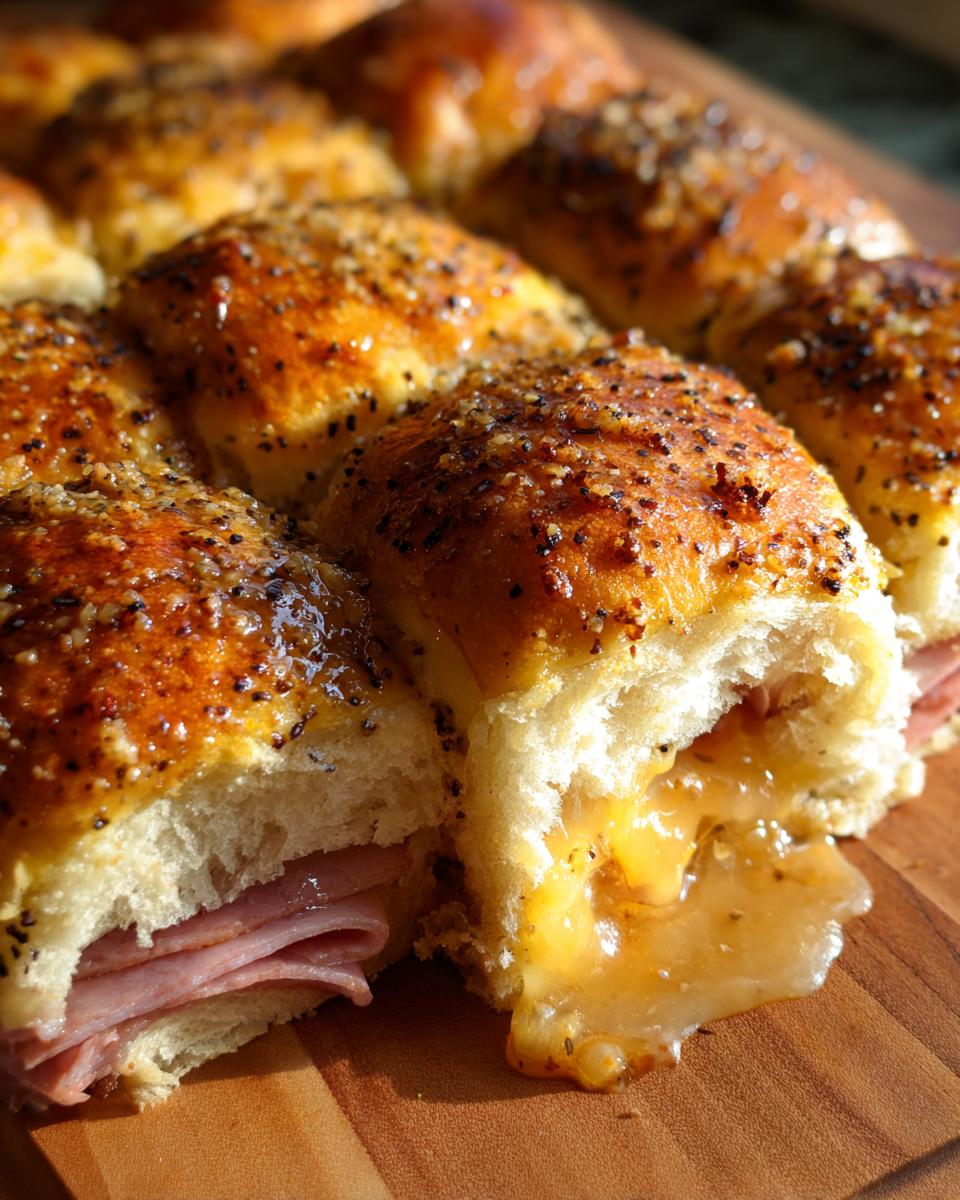
Now for the filling! You just layer it up: pile that thinly sliced ham evenly over the bottom rolls. Then, cover the ham with all the slices of Swiss cheese. Think even coverage here—no bare spots! Finally, gently place the top half of the rolls right back on top. It should look like one big, uncut loaf again. These **party sandwiches** are almost done!
Baking Technique for Optimal Ham and Cheese Sliders
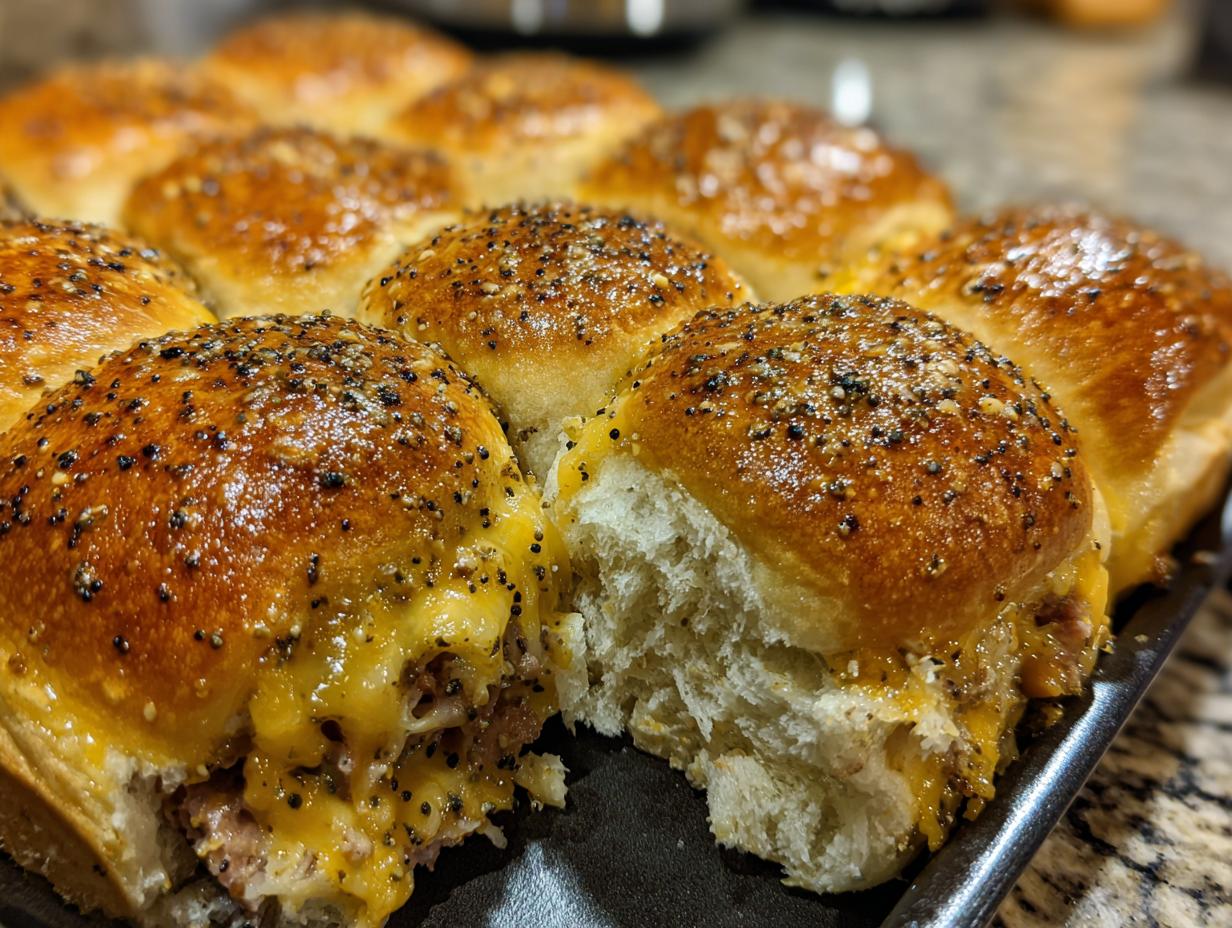
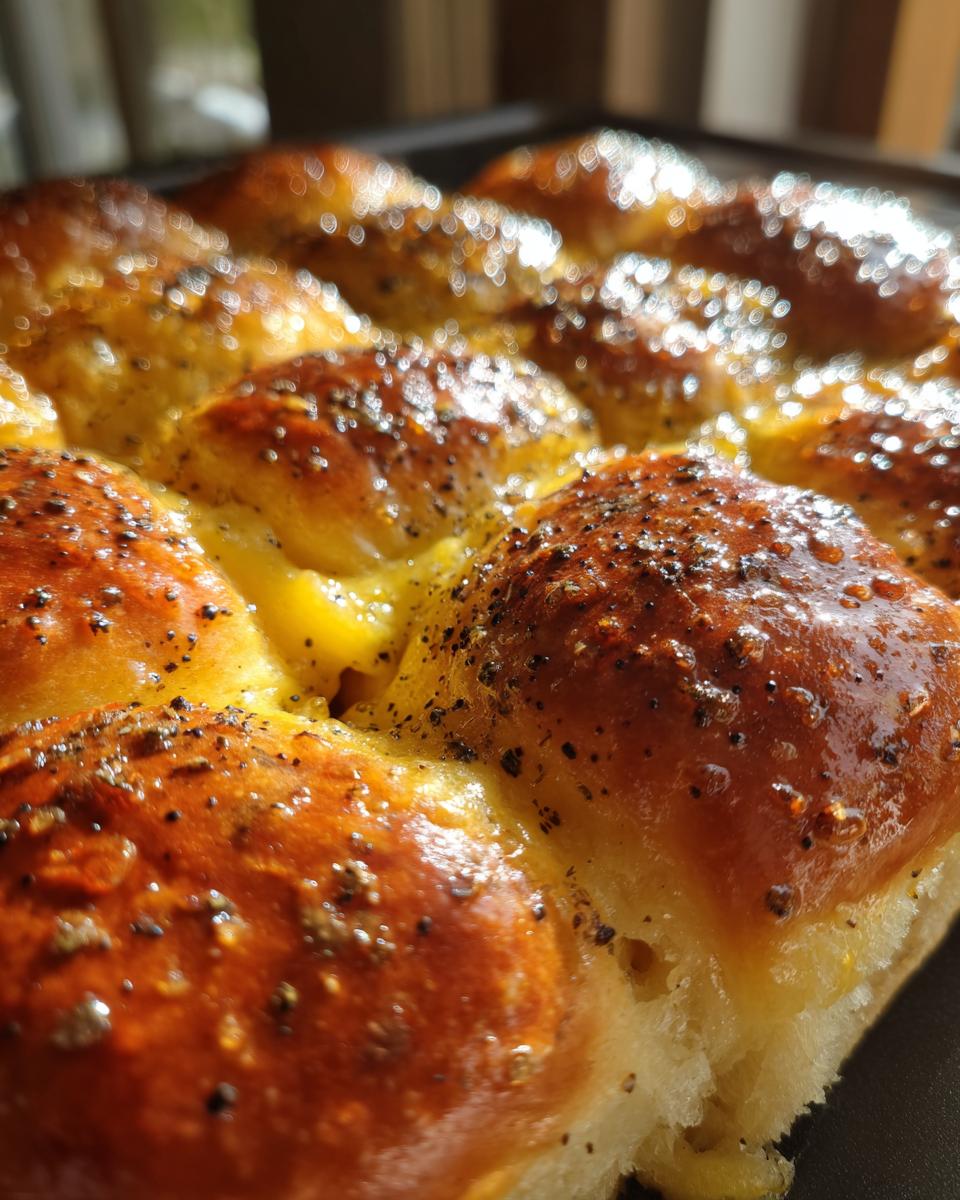
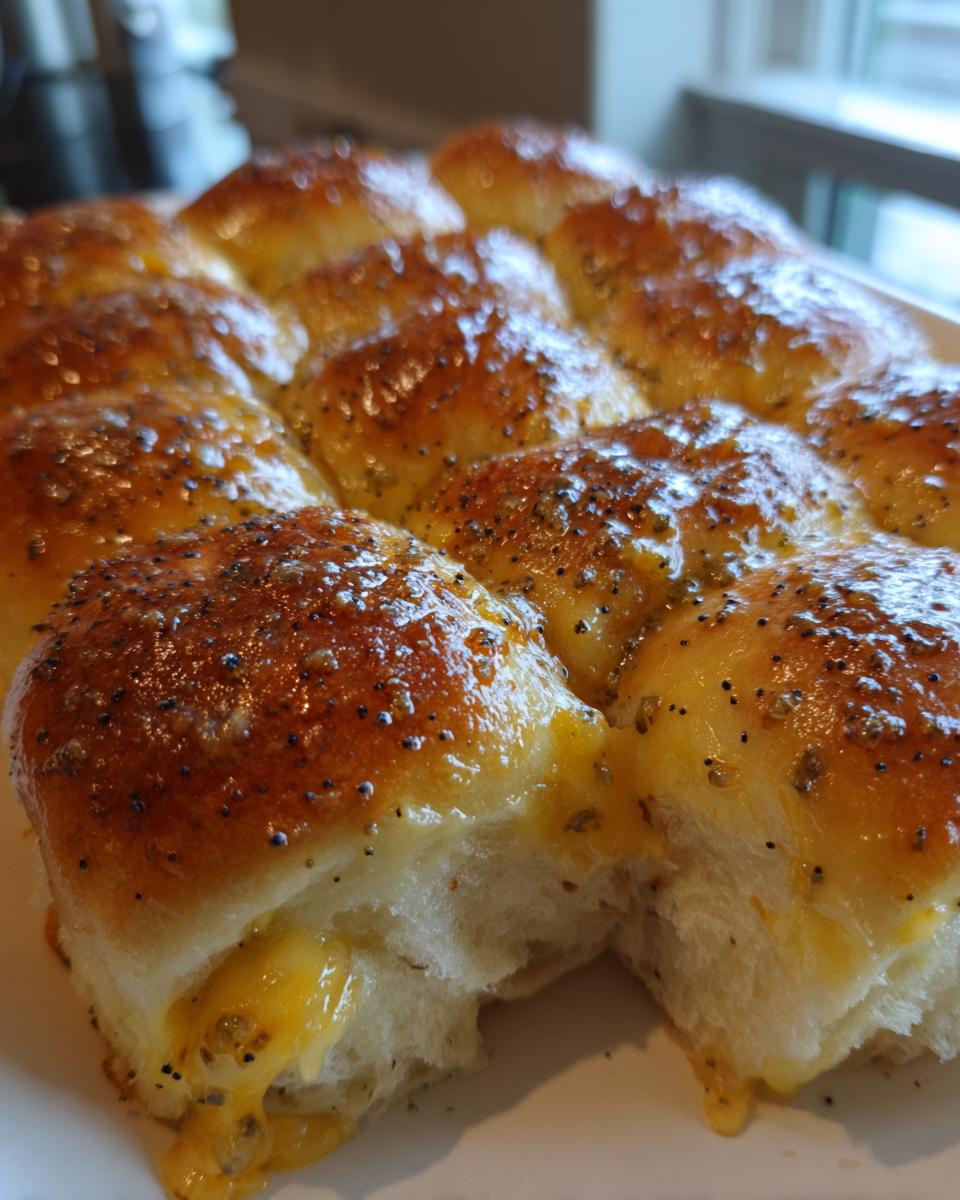
Once you’ve poured all that gorgeous mustard glaze over the tops and sprinkled on your poppy seeds—which add such a fun little crunch, by the way—we move to the oven. We bake these in two stages, which prevents the bread from burning before the cheese gets nice and gooey. Cover your dish tightly with aluminum foil, and let them bake for 15 minutes at 350°F. This steam-bakes them perfectly.
After 15 minutes, pull off that foil! You want the tops to get golden and slightly crisp, so bake them uncovered for another 5 to 10 minutes. Keep an eye on them! When the cheese is totally melted and the tops look lightly browned—that’s your signal. Pull them out, but do *not* cut them right away! Let your amazing **Ham and Cheese Sliders** rest for about 5 minutes before slicing between the rolls. Seriously, just wait those few minutes; it lets the cheese set up just enough.
Tips for Success with Hawaiian Roll Sliders
Even though these **Ham and Cheese Sliders** are simple, if you want them to look as good as they taste, there are a couple of little secrets I learned the hard way. First up: that slicing step is everything! You absolutely need a serrated knife—the long, toothy kind you use for bread—to cut through those connected rolls after baking. If you use a regular knife, you’ll just squish the whole thing, and nobody wants a sad, flattened slider.
My biggest personal tip for these **baked sliders** is about the glaze. When you pour that buttery mixture over the top, make sure you grab a pastry brush or just use a spoon to gently nudge some of that glaze onto the exposed sides of the rolls, especially near those seams. That way, you don’t have any dry spots when you pull apart your **Ham and Cheese Sliders**. You want flavor saturation right down to the bottom!
Make Ahead Appetizers: Preparing Ham and Cheese Sliders Early
I love recipes that let me get ahead of the game, especially when I’m hosting on a wild weekend. These **Ham and Cheese Sliders** were basically invented to be **make ahead appetizers** for parties or tailgates! You can assemble the whole thing—rolls, ham, cheese, the whole nine yards—a few hours before you need them.
Just assemble everything exactly as you would if you were baking them right away, but skip the glaze for now. Cover that whole dish tightly with plastic wrap, make sure it’s sealed well, and tuck it into the fridge. They keep beautifully for up to four hours that way.
When it’s time to serve your **Ham and Cheese Sliders**, you still want to add that glorious buttery glaze and the poppy seeds just before they bake. Because the rolls start out cold, you’ll need to add a little extra time to the covered bake. I usually add about 5 to 10 extra minutes under the foil to make sure they heat all the way through before you let the cheese brown. See? Less stress, maximal payoff!
Serving Suggestions for Game Day Sliders
Every good **game day slider** needs something on the side to round out the meal, right? Since these **Hawaiian roll sliders** are already sweet from the bread and salty from the ham and cheese, we want sides that offer a little contrast—something crunchy or something vinegary.
When I make these for watching the game, I always keep it simple because I’m usually chasing kids or getting drinks ready. You really can’t go wrong with a big bowl of crunchy pickle spears. The sharp sourness just cuts right through the richness of that melted cheese and butter glaze so nicely.
Also, potato chips are a must-have. I like the plain, ripple-cut kind, you know? They’re sturdy enough to scoop up any last bits of glaze that might drip onto the tray. Or, sometimes, if I’m feeling ambitious, I’ll whip up a quick, creamy coleslaw. The cool crunch of the slaw against the hot, gooey slider is just divine. It’s all about easy, satisfying pairings that let everyone keep their eyes on the TV!
Frequently Asked Questions About Ham and Cheese Sliders
When you make a recipe this popular, people always have questions! That’s totally fair; you want to make sure your **Ham and Cheese Sliders** turn out perfectly for your party, right? I’ve collected the top things people ask me about keeping these **party sandwiches** perfect, from what kind of bread to use to how to save the leftovers for tomorrow.
Can I use different kinds of rolls for these baked sliders?
That’s a great question! While the recipe calls for Hawaiian rolls for a specific reason—that touch of sweetness is crucial for balancing out the salty ham and savory glaze—you absolutely have options if you can’t find them or just want a change. Potato rolls are a fantastic substitute; they are soft and only slightly sweet.
Brioche rolls also work really well because they have that beautiful high-fat content which gives them a nice golden crust when baked! Just remember, if you stray too far from the slight sweetness of the Hawaiian rolls, you might want to bump up the Dijon mustard in your glaze just a tiny bit to keep that perfect sweet-and-savory equilibrium. Let me know if you try making **baked sliders** with brioche!
How do I store leftovers of these party sandwiches?
These **Ham and Cheese Sliders** are honestly still good the next day, which is fantastic when you’re cleaning up after a big event! If you have any left over, you need to store them correctly so they don’t get soggy overnight. Cover the dish tightly—plastic wrap is your best friend here—and pop them straight into the refrigerator. They should keep well for about three or four days if they are wrapped tightly.
When you are ready to eat the leftovers, the best way to revive them is in the oven. Don’t let them get hot in the microwave, because that makes the bread tough! Reheat them, covered with foil, at about 325 degrees F for about 10 minutes, or until they are steaming hot all the way through. If you want them a little crispier, pull the foil off for the last few minutes. For any general questions or feedback on keeping your food fresh, you can always reach out to me here: Send me a message!
Storage and Reheating Instructions for Your Ham and Cheese Sliders
One of the best things about these amazing **Ham and Cheese Sliders** is that they are surprisingly resilient! If you’re lucky enough to have any leftovers, you’ll want to store them right away so they don’t get soggy overnight. Wrap that baking dish up super tight with plastic wrap and stick them in the fridge. They hold up really well for about three days maximum.
When you reheat them, please, please, *please* use the oven! The microwave makes the sweet rolls instantly rubbery, and we can’t have that happening to our beautiful **baked sliders**. Cover the dish with foil and warm them at 325 degrees until they’re piping hot. That keeps the texture just about perfect for a second round!
Estimated Nutritional Data
Now, listen, I’m not a nutritionist, and I’m certainly not tracking macros when I’m making **party sandwiches** for fifty people! Life is too short to stress over every single carb when the food is this good. But because I know some of you like to keep track, this information is based on what I found for the ingredients used.
Please take these numbers with a big ol’ grain of salt—this is truly just an estimate based on using the standard ingredients listed above, especially the full-fat butter in the glaze! These are **Ham and Cheese Sliders**, after all; they are designed for enjoyment, not dieting, but it’s good to have a general idea!
For one slider, you are looking at roughly:
- Calories: 320
- Fat: 16g
- Protein: 18g
- Carbohydrates: 28g
If you’re worried about the sodium content from the ham and cheese, that’s understandable for high-volume eating. If you want to lean into lower-sodium options on future batches, you could definitely look into lower-sodium ham varieties. For now, enjoy them guilt-free! For more on how we handle your privacy here at YumDrizzle, you can check out our policy right here.
Share Your Favorite Tailgate Food Experience
Okay, now that you’ve made a giant pan of these incredible **Ham and Cheese Sliders**, I absolutely need to hear about it! This is the kind of **tailgate food** that generates chatter at parties, so don’t keep your success a secret!
Did you make them for a huge game day spread, or maybe you just whipped them up for a weeknight dinner because you deserved something easy and delicious? I want to know everything! Were they gooey enough? Did everyone fight over the corner pieces?
Please take a minute right now to leave a rating for the recipe—five stars if they made your life easier! And if you took a photo of those beautiful, shiny, golden-brown tops fresh out of the oven, tag me online! It seriously makes my day to see my recipes pop up in your kitchens. We’re building this flavor community together, and your feedback means the world to me. For all our legal stuff about sharing content, you can check our terms over here: Terms of Use. Happy eating, everyone!
PrintButtery Ham and Cheese Sliders on Hawaiian Rolls

Assemble easy baked sliders using Hawaiian rolls, ham, and Swiss cheese, topped with a savory mustard glaze for perfect pull-apart party sandwiches.
- Prep Time: 10 min
- Cook Time: 25 min
- Total Time: 35 min
- Yield: 12 sliders 1x
- Category: Lunch
- Method: Baking
- Cuisine: American
- Diet: Vegetarian
Ingredients
- 1 (12 count) package Hawaiian sweet rolls
- 1 pound thinly sliced deli ham
- 1 pound sliced Swiss cheese
- 1/2 cup (1 stick) unsalted butter, melted
- 2 tablespoons Dijon mustard
- 1 tablespoon Worcestershire sauce
- 1 teaspoon dried onion powder
- 1 teaspoon poppy seeds
Instructions
- Preheat your oven to 350 degrees Fahrenheit. Lightly grease a 9×13 inch baking dish.
- Slice the entire package of Hawaiian rolls horizontally, keeping the rolls connected. Place the bottom half of the rolls in the prepared baking dish.
- Layer the ham evenly over the bottom half of the rolls.
- Layer the Swiss cheese slices evenly over the ham.
- Place the top half of the rolls over the cheese layer.
- In a small bowl, whisk together the melted butter, Dijon mustard, Worcestershire sauce, and onion powder to create the glaze.
- Pour the butter mixture evenly over the top of the assembled sliders. Sprinkle the poppy seeds over the glaze.
- Cover the baking dish tightly with aluminum foil.
- Bake for 15 minutes covered.
- Remove the foil and bake for another 5 to 10 minutes, or until the cheese is melted and the tops are lightly golden brown.
- Let the sliders rest for 5 minutes before slicing between the rolls to create individual sandwiches. Serve warm.
Notes
- For easy slicing, use a serrated knife to cut through the connected rolls after baking.
- You can prepare these sliders up to 4 hours ahead of time; cover them tightly and refrigerate before baking. Add 5 to 10 minutes to the covered baking time if baking directly from the refrigerator.
- Substitute provolone or Gruyère cheese for Swiss cheese if you prefer a different flavor profile.
Nutrition
- Serving Size: 1 slider
- Calories: 320
- Sugar: 8
- Sodium: 850
- Fat: 16
- Saturated Fat: 8
- Unsaturated Fat: 8
- Trans Fat: 0.5
- Carbohydrates: 28
- Fiber: 1
- Protein: 18
- Cholesterol: 50