
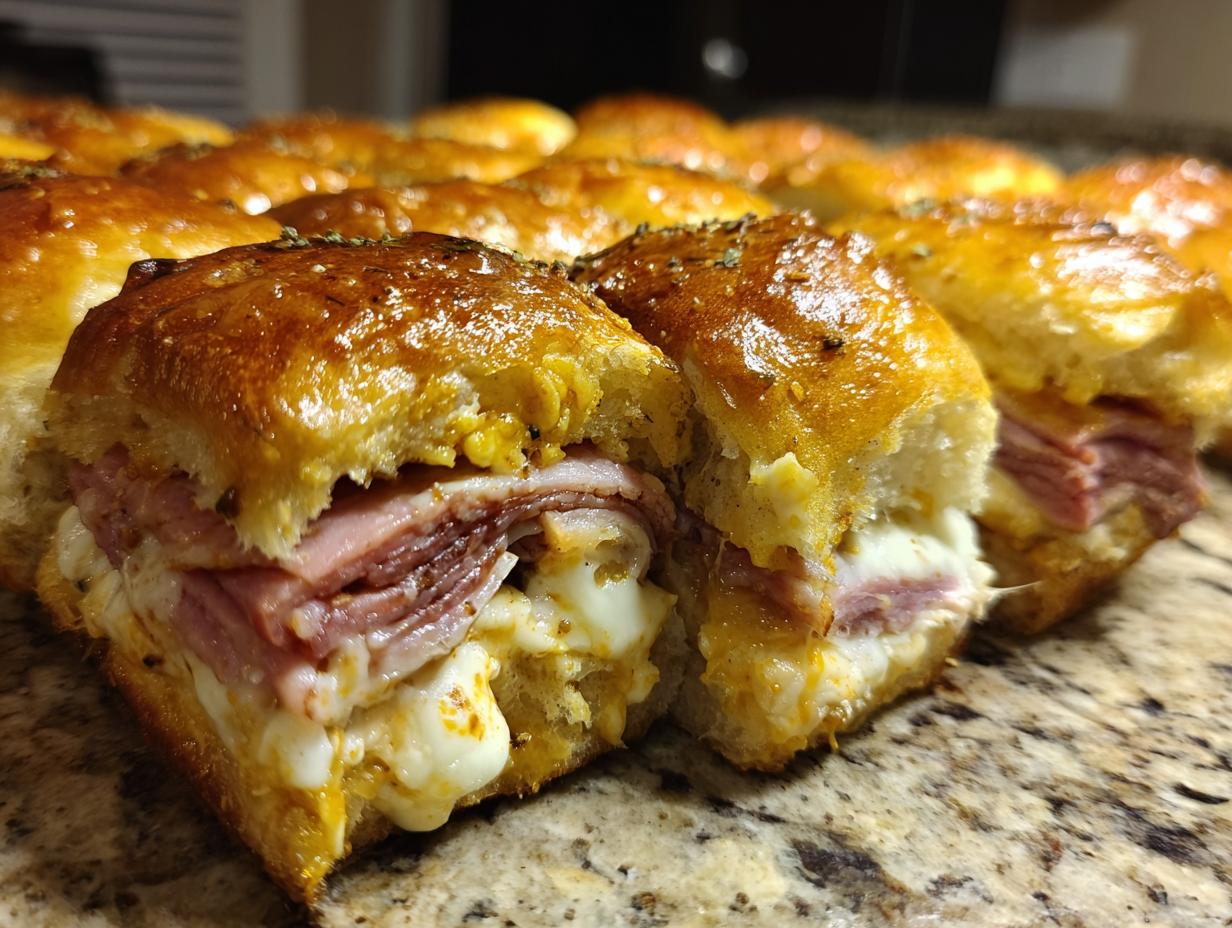
When I was out on the road, lugging amps and chasing that next sound check, I learned one thing fast: the best food is the kind that brings people together with zero fuss. Forget the complicated four-hour braises; I needed flavor that hit hard and fast. That’s exactly why these Italian grinder sliders became legendary on the tour bus! We took the guts of a massive, messy Italian Grinder Sandwich—all that deli meat and gooey cheese—and shrunk it down onto soft, slightly sweet Hawaiian rolls. Trust me, stacking these savory layers and baking them until they’re perfectly melty is the shortcut to becoming the hero of any party or the savior of a chaotic weeknight. These are the ultimate crowd-pleaser!

- Why You Will Make These Italian Grinder Sliders Again and Again
- Gathering Ingredients for Your Grinder Sliders
- Step-by-Step Instructions for Perfect Grinder Sliders
- Expert Tips for Making Amazing Grinder Sliders
- Variations on Classic Grinder Sandwiches Sliders
- Serving Suggestions for Your Grinder Sliders
- Storage and Reheating Instructions for Leftover Grinder Sliders
- Frequently Asked Questions About These Easy Slider Recipes
- Estimated Nutritional Information for Grinder Sliders
Why You Will Make These Italian Grinder Sliders Again and Again
Look, I get it. Life is busy, but that doesn’t mean dinner has to taste boring. These little sandwiches are pure genius, and once you try them, you’ll be hooked. You can whip these up faster than ordering delivery!
- They are ridiculously fast! We’re talking under 35 minutes total for total satisfaction.
- They win every time as ultimate Party Appetizers—seriously, they disappear first.
- The sweet and salty combo from the Hawaiian rolls and the Italian meats is just perfection.
- If you need Easy Slider Recipes that actually taste homemade, this is your new go-to favorite. Check out my other quick eats here!
Gathering Ingredients for Your Grinder Sliders
Okay, before you even think about preheating the oven, we need to gather our players. The beauty of these grinder sliders is that they use stuff you probably already have in your fridge, or can grab in one quick trip. I like to keep things super clear so there are no surprises, especially when layering!
You’ll need one 12-count package of those soft, sweet Hawaiian rolls—don’t skip those, they make all the difference! Then pile on the meats and cheeses. Don’t skimp here; the secret to a great sandwich starts with good quality fillings.
Deli Meats and Cheeses for the Best Grinder Sliders
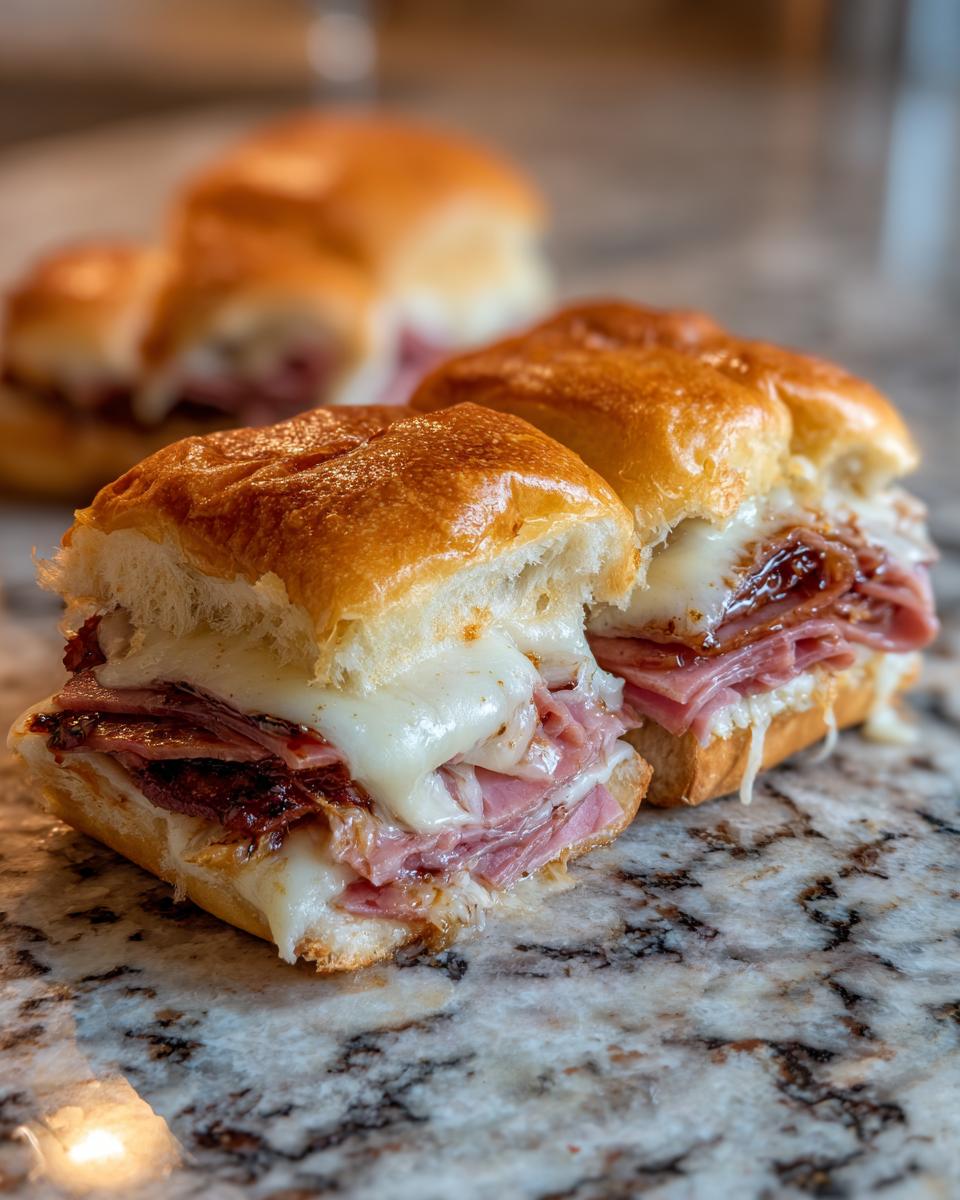
For the true Italian vibe, we’re using a classic trio: salami, ham, and turkey breast. Make sure they are sliced paper-thin! That thinness is crucial so you get that amazing, even layer when you stack them up. For cheese, I go for a bit of Provolone (sharpness!) and Swiss (that melt factor!).
The Savory Glaze for Hot Italian Sliders
This glaze is what separates a good slider from a legendary one. It’s where all the savory magic happens for these Hot Italian Sliders. You’re melting down butter—real butter, please—and whisking in Dijon mustard for a little tang, Worcestershire sauce for depth, and then hitting it hard with garlic powder, onion powder, and Italian seasoning. Brush it on liberally; the top crust needs that flavor!
Step-by-Step Instructions for Perfect Grinder Sliders
Alright, let’s get cooking! This part is so satisfying because you literally watch your mountain of ingredients turn into cheesy perfection in minutes. Preheat your oven to 350 degrees Fahrenheit and have your 9×13 baking dish ready—give it a little grease so nothing sticks later!
The real trick here is speed and efficiency. Mix up that amazing glaze while you’re doing the slicing. Don’t worry about getting fancy here; we are going for quick comfort food!
Preparing the Rolls and Layering the Grinder Sliders
This is the fun part where you avoid individual sandwich making! Take your entire package of sweet rolls and, keeping them all connected, slice them straight across horizontally, like you’re opening a book. Place the bottom half snug in your dish. Now, layer everything on top evenly: salami first, then ham, then turkey. Finally, alternate those slices of Provolone and Swiss right over the top of the meat pile. Place the top half of the rolls right back on, lids closed!
Mixing and Applying the Flavor Glaze to Baked Sliders
Now for the topping that makes these Baked Sliders sing. In a small bowl, whisk together that melted butter with the Dijon, Worcestershire, Italian seasoning, garlic powder, and onion powder until it looks totally combined. Take a pastry brush—or even just a spoon if you’re feeling wild—and brush that garlic butter glaze all over the top of the entire sheet of rolls. Be generous; this creates that crispy, flavorful crust. Cover the dish tightly with foil and slide it into the oven for 15 minutes. Take the foil off, and let it bake for another 5 to 10 minutes until that cheese is bubbly and the tops are golden brown! Let them rest five minutes before slicing between the rolls. If you need more quick tips on amazing baked goods, check out this garlic bread recipe!

Expert Tips for Making Amazing Grinder Sliders
Even though these are super easy, there are a few little things I picked up on the road that turn these good Comfort Food Sandwiches into something truly unforgettable. Never mess with the crust, but feel free to jazz up the insides!
First, let’s talk about keeping things dry. If you’re worried about the bottom rolls getting soggy under all that cheesy goodness, don’t cover them with foil right away. I sometimes bake them, covered, for just 10 minutes, then pull the foil off to let the bottom steam out a little before slathering on the butter glaze and finishing the bake.
Also, remember those notes I mentioned? If you’re feeling extra, definitely spread a thin layer of regular mayonnaise or even some zesty Italian dressing on the bottom rolls before the meat goes on. It adds another layer of tang that just complements the salty meats perfectly. For more amazing sides to go with your comfort food, check out my rice pilaf recipe!
Variations on Classic Grinder Sandwiches Sliders
One of the best things about making big batches of grinder sliders is that you can customize them for every single person at the party. I really believe that food should be fun and flexible, not a strict set of rules! These are great as-is, but maybe your crew hates salami, or maybe you’re craving something with a little more kick.
Don’t be afraid to swap out those deli meats. If you want these to be spicier—which sometimes I totally do—ditch the ham and try adding some capicola or even just spicy pepperoni instead. It makes these Grinder Sandwiches feel completely different!
Also, remember what I said about adding spreads? That’s the best way to pivot the flavor profile. A little ranch dressing or even some spicy brown mustard mixed into the butter glaze works wonders. For some other fun flavor twists, you have to check out my recipe for easy pizza sliders! And if you want to see another take on this concept, check out this other take on slider fun here.
Serving Suggestions for Your Grinder Sliders
Once these cheesy, savory little torpedoes come out of the oven, you need the right side dishes to balance them out. Since these grinder sliders are so hearty and rich, I usually keep the sides light and bright so nobody feels overly stuffed!
They are the perfect anchor for any spread when you’re watching the big game. Forget complicated sides; we’re aiming for crowd-pleasers that taste fresh next to all that melted cheese. Think crisp salads or something tangy!
For a guaranteed win on Game Day Food duty, try a big bowl of something crunchy and acidic to cut through all that delicious fat. A simple pickle spear or a bright, zesty dip is perfect. Check out my absolute favorite appetizer dip that pairs perfectly with these savory sandwiches—you have to try this Cowboy Caviar!
Storage and Reheating Instructions for Leftover Grinder Sliders
Now, I’m going to be honest with you: these grinder sliders are absolutely, one-hundred-percent best eaten the second they come out of the oven. That mix of hot cheese and crispy-but-soft roll is magic, and it doesn’t last long!
If you do end up with extras, don’t just toss them. Cool them down completely on a wire rack first—this stops humidity from getting trapped. Store them in an airtight container. When you’re ready for round two, skip the microwave completely! That’ll just make them soggy messes.
Instead, pop them directly onto a baking sheet and heat them in a 350-degree oven for about 8 minutes. This crisps the tops back up just enough to bring them back to life. They make a fantastic, comforting late-night snack!

Frequently Asked Questions About These Easy Slider Recipes
I know you might have some little questions bouncing around. Honestly, when I first started making these, I had a laundry list of things I needed to figure out before I trusted myself to serve them at a party! These little Hawaiian Roll Sliders are generally forgiving, but here are the things people ask me most often.
Can I make these grinder sliders ahead of time?
You can totally assemble them ahead of time! I assemble everything—the bottom rolls, the meat and cheese, the top rolls—and then I wrap the whole thing tightly in plastic wrap and stick it in the fridge for up to 8 hours. Just add that garlic butter glaze right before baking, and let them sit on the counter for about 30 minutes to warm up slightly before they go into the oven. This is key for even melting!
What if I don’t have Hawaiian rolls? Will they still be cheesy sliders?
Yes, absolutely they will still be fantastic cheesy sliders! As the recipe notes mentioned, you can use any soft slider bun you like. If you use different rolls, you might lose a tiny bit of that unique sweetness, but the melted cheese and savory glaze will still save the day. Just make sure your substitute rolls are packed tightly together in the pan so you can slice them easily after baking.
Can I use different meats or cheeses?
You totally can switch things up! They are your sandwiches, after all. If you want to keep that Italian profile, stick to cured meats that slice thin, like capicola or pepperoni. For cheese swaps, pepper jack adds a nice kick, or even mozzarella works great for extra stretchiness! If you’re looking for another cheesy shortcut, check out my four-ingredient cheese crackers—they pair great on the side!
Where did this idea for Italian Grinder Sandwiches Sliders even come from?
It’s a modern twist on the classic chopped Italian Grinder Sandwiches! I saw a few takes floating around online, but combining that flavor punch with the ease of baked Hawaiian rolls just clicked for me back on the road. If you want to see another amazing take on how to serve these, check out this inspiration here!
Estimated Nutritional Information for Grinder Sliders
Okay, let’s talk numbers for a second, because while these are absolutely comfort food, it’s good to know what you’re digging into! We want satisfaction, not surprises, right? I always tell folks that my recipes are built for real life, which means using what’s available at the local grocery store, not some specialty health food shop.
Because we’re using a full package of Hawaiian rolls and a specific mix of deli meats and cheeses, these numbers are calculated based on that exact line-up. If you swap out the sweet rolls for a whole wheat bun, or use veggie deli slices instead, trust me, those macros will change!
Here’s what you can generally expect for one of these amazing grinder sliders, based on the ingredients listed for this recipe:
- Serving Size: 1 slider
- Calories: 350
- Fat: 18g
- Saturated Fat: 8g
- Carbohydrates: 28g
- Protein: 18g
- Sugar: 8g
- Sodium: 850mg
Keep in mind that sodium is a bit high because we’re using cured deli meats and cheese—they bring the flavor, but they also bring the salt! That’s why I always recommend serving these with something plain or acidic on the side to balance it all out.
PrintEasy Italian Grinder Sliders: Perfect Game Day Food

Make these easy Italian Grinder Sliders using Hawaiian rolls for a crowd-pleasing party appetizer or quick weeknight dinner. These hot Italian sliders are packed with deli meats and melted cheese.
- Prep Time: 10 min
- Cook Time: 25 min
- Total Time: 35 min
- Yield: 12 sliders 1x
- Category: Lunch
- Method: Baking
- Cuisine: American
- Diet: Vegetarian
Ingredients
- 1 (12 count) package Hawaiian sweet rolls
- 4 ounces thinly sliced salami
- 4 ounces thinly sliced ham
- 4 ounces thinly sliced turkey breast
- 4 ounces provolone cheese, sliced
- 4 ounces Swiss cheese, sliced
- 1/2 cup unsalted butter, melted
- 2 tablespoons Dijon mustard
- 1 tablespoon Worcestershire sauce
- 1 teaspoon dried Italian seasoning
- 1 teaspoon garlic powder
- 1/2 teaspoon onion powder
Instructions
- Preheat your oven to 350 degrees Fahrenheit. Lightly grease a 9×13 inch baking dish.
- Slice the entire package of Hawaiian rolls in half horizontally, keeping the rolls connected. Place the bottom half of the rolls in the prepared baking dish.
- Layer the deli meats and cheeses evenly over the bottom half of the rolls. Start with salami, then ham, then turkey, followed by alternating layers of provolone and Swiss cheese.
- Place the top half of the rolls over the meat and cheese layers.
- In a small bowl, whisk together the melted butter, Dijon mustard, Worcestershire sauce, Italian seasoning, garlic powder, and onion powder to create the glaze.
- Brush the entire top surface of the slider rolls generously with the garlic butter glaze.
- Cover the baking dish tightly with aluminum foil.
- Bake for 15 minutes. Remove the foil and bake for another 5 to 10 minutes, or until the cheese is fully melted and the tops are lightly golden brown.
- Let the grinder sliders rest for 5 minutes before slicing between the rolls. Serve warm.
Notes
- For extra flavor, add a thin layer of mayonnaise or Italian dressing to the bottom rolls before adding the meat.
- You can substitute the deli meats with pepperoni or capicola for a spicier kick.
- If you do not have Hawaiian rolls, use any soft slider bun.
Nutrition
- Serving Size: 1 slider
- Calories: 350
- Sugar: 8
- Sodium: 850
- Fat: 18
- Saturated Fat: 8
- Unsaturated Fat: 10
- Trans Fat: 0.5
- Carbohydrates: 28
- Fiber: 1
- Protein: 18
- Cholesterol: 45