
Listen up, because some desserts aren’t just food; they’re an experience. If you’ve ever chased that mythical, perfect slice—the one that’s unbelievably rich but somehow still silky smooth—your hunt ends right here. I spent years on the road, hunting down the true flavor staples of this country, and I brought those lessons back to my own kitchen. That whole experience taught me that the best things don’t need fancy fuss; they just need the right balance. That’s exactly what we’ve achieved in this Decadent Triple Chocolate Cheesecake with Easy Oreo Crust. Trust me, this is the ultimate homemade chocolate cheesecake you’ve been dreaming about.
- Why This Decadent Triple Chocolate Cheesecake Recipe Works (E-E-A-T Focus)
- Gathering Ingredients for Your Homemade Chocolate Cheesecake
- Step-by-Step Instructions for the Best Chocolate Cheesecake
- Making the No Bake Chocolate Cheesecake Variation
- Finishing Touches: Topping Your Chocolate Cheesecake
- Tips for Success with Your Chocolate Cheesecake
- Storage and Reheating Instructions for Leftover Chocolate Cheesecake
- Frequently Asked Questions About This Rich Chocolate Dessert
- Estimated Nutritional Data for This Chocolate Cheesecake
Why This Decadent Triple Chocolate Cheesecake Recipe Works (E-E-A-T Focus)
Look, I’ve seen a ton of recipes that promise the moon but deliver a dull brick. This isn’t one of them. What makes this chocolate cheesecake recipe stand out is sheer dedication to texture—we’re hitting that perfect, unapologetically rich chocolate dessert vibe every single time. It’s about layering deep, dark chocolate against the sweetness of milk and white chocolate—that’s the triple threat that makes it feel like a bakery masterpiece. If you love that deep cocoa note, check out my recipe for flourless chocolate torte, too!
And don’t even get me started on the crust. We ditch the fussy pastry work for an Oreo crust cheesecake base. It comes together in minutes, chills hard, and gives you the perfect crunchy contrast to the filling. My mission, learned from those highway stops, is to make incredible flavor accessible. This is proof you can make a genuinely creamy cheesecake recipe at home without needing crazy equipment or skills.
Achieving Silky Smooth Cheesecake Texture Secrets
The number one secret for that melt-in-your-mouth experience? Temperature! Your cream cheese has to be completely, unapologetically room temperature—soft enough to nap on. Seriously, pull it out early! When you mix, go slow. The only time you speed up is beating the cream cheese and sugar until it’s fluffy. Once those eggs go in, you switch to beginner mode. Add them one at a time and mix just until they vanish. Overmixing the eggs is what traps air and gives you cracks later. Keep it gentle for that utterly silky smooth cheesecake finish.
Gathering Ingredients for Your Homemade Chocolate Cheesecake
Alright, let’s talk about what makes a chocolate cheesecake truly sing. It’s not about having a giant shopping list; it’s about hitting the quality marks on the things that count—especially the chocolate! For this recipe, we’re using three types to get that layered, decadent flavor. Remember, we need the full 3 blocks of cream cheese to be completely softened. No cheating on that step, or your filling will look lumpy instead of luxurious.
We’re starting creamy on the bottom with the Oreos, and then building that deep chocolate flavor with the filling ingredients listed below. If you don’t have a good springform pan, now is the time to grab one, because we need reliable release for a dessert this rich.
Ingredient Notes and Chocolate Substitutions
The quality of your chocolate matters more here than almost anywhere else. For the main bittersweet chocolate, grab the best quality you can find—it defines the base flavor! If you’re nervous about the water bath baking method, remember that skipping it means sticking strictly to my No Bake Chocolate Cheesecake variation. Also, don’t buy pre-sifted cocoa powder if you can avoid it; sifting it right before you add it ensures you don’t get those dry pockets in your smooth filling. A good Dutch-processed cocoa will give you a deeper, darker rich chocolate dessert profile.
Step-by-Step Instructions for the Best Chocolate Cheesecake
Okay, here we go! This is where the magic happens, and I promise you, making this chocolate cheesecake is way less scary than people make it out to be. We’re going from simple cookies and cream cheese blocks to a show-stopping, triple-layer masterpiece. If you need a simple chocolate dip for some fruit afterward, check out my easy chocolate fondue recipe—it pairs perfectly with leftover crust crumbs!
Preparing the Oreo Crust Cheesecake Base
First things first: the foundation. Get those Oreos pulsed into crumbs—we need about 1 3/4 cups. Mix them really well with the melted butter until it looks like wet sand, not dry dirt. You must press this firmly into the bottom of your 9-inch springform pan. Use the bottom of a flat measuring cup to really compact it down; you want that crunch to hold up! Once it’s packed tight, shoot it into the freezer for a quick 15-minute chill. This keeps the crust from crumbling when we pour the heavy filling on top.
Baking Tutorial for a Crack-Free Chocolate Cheesecake
If you are baking—and you should, because the flavor depth is wild—preheat your oven to 325°F. Wrapping that springform pan tightly in heavy-duty foil is non-negotiable if you’re using a water bath. This part is crucial for any serious Baked Cheesecake Tutorial: we want humidity! After pouring your batter, place the pan inside a larger roasting pan and carefully fill the roaster with hot water until it comes halfway up the sides of the springform. Bake for about 55 to 65 minutes. The edges should look set, but the very center should still giggle slightly when you nudge the pan. That jiggle means moist, not scorched!
The absolute biggest trick to avoid cracks? Slow cooling! Turn that oven off. Prop the door open just a crack—maybe stick a wooden spoon in there. Let the cake hang out in that warm oven for a full hour before you dare pull it out to cool on the counter. Patience here guarantees that beautiful, smooth top.
Making the No Bake Chocolate Cheesecake Variation
I know, sometimes you just can’t mess with turning on the oven, and guess what? That’s totally fine! My philosophy is about making amazing food accessible, and this No Bake Chocolate Cheesecake variation proves it. If you want to skip all the fuss with the water bath and the slow cooling, you absolutely can. It’s a different texture—a bit lighter, maybe closer to a very rich mousse—but it’s fantastic and incredibly easy.
To pivot to no-bake, you toss out steps 2, 4 (we skip the cocoa and the bittersweet chocolate), 5, 6, 7, 8, 9, and 10 from the main recipe. Instead of baking, we just focus on smoothing out the filling ingredients listed in the main steps 3 and substitutions for the chocolate layers. You mix the cream cheese, sugar, sour cream, and vanilla until it’s perfect. Then, instead of swirling the dark chocolate, you need to melt 8 ounces of milk chocolate and gently fold that right into the cream cheese mixture until it’s uniform. Seriously, no eggs involved means no risk of cracking!
Pour that beautiful, thick filling right over your chilled Oreo crust. Then, you have to let it sit in the fridge for a minimum of 8 hours—or longer, preferably overnight—until it’s fully firm. If you want to save some time on the topping, you could even use a quick ganache or just some fresh whipped cream on top. For another incredible, oven-free idea, you have to check out my recipe for the easy no-bake Oreo dirt cake. If you want more details on making a completely oven-free version, my friend over at Sofia’s place has a great take on it here: Easy No Bake Chocolate Cheesecake Recipe.
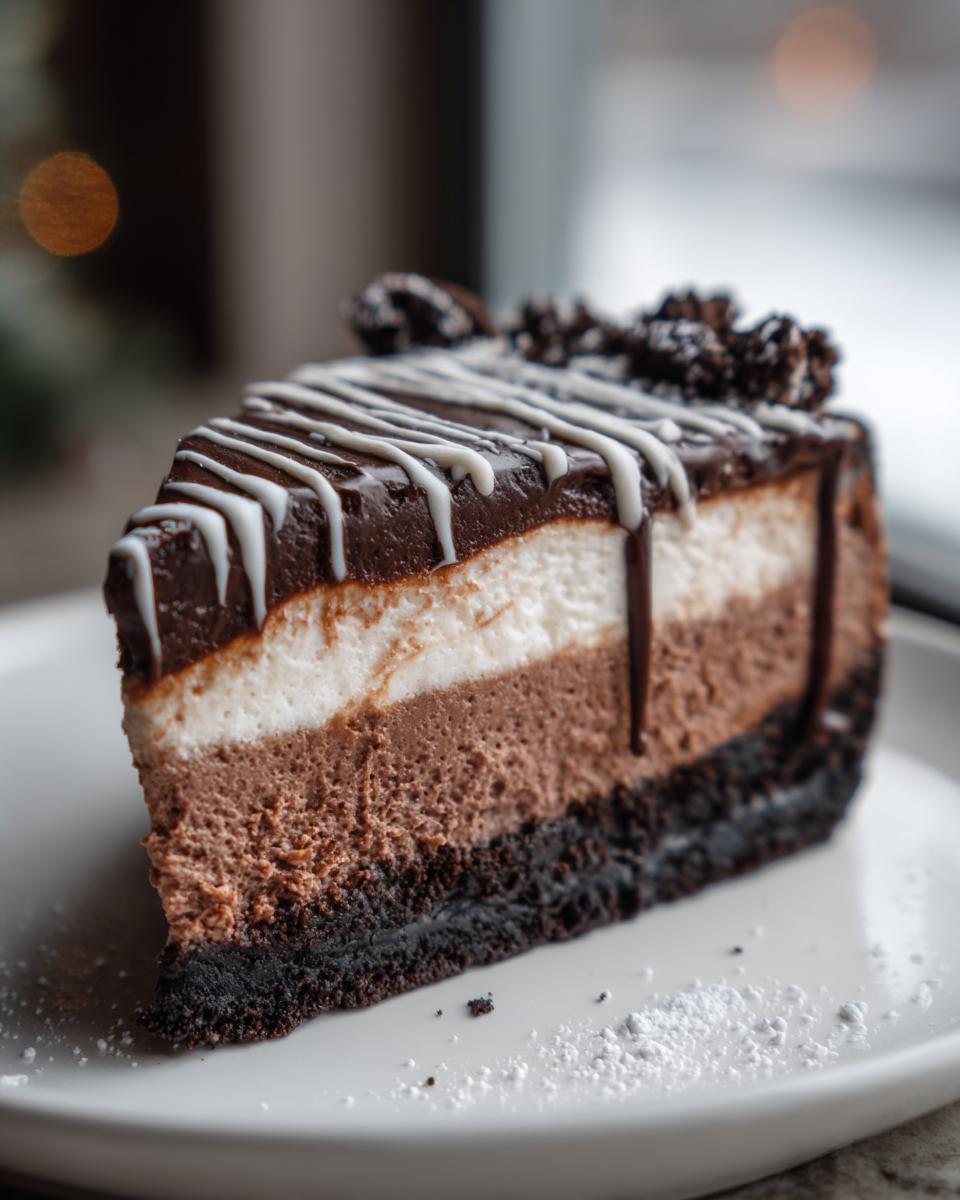
Finishing Touches: Topping Your Chocolate Cheesecake
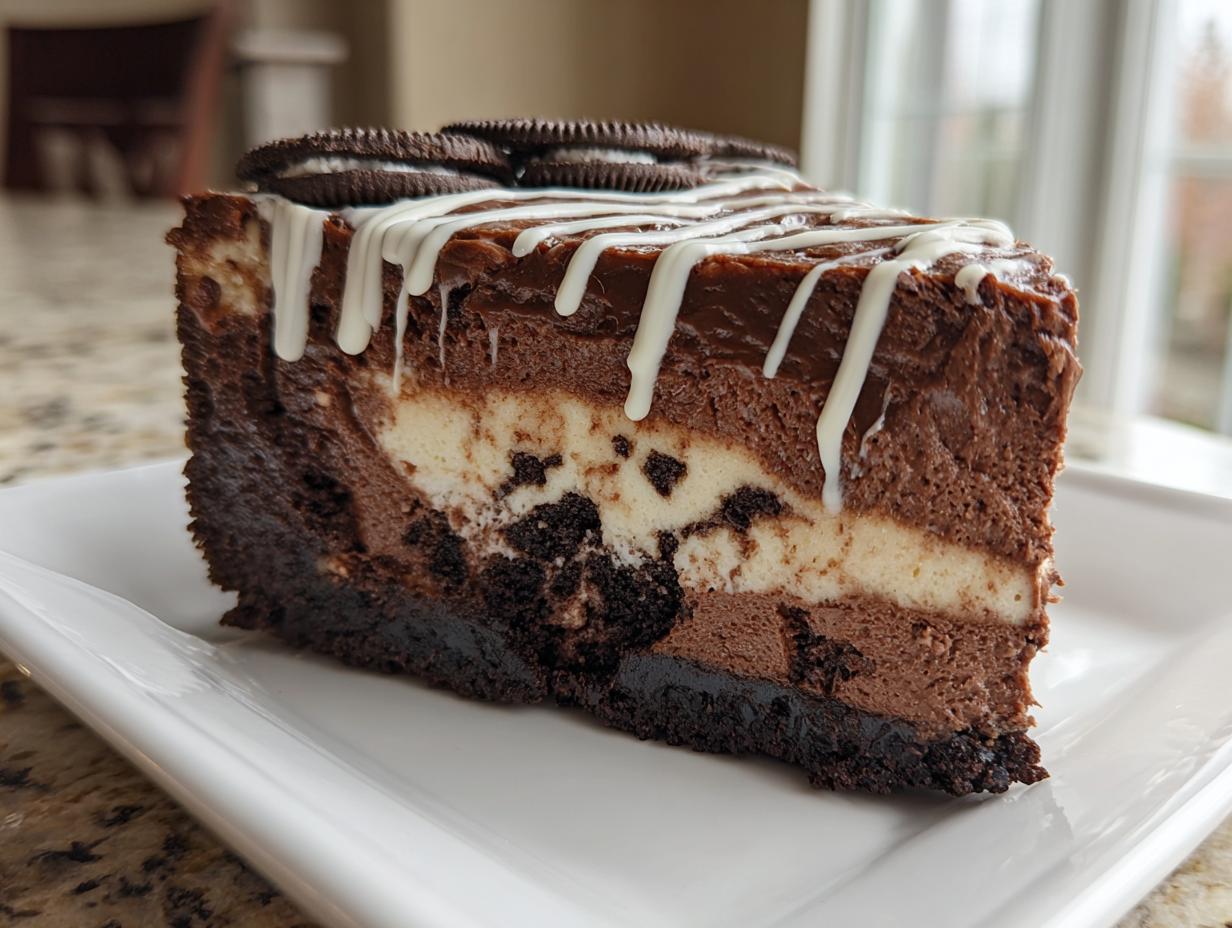
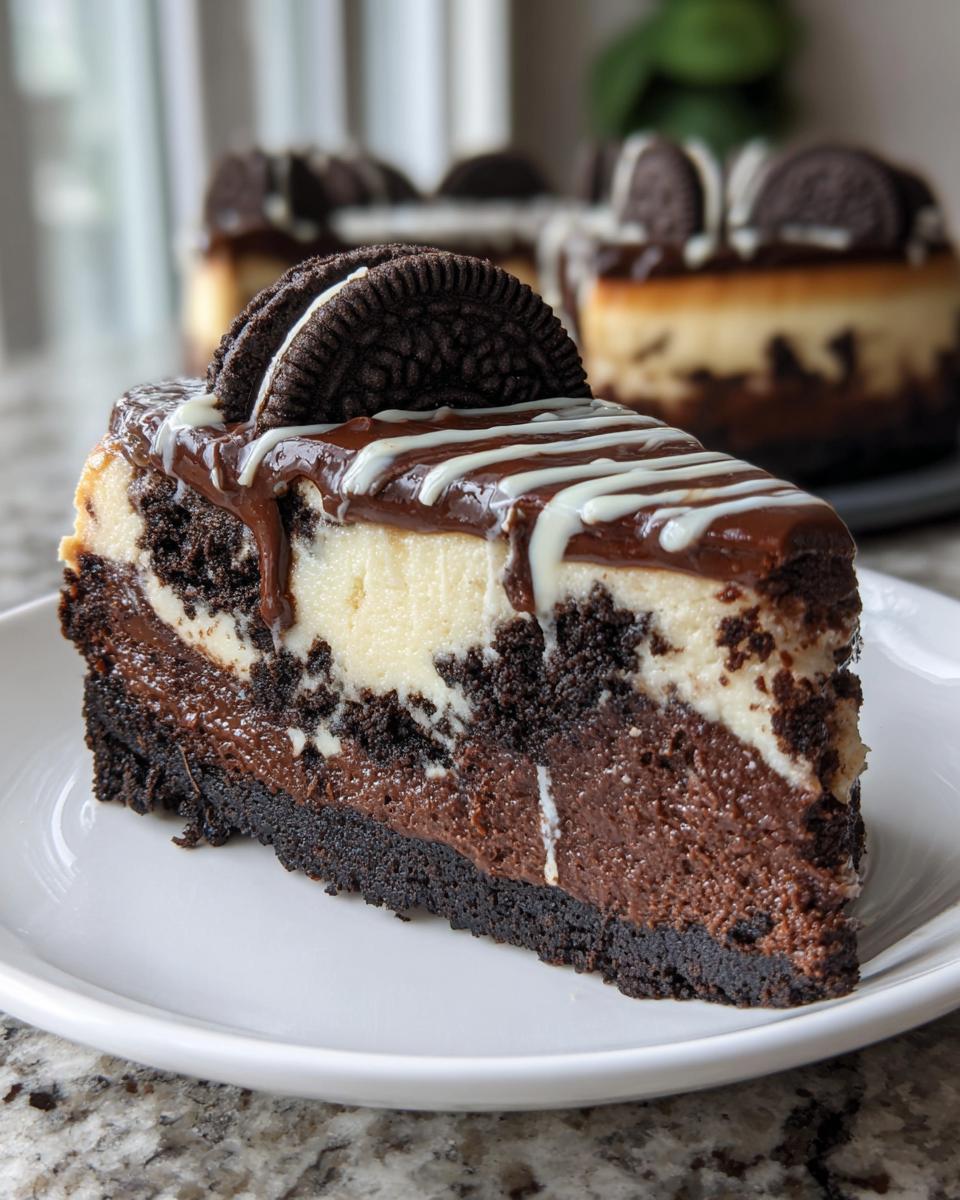
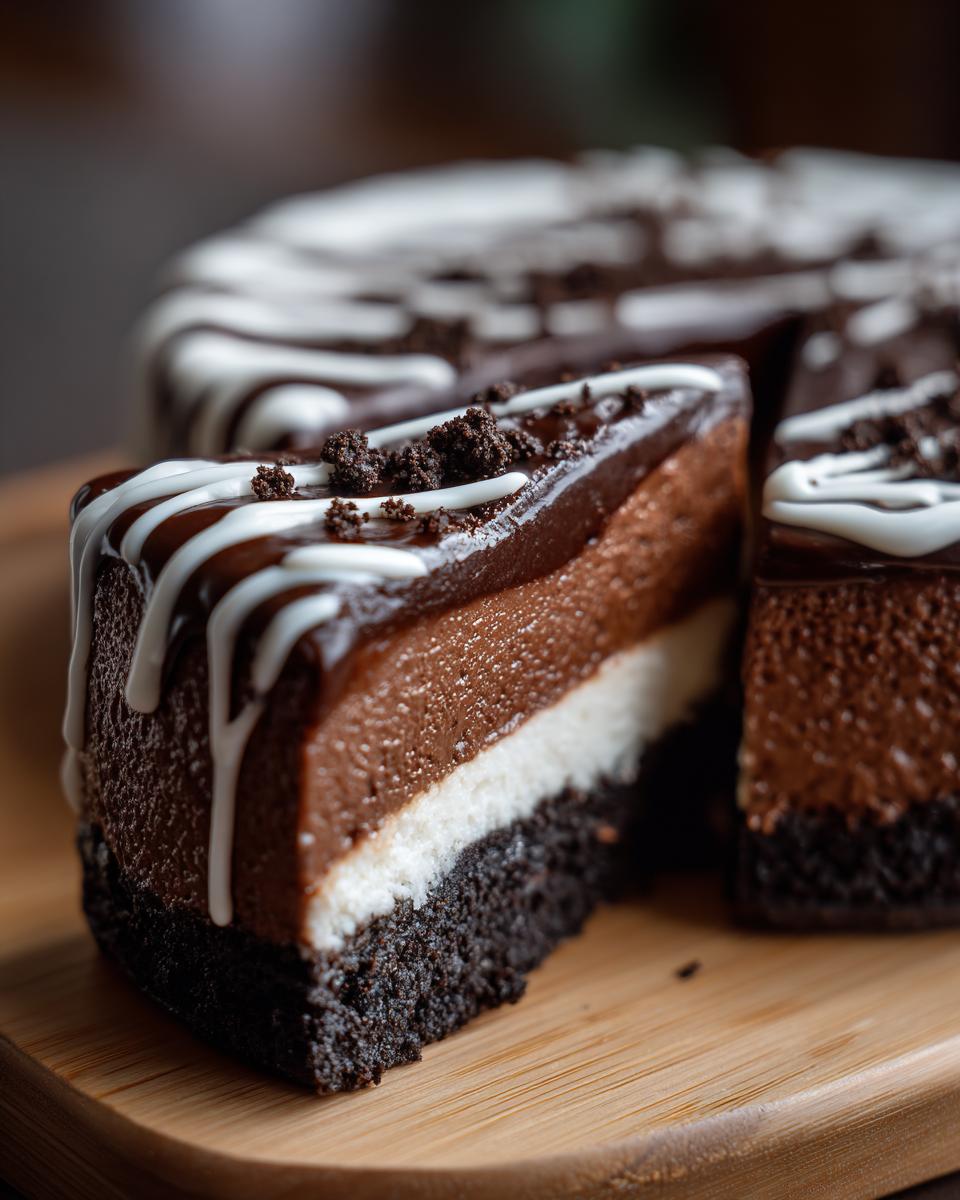
We’ve done the hard work—the chilling is done, the structural integrity is holding strong, and now it’s time for the fireworks! This is where we turn our perfect dark, rich base into that show-stopping Decadent Triple Chocolate Cheesecake. We’re using that simple white chocolate mixture for the final layer, and getting the consistency right is everything.
Remember, this topping is just chopped white chocolate melting into heavy cream. You need to let it cool down slightly after you mix it until it reaches a consistency that pours but resists flowing too fast. If it’s too hot, it’ll just run right off the sides and disappear into the pan, which is definitely not the look we want!
Once it’s cooled just enough—think warm syrup, not hot liquid—gently pour it over the center of your chilled cheesecake. Use an offset spatula or the back of a spoon to guide it just slightly toward the edges, but let gravity do most of the work. You want that beautiful, thick, glossy coating. For an amazing frosting that goes with everything else, you might want to check out my guide to the best cream cheese frosting recipe!
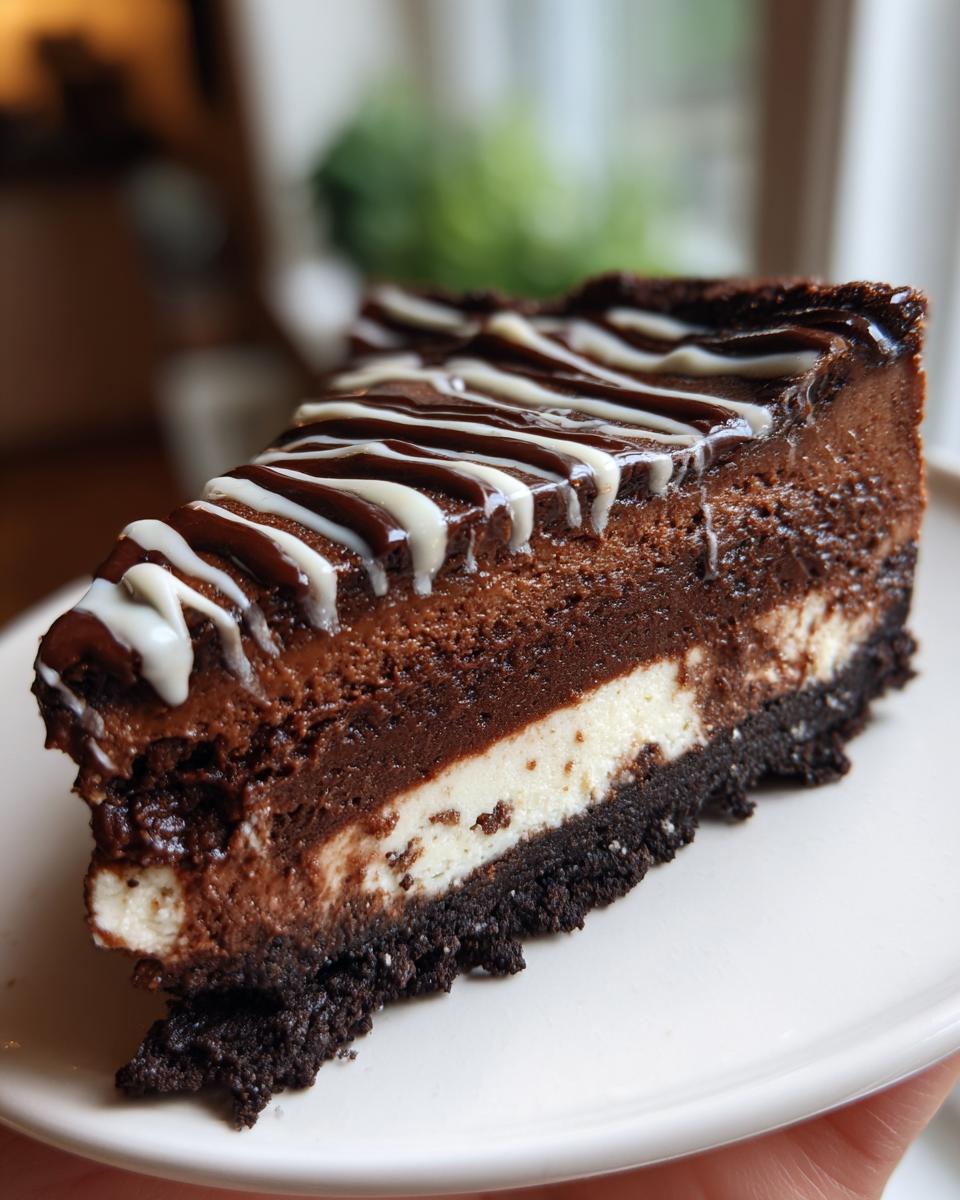
If you want to amp up the visual wow-factor, wait about five minutes after you pour the white chocolate layer. Then, you can take a toothpick or a skewer and gently drag lines across the top to create a marble effect. Honestly, though, even a simple, thick pour of that high-contrast white chocolate over the dark, baked surface is enough to make everyone think you bought this homemade chocolate cheesecake from an actual bakery!
Tips for Success with Your Chocolate Cheesecake
Making the best chocolate cheesecake isn’t just about the mixing; it’s about the patience afterward. I learned this the hard way when I rushed a beautiful dessert out of the fridge too soon. Honestly, you need time for those cheesecake filling secrets to settle in. If you follow my guide, you’ll have a keeper!
First tip: Never, ever try to slice this thing straight from the fridge after just four hours. It needs that minimum six-hour chill, but honestly, overnight is where it solidifies into that truly luscious texture. If you slice it early, it’s going to smear everywhere. You want clean cuts for that bakery look, right?
When it comes time to cut, use a sharp, thin knife dipped in hot water and wiped dry between every single slice. It sounds tedious, but this tiny step makes the difference between a perfect wedge of dessert and a messy pile of chocolate goodness. You can see how they pull off incredibly clean slices on this recipe from Butternut Bakery, which is always helpful inspiration: Foolproof Baked Chocolate Cheesecake.
Also, if you’re planning for a party and want to make sure you have time, this recipe takes very well to being made a day ahead. Just wait to pour the final white chocolate topping until about an hour before serving so it stays perfectly glossy. For more thoughts on technique, check out the tips I put together for my creamy and tangy key lime cheesecake—the mixing rules are very similar for creating density!
Storage and Reheating Instructions for Leftover Chocolate Cheesecake
So, you managed to have leftovers? Good for you! That means you have a treat waiting for you tomorrow. The hardest part about this chocolate cheesecake is honestly waiting for it to set properly, but once it does, storing it is super straightforward. The cream cheese base is delicate, and we want to protect that beautiful, rich flavor.
First off, you *must* let it chill completely before you ever think about covering it. I know I said it earlier, but I’m going to say it again because it’s that important: give it that minimum 6 hours—but seriously, overnight is perfection. If you cover that warm cheesecake, you’re just trapping moisture and tempting fate with sogginess.
Once it’s fully chilled and firm, cover the top of your springform pan with plastic wrap or foil, but don’t press it down onto the surface of the cheesecake if you can help it—we don’t want to mess up that gorgeous top layer. If you’ve already sliced it, transfer the remaining wedges to an airtight container. Cheesecakes are famous for soaking up fridge odors, so keeping it sealed tight protects that pure chocolate taste.
If you somehow end up with more than you can eat in a few days, yes, you can freeze it! Take the cake—or wedges, which is easier—and wrap it tightly in a double layer of plastic wrap, followed by a layer of aluminum foil. Make sure there’s no air touching the surface. It freezes beautifully for up to a month. When you’re ready to enjoy it, just transfer the wrapped cake to the fridge to thaw slowly overnight. Never try to freeze or heat this dessert, or you’ll lose that signature silky texture!
Frequently Asked Questions About This Rich Chocolate Dessert
I get so many messages asking for clarifications on this recipe—which is great! It means you guys are serious about making the best chocolate cheesecake possible. I’ve gathered up the most common ones right here so you can troubleshoot like a pro before you even start mixing. If you’re looking for more simple ideas after this epic bake, I have a huge collection of easy dessert recipes ready for you!
Can I use a different crust instead of the Oreo Crust Cheesecake option?
Absolutely! While the Oreo crust is my go-to for that intense texture contrast, you can totally switch it up. If you want something a little less heavy, a classic graham cracker crust works beautifully. Just use about 1 3/4 cups of prepared crumbs and stick with the 6 tablespoons of melted butter. For a buttery, slightly shorter flavor that lets the chocolate shine even more, try using finely crushed shortbread cookies instead. Either way, remember to press it firmly and chill it hard before adding the filling!
What is the best way to get a truly dark chocolate cheesecake flavor?
If you are a true dark chocolate fanatic like me, you need to focus on two things in this chocolate cheesecake recipe: the bittersweet chocolate and the cocoa powder. For the deepest, most intense background flavor, make sure the bittersweet chocolate you use is at least 60% cacao, or even push it toward 70% if you like that slight edge of bitterness. Secondly, when you sift the cocoa powder into the batter, opt for a Dutch-processed cocoa. It’s less acidic and gives you that classic, deep, almost black color and a richer flavor profile than natural unsweetened cocoa.
How do I know when my baked chocolate cheesecake is done?
This is where a lot of folks panic, especially when dealing with a baked cheesecake tutorial! Forget the toothpick test for a second; on cheesecake, it often comes out looking cleaner than it should be. You are looking for visual confirmation. When you gently nudge the side of the roasting pan, the outer ring—about an inch and a half from the edge—should look completely set and firm. The absolute center, maybe the size of a silver dollar, should still have a noticeable, gentle wobble or jiggle. That jiggle is key! It means there’s still moisture in the middle, which will firm up perfectly as it cools slowly in the turned-off oven. That’s how you guarantee a creamy texture, never a dry one.
Estimated Nutritional Data for This Chocolate Cheesecake
Okay, I know some of you check this stat first! Let’s talk numbers for this decadent dessert. I want to be super clear: because this is a homemade creation—especially with options like the no-bake switch or different chocolate percentages—these numbers are just estimates based on the standard ingredients and serving size (one slice) from the recipe card. Don’t treat this like a label on a store-bought item, okay?
This is a truly rich chocolate dessert, so you know the fats and sugars are going to reflect that luxurious texture we worked so hard to achieve. But hey, you deserve it! When you’re serving up the best chocolate cheesecake, you expect indulgence!
- Serving Size: 1 slice
- Calories: 480
- Sugar: 35g (That’s the good stuff!)
- Fat: 34g
- Saturated Fat: 20g
- Carbohydrates: 40g
- Protein: 8g
If you’re tracking macros or watching for specific ingredients, remember that swapping out the Oreo crust for a plain graham cracker crust will slightly change these numbers, usually lowering the fat and maybe bumping up the carbs just a touch. Enjoy responsibly!
PrintDecadent Triple Chocolate Cheesecake with Easy Oreo Crust

You can make a truly rich and creamy chocolate cheesecake using this recipe. We focus on achieving a silky smooth texture and deep chocolate flavor, built on a simple, crunchy Oreo cookie crust. This recipe delivers dessert perfection for any gathering.
- Prep Time: 30 min
- Cook Time: 65 min
- Total Time: 8 hours 35 min
- Yield: 12 servings 1x
- Category: Dessert
- Method: Baking
- Cuisine: American
- Diet: Vegetarian
Ingredients
- 1 3/4 cups Oreo cookie crumbs (about 30 cookies)
- 6 tablespoons unsalted butter, melted
- 3 (8-ounce) packages full-fat cream cheese, softened to room temperature
- 1 1/2 cups granulated sugar
- 1/2 cup sour cream
- 1 teaspoon vanilla extract
- 1/4 cup unsweetened cocoa powder, sifted
- 8 ounces bittersweet chocolate, melted and cooled slightly
- 3 large eggs, room temperature
- 4 ounces milk chocolate, chopped
- 4 ounces white chocolate, chopped
- 1/2 cup heavy cream (for ganache)
Instructions
- Prepare the crust: Mix the Oreo crumbs and melted butter until fully combined. Press the mixture firmly into the bottom of a 9-inch springform pan. Chill the crust in the freezer for 15 minutes while you prepare the filling.
- Preheat your oven to 325°F (160°C). If you plan to bake, wrap the outside of the springform pan tightly with heavy-duty aluminum foil to prevent water seepage if using a water bath.
- Make the cheesecake filling base: In a large bowl, beat the softened cream cheese with an electric mixer until smooth and creamy, about 2 minutes. Gradually add the sugar and beat until just combined. Scrape down the sides of the bowl.
- Mix in the sour cream, vanilla extract, and sifted cocoa powder until smooth. Beat in the cooled, melted bittersweet chocolate until the mixture is uniform.
- Add the eggs one at a time, mixing on low speed after each addition only until the yolk disappears. Do not overmix the batter once the eggs are added.
- Pour half of the cheesecake batter over the chilled Oreo crust.
- Prepare the milk chocolate layer: Gently melt the chopped milk chocolate with 2 tablespoons of the heavy cream until smooth. Gently swirl this mixture into the batter currently in the pan using a knife or skewer.
- Pour the remaining plain cheesecake batter over the top.
- Bake: Place the foil-wrapped pan into a larger roasting pan. Carefully pour hot water into the roasting pan until it reaches halfway up the sides of the springform pan (water bath). Bake for 55 to 65 minutes, or until the edges are set but the center still has a slight jiggle.
- Cool the cheesecake: Turn off the oven, crack the door open slightly, and let the cheesecake cool inside the oven for 1 hour. Remove from the water bath, remove the foil, and let it cool completely on a wire rack.
- Chill: Refrigerate the cheesecake for at least 6 hours, or preferably overnight, before serving.
- Prepare the white chocolate topping: Melt the chopped white chocolate with the remaining heavy cream until smooth. Let it cool slightly until it reaches a pourable but thick consistency. Pour or drizzle this over the chilled cheesecake before slicing.
Notes
- For a no-bake option, skip steps 2, 4 (omit cocoa powder and melted bittersweet chocolate), 5, 6, 7, 8, 9, and 10. Instead, beat the cream cheese, sugar, sour cream, and vanilla until smooth. Fold in 8 ounces of melted and cooled milk chocolate. Pour over the chilled crust and chill for at least 8 hours until firm.
- To get a truly silky smooth texture, make sure your cream cheese is completely at room temperature before starting.
- If you skip the water bath for the baked version, place a shallow pan of hot water on the rack below the cheesecake to add humidity to the oven environment.
Nutrition
- Serving Size: 1 slice
- Calories: 480
- Sugar: 35g
- Sodium: 310mg
- Fat: 34g
- Saturated Fat: 20g
- Unsaturated Fat: 14g
- Trans Fat: 0.5g
- Carbohydrates: 40g
- Fiber: 2g
- Protein: 8g
- Cholesterol: 115mg