
Listen, I know parties. Whether it’s game day or just a Tuesday, you need food that travels well, tastes amazing, and disappears fast! If you want to be the hero of the neighborhood potluck, you absolutely need the roadmap for the **seven layer dip**. Forget the sloppy, sad dips where all the flavors just run together. I’ve figured out the foolproof way to layer this Tex-Mex wonder so that every scoop gives you that perfect, distinct bite from bottom to top.
Jax totally hammered home the importance of reliability when he was collecting these recipes on the road—food that works, period! This easy seven layer dip is designed to hold its structure whether it sits on the buffet for five minutes or two hours. Trust me, this assembly method is the secret weapon. Check out why this version is the one you’ll use forever.
If you want to read more about how we believe in making good food accessible for real life, you can check out our story here.
- Why This Is the Best 7-Layer Dip for Your Next Party
- Gathering Ingredients for Your Easy Seven Layer Dip
- Step-by-Step Instructions: How to Make Seven Layer Dip
- Tips for the Most Attractive Party Layered Dip
- Ingredient Notes and Simple Substitutions for Seven Layer Dip
- Frequently Asked Questions About This Tex-Mex Appetizer
- Storing and Reheating Your Leftover Seven Layer Dip
- Share Your Experience Making This Seven Layer Dip
Why This Is the Best 7-Layer Dip for Your Next Party
Honestly, what makes this dip the champion of any party spread is how seriously it takes structure. We’ve all seen those sad, bleeding dips where the chip goes straight to the bottom only to hit mush? Never again! This recipe is built on the YumDrizzle philosophy: real food that works in your actual, busy life. It’s designed to look just as good as it tastes, even after an hour sitting out.
Here’s why you should ditch the tired old recipe card and use this method instead:
- You actually taste every layer individually—they don’t just become spicy soup.
- The assembly is so straightforward, you can do it while catching up on your favorite show.
- It’s the ultimate crowd-pleaser; everyone loves scooping through all the textures.
- The appearance is unbeatable, especially when you use that clear glass dish I mentioned!
Key Components of a Perfect Seven Layer Dip
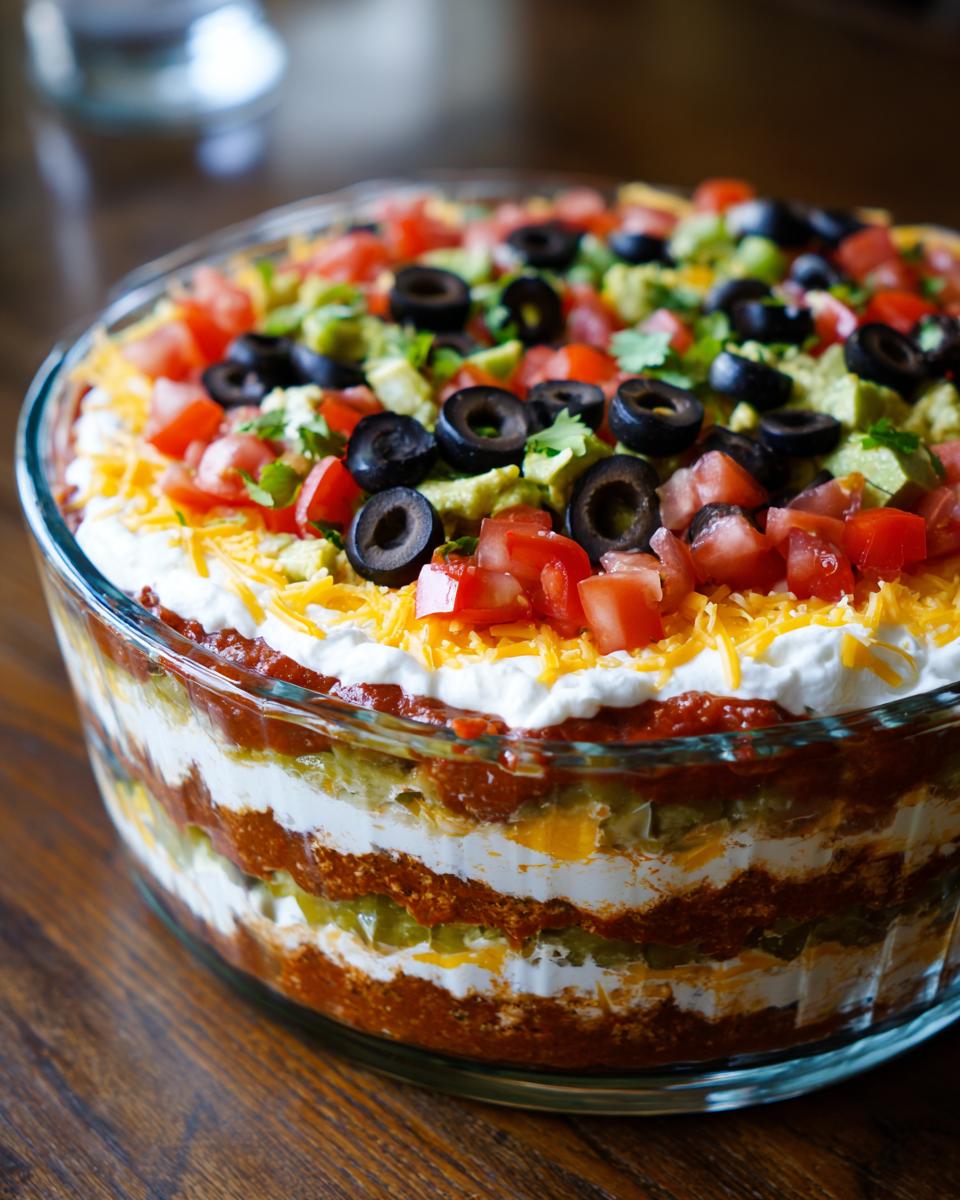
The beauty is in the order, my friends. Keep these seven heavy hitters in line, and you won’t go wrong. We start with the sturdy base and work our way up to the light and fresh toppings. That foundation is what keeps everything tight.
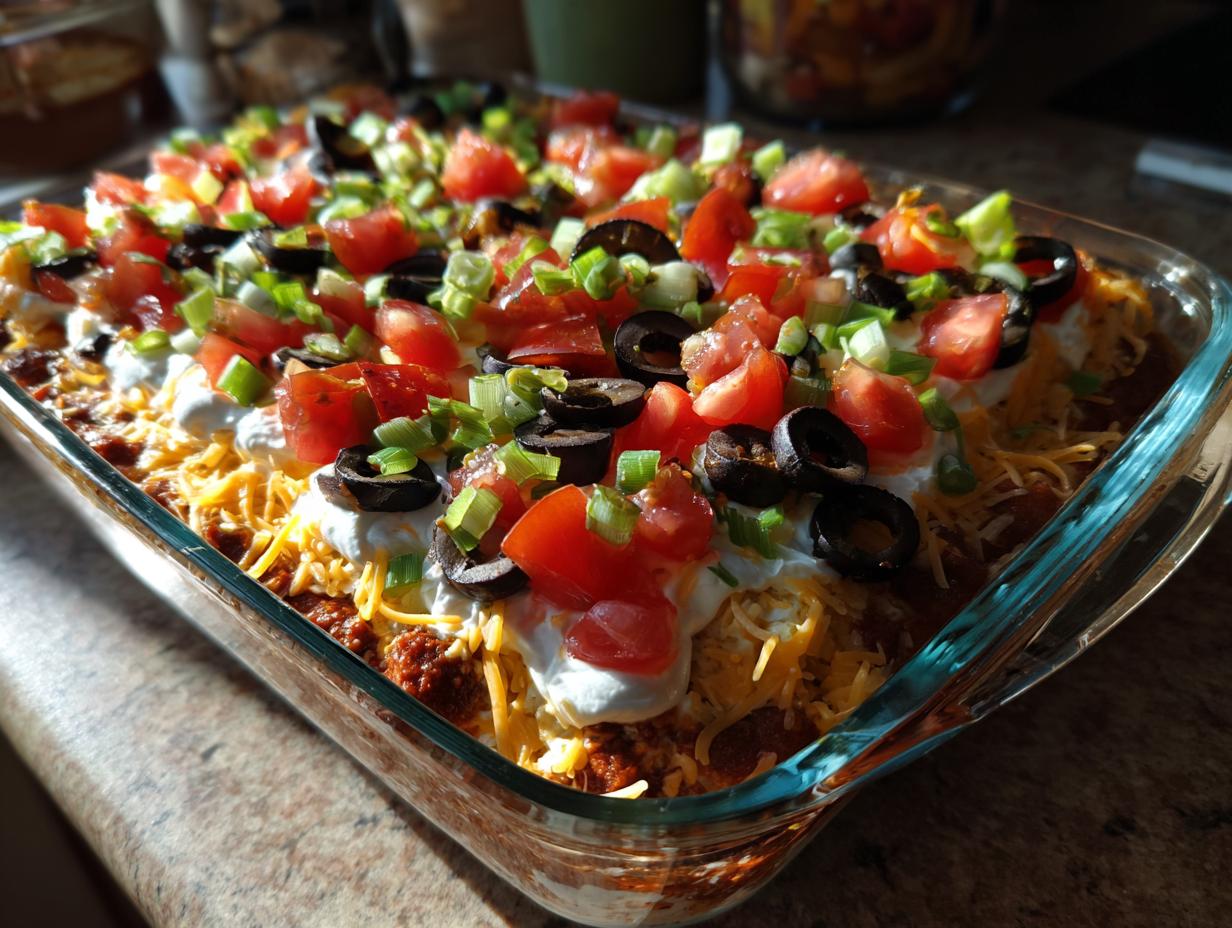
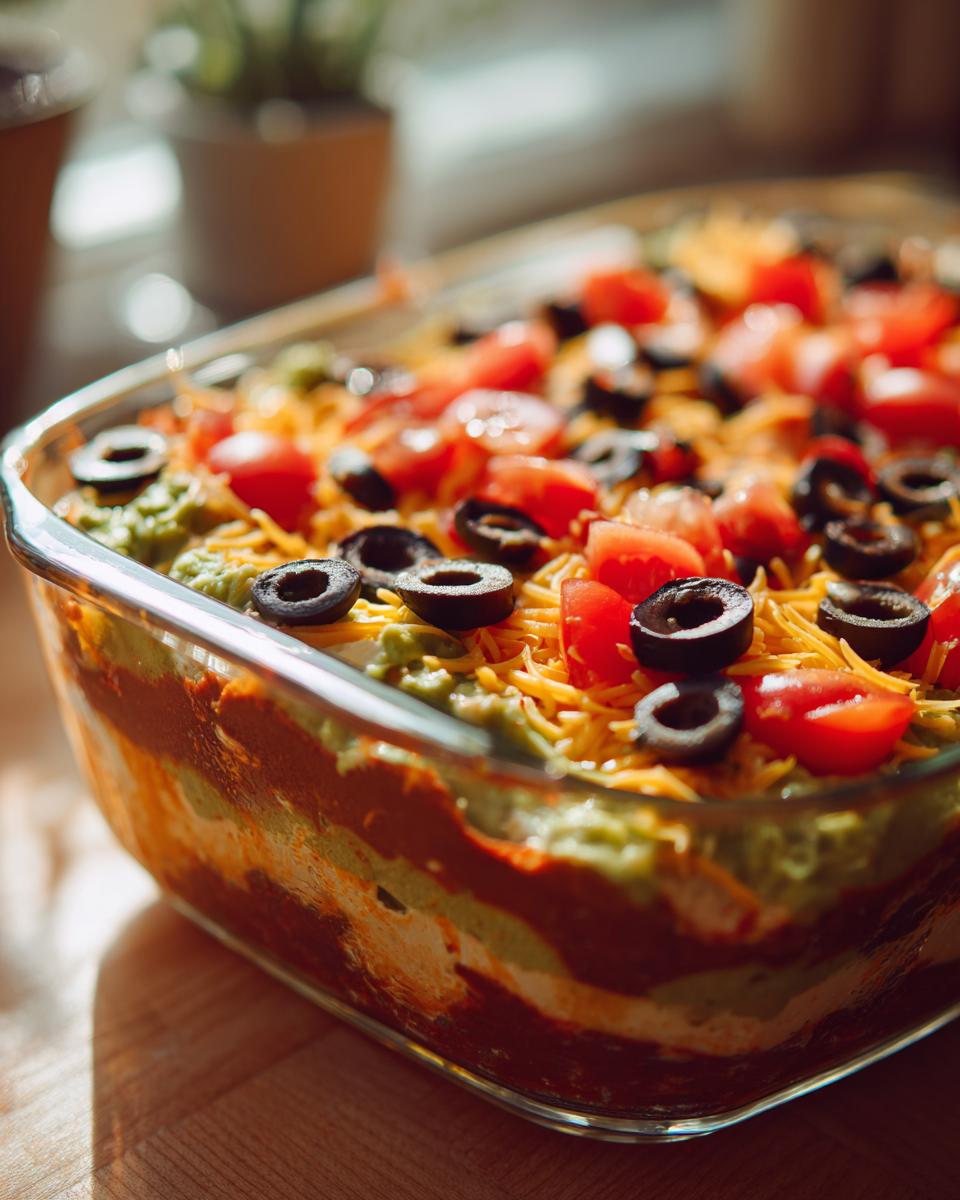
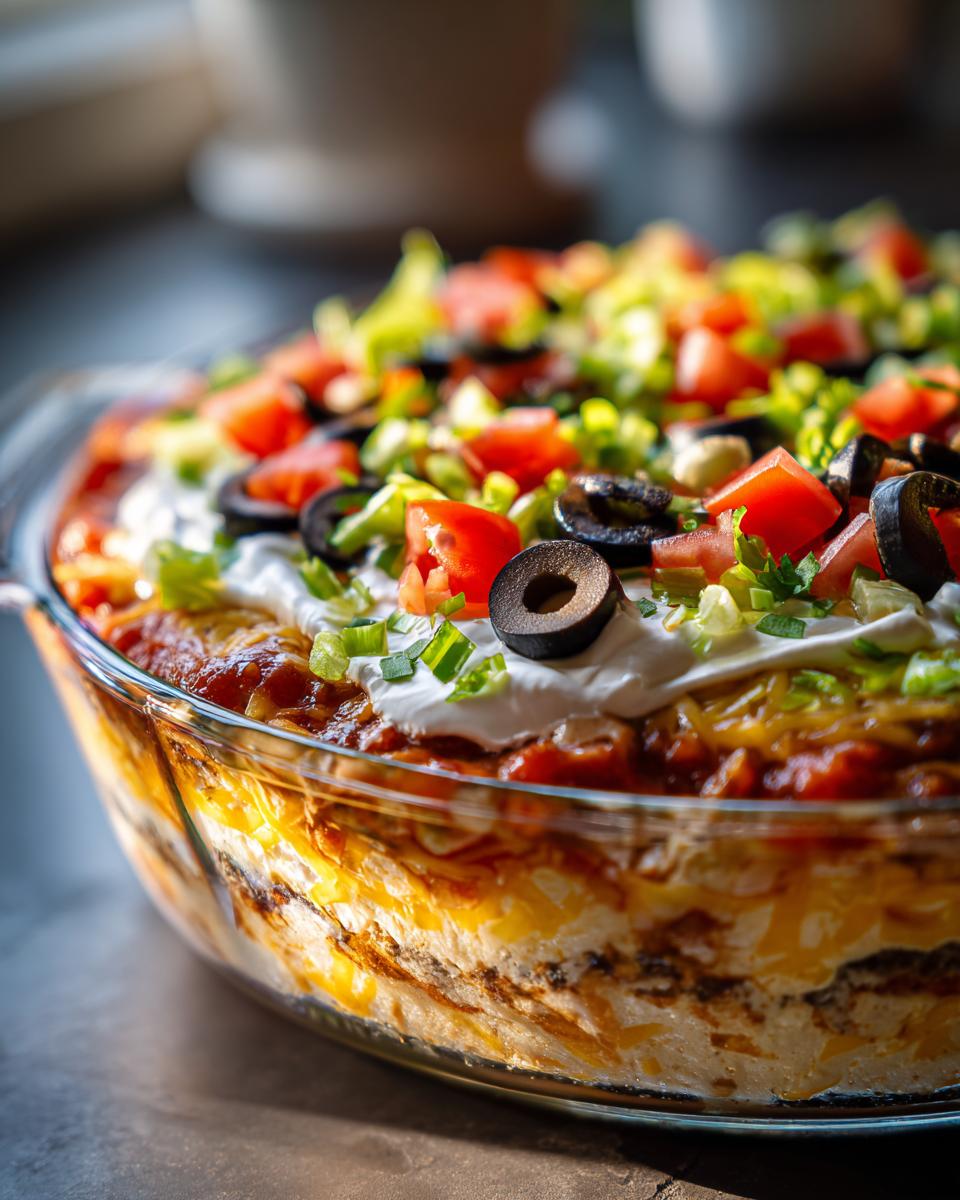
We’re talking about this sequence: spiced refried beans, creamy guacamole, seasoned sour cream, well-drained salsa, shredded cheese, fresh tomato dice, and finally, those salty black olives on top.
Gathering Ingredients for Your Easy Seven Layer Dip
Okay, once you’ve got your assembly strategy down, grabbing the ingredients is the fun part! Remember, the secret to not shredding your bean layer when you spread it is making sure those refried beans are nice and soft—room temperature is key here, trust me on this one. Don’t try to spread them cold; you’ll just end up digging holes!
This recipe keeps things super simple; we are sticking to classic, easy-to-find supermarket items that pack maximum flavor. It’s all right here, broken down so you can check off your list before you start layering.
Ingredient Breakdown by Layer
- One 16-ounce can of refried beans, and please make sure they are warmed up to room temperature before you start spreading!
- One teaspoon of ground cumin and half a teaspoon of chili powder for seasoning that bean base. Don’t skip these spices; they give the foundation that Tex-Mex punch.
- One cup of your favorite guacamole—homemade is best, but I won’t tell if you grab a great quality tub.
- One cup of sour cream, ready to be transformed!
- One whole 1-ounce packet of taco seasoning mix for jazzing up that sour cream.
- One cup of salsa, and this is crucial: make sure it is really well drained, or your dip will turn soupy fast.
- One cup of shredded either sharp cheddar or one of those handy Mexican blend cheeses.
- Half a cup of fresh tomatoes, chopped small.
- A quarter cup of sliced black olives, also drained really well.
- If you want that extra professional look, some chopped green onions for the very top garnish!
Step-by-Step Instructions: How to Make Seven Layer Dip
Now for the fun part—the construction! Remember, we want distinct lines, so be gentle as you spread, especially when you get to the softer layers like guacamole. I always grab my prettiest clear 9×13 dish for this because you simply have to show off all that hard work. Keep those layers separate, and you’ve got yourself a showstopper.
Preparing the Base Layers
First things first: grab those room-temperature refried beans and stir in that cumin and chili powder until it’s all married together. Spread that mixture evenly across the bottom of your dish. This sturdy base is crucial! Next, gently spoon your cup of guacamole right on top. If you’ve got folks who like to snack early, I sometimes brush a tiny bit of lime juice over the guac just to keep it looking vibrant green until serving time.
For layer number three, ditch the plain sour cream! In a separate bowl, mix that entire packet of taco seasoning right into the cup of sour cream until you see those lovely orange specks blended through. Spread this seasoned cream gently over the guacamole. Take your time here; we don’t want any mixing between the green and white layers!
Assembling the Top Layers of Your Seven Layer Dip
Time for flavor boost number four. Take that well-drained salsa and spoon it carefully over the sour cream. I mean it—drain that salsa in a sieve for a good ten minutes first! Excess liquid is the enemy of a stable layered dip. Once the salsa is settled, go ahead and sprinkle that cup of shredded cheese evenly across the top.
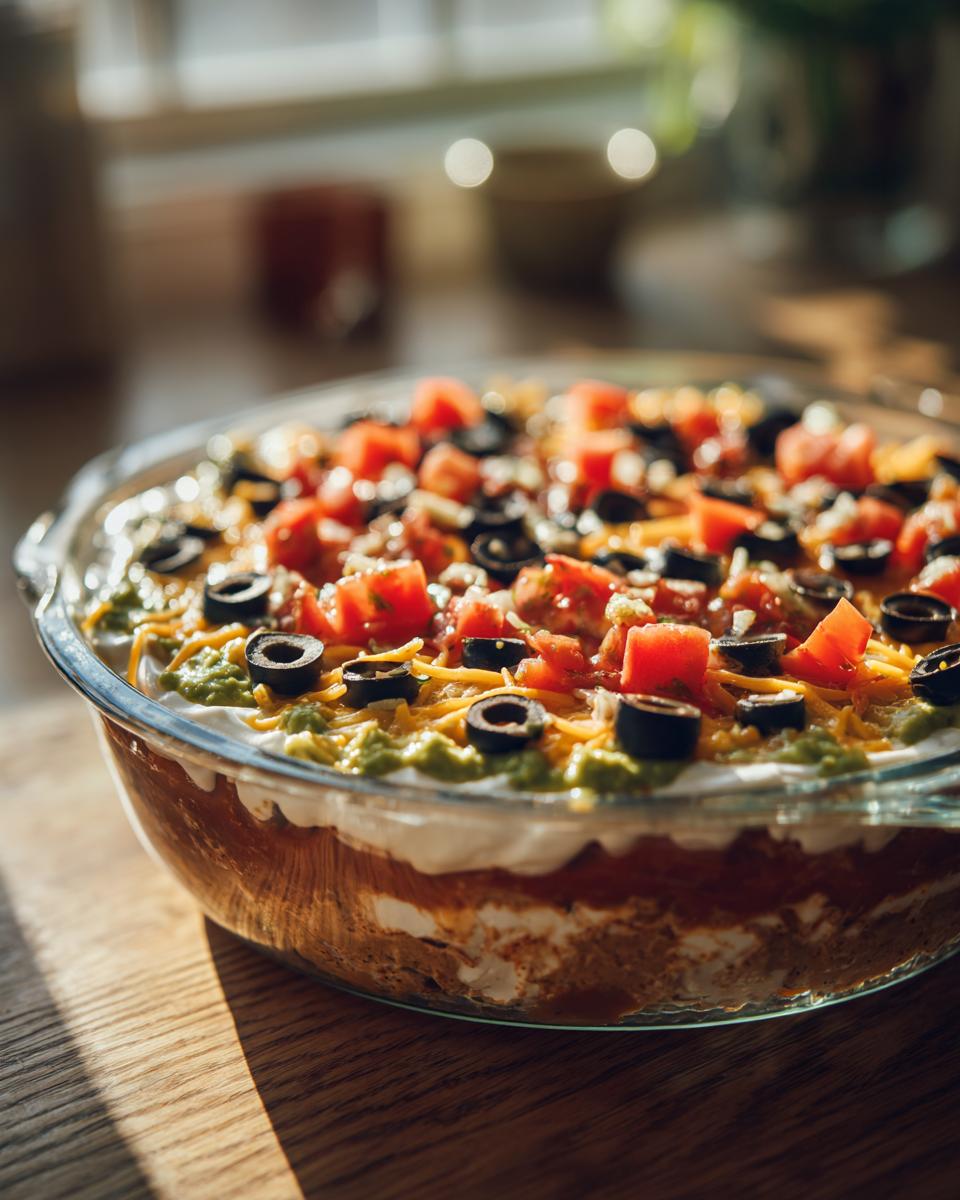
Next up, you’ll scatter the half-cup of chopped fresh tomatoes over the cheese. This adds a beautiful pop of color and freshness. Finally, finish it off by scattering those black olives across the very top. Those olives are the crowning glory, the final visual touch that tells everyone, “This is it, the real deal!” Now, cover it up and let it chill so everything sets before the chip assault begins.
Tips for the Most Attractive Party Layered Dip
We’ve done all the hard work assembling, but the presentation is what stops people in their tracks! Remember, this is a Tex-Mex appetizer that needs to look vibrant. If you’re worried about that guacamole starting to look a little sad (you know, that slightly brownish hue that creeps in?), a light squeeze of lemon or lime is your best friend right before you put the final toppings on. It locks in that bright green color for hours.
The structure is just as important as the taste, so make sure that salsa is drained ruthlessly! Soggy salsa means runny layers, and that defeats the whole purpose of this beautiful construction project.
Chilling and Serving the Seven Layer Dip
Don’t be tempted to scoop this straight out of the mixing bowl! You absolutely need to cover your dish tightly, probably with plastic wrap, and put it in the fridge for at least one solid hour. This chilling time is critical; it lets the bean and sour cream layers firm up nicely so they don’t squish out when someone dives in with a chip. This also lets all those spices in the bean layer really bloom, which is fantastic.
When you serve it up, make sure you offer sturdy, thick tortilla chips. Those flimsy little triangles won’t cut it when people are trying to get a spoonful that includes the cheesy top *and* the seasoned beans underneath. You need a chip with some backbone for this depth of flavor!
Ingredient Notes and Simple Substitutions for Seven Layer Dip
I know sometimes you open your fridge and realize you’re missing one thing, or maybe you’re just trying to lighten things up before the holidays. That’s okay! That resourceful spirit is what YumDrizzle is all about—making delicious food happen with what you have.
This recipe is forgiving, but here are a few swaps I’ve tested when I needed them. If you need to lighten this up without losing that creamy texture, swapping the sour cream for plain, full-fat Greek yogurt is shockingly good. It adds a little tang which actually works great with the taco seasoning, so it’s a win-win!
Also, if you’re out of cheddar, just use whatever Mexican blend you have sitting in the bag. The key players here are the beans and the seasoning, not the exact cheese type. Don’t stress about perfection; focus on making it fun and getting it on the table!
Frequently Asked Questions About This Tex-Mex Appetizer
Since everyone wants to know my tricks, especially when they are trying to master **how to make seven layer dip** for the first time, I figured I’d answer a few common questions right here. Getting these little details right turns a good dip into the absolute **best 7-layer dip**, trust me!
Can I make this seven layer dip ahead of time?
Yes, you totally can, and I actually recommend it! For the best results on an **easy seven layer dip**, I aim to assemble the entire thing about four to six hours before the party kicks off. This gives the flavors time to mingle nice and deep, especially the seasoning in the bean layer. You need to cover it tightly with plastic wrap—make sure the wrap isn’t touching the top layer of olives, or they’ll stick! Keep it sealed in the fridge until about 30 minutes before guests arrive. It holds up beautifully!
What if I don’t want to use olives in my party layered dip?
Oh, olives aren’t everyone’s jam, I totally get it! They are traditional, but if you’re making this for your crew, skip them. If you omit them, you might want to double up on something else fresh for the very top layer. I often sprinkle a little extra chopped fresh cilantro or maybe some finely diced green bell pepper instead. Both add a nice crunch and color without that distinct olive punch. The key to a great **party layered dip** is making it work for *your* guests!
Storing and Reheating Your Leftover Seven Layer Dip
Okay, let’s talk about the aftermath—because sometimes this dip is so good there are actual leftovers! Since this whole thing is built cold, you definitely don’t want to try heating it up. Microwaving this Tex-Mex masterpiece will just turn your cheese into oil slick and make everything mushy. Don’t do it!
The main thing is keeping it tightly covered. Use plastic wrap, press it right down onto the surface of the dip so the air can’t get to the avocado, and pop it back into the fridge. It’ll stay really fresh for about two days. If you’re serving it on day three, the layers might start bleeding a little bit. If that happens, just scoop off the very top layer of olives and tomatoes, give the sour cream layer a quick stir if it looks sad, and top it with some fresh diced veggies. Easy peasy!
Share Your Experience Making This Seven Layer Dip
Alright, now you have the blueprint for what I firmly believe is the most structurally sound and delicious **seven layer dip** you’ll ever bring to a gathering. It’s simple, it’s classic, and it guarantees everyone gets a great scoop every single time. Honestly, the best part of sharing these recipes is hearing how they turned out!
So, once you’ve made this for Game Day or your next big hangout, please, please come back and tell me how it went! Did your layers stay perfectly separate? Did you try adding a little extra lime juice to the sour cream, perhaps? Don’t be shy—let us know in the comments below.
I always want to know what you paired it with! Were you serving this **Tex-Mex appetizer** with classic scoops, or did you get fancy with veggie sticks too? Leaving a star rating helps other folks know this is a reliable winner for their own parties, too. If you have any tricky questions about assembly or need troubleshooting help for next time, you can always shoot us a note through the contact page. Happy dipping, everyone!
PrintClassic Seven Layer Dip

Make this easy seven layer dip for your next gathering. It features distinct, flavorful layers perfect for scooping with tortilla chips.
- Prep Time: 20 min
- Cook Time: 0 min
- Total Time: 20 min
- Yield: 10 servings 1x
- Category: Appetizer
- Method: Layering
- Cuisine: Tex-Mex
- Diet: Vegetarian
Ingredients
- 1 (16 ounce) can refried beans, room temperature
- 1 teaspoon ground cumin
- 1/2 teaspoon chili powder
- 1 cup guacamole
- 1 cup sour cream
- 1 packet (1 ounce) taco seasoning mix
- 1 cup salsa, drained well
- 1 cup shredded cheddar or Mexican blend cheese
- 1/2 cup chopped fresh tomato
- 1/4 cup sliced black olives, drained
- Optional: Chopped green onions for garnish
Instructions
- In a small bowl, mix the refried beans with cumin and chili powder. Spread this mixture evenly over the bottom of a clear 9×13 inch serving dish. This is your first layer.
- Spread the guacamole evenly over the bean layer. To prevent browning, you can lightly brush the top of the guacamole with a thin layer of lime juice.
- In a separate bowl, mix the sour cream with the entire packet of taco seasoning until fully combined. Spread this seasoned sour cream mixture over the guacamole layer.
- Spoon the drained salsa evenly over the sour cream layer. Make sure the salsa is well-drained so the dip does not become watery.
- Sprinkle the shredded cheese evenly over the salsa.
- Top the cheese with the chopped fresh tomatoes.
- Finish the dip by scattering the sliced black olives over the top.
- If using, sprinkle with green onions.
- Cover the dish and chill in the refrigerator for at least 1 hour before serving to allow the layers to set. Serve cold with tortilla chips.
Notes
- Use a clear glass dish so guests can see all seven layers.
- Ensure the refried beans are at room temperature before spreading; this prevents tearing the layer beneath it.
- Drain the salsa thoroughly; excess liquid makes the dip runny.
- For a low-fat option, substitute plain Greek yogurt for the sour cream.
Nutrition
- Serving Size: 1/10 of dip
- Calories: 180
- Sugar: 4
- Sodium: 450
- Fat: 12
- Saturated Fat: 6
- Unsaturated Fat: 6
- Trans Fat: 0
- Carbohydrates: 12
- Fiber: 3
- Protein: 7
- Cholesterol: 25