
Oh my gosh, if you are craving something sweet, crunchy, salty, and ridiculously easy, you have found your new obsession! I get it—sometimes you need a full-on indulgent dessert, but you absolutely do not have the time (or the desire!) to turn on the oven. That’s why I’m sharing my absolute favorite butterfinger pie recipe. This isn’t just any pie; it’s the easiest, no-bake version out there—and I mean it when I say you can have it prepped in about 20 minutes flat. Believe me, after years of chasing flavors on the road, I learned that the best food isn’t complicated; it’s sincere and accessible. This pie hits all those marks. You get that dreamy, cool, creamy peanut butter pie texture layered right over a sharp, dark chocolate cookie crust. It’s instant nostalgia perfection, zero baking required!
- Why This Easy Butterfinger Pie Recipe is a Must-Try
- Gathering Ingredients for Your No Bake Butterfinger Pie
- Ingredient Notes and Substitutions for the Best Butterfinger Pie
- Step-by-Step Instructions for Easy Butterfinger Pie
- Tips for the Best Butterfinger Pie Success
- Serving Suggestions for Your Indulgent Dessert
- Storage and Reheating Instructions for this Butterfinger Dessert
- Frequently Asked Questions About No Bake Butterfinger Pie
- Estimated Nutritional Data for This Indulgent Dessert
- Share Your Experience with This Quick Candy Bar Pie
Why This Easy Butterfinger Pie Recipe is a Must-Try
Seriously, why haven’t you made this yet? This recipe manages to pack so much flavor and crunch into something that requires almost zero effort. It’s my go-to when I need a show-stopper dessert without starting a fire in the kitchen. If you’re looking for that perfect marriage of peanut butter heaven and crunchy candy, this is it!
- It’s completely no bake! That’s right, put the oven away. This is perfect for those hot summer days or when you’re just feeling lazy—we all have those days!
- You’re looking at maybe 20 minutes of hands-on prep time. It’s truly a quick candy bar pie that disappears fast.
- The filling is unbelievably creamy. We use a combination of cream cheese and whipped topping to get a texture that melts in your mouth. This is honestly the best simple no bake dessert I’ve ever whipped up.
- It’s a massive crowd-pleaser. Bring this baby to any family gathering or potluck, and I promise you won’t bring back any leftovers. Everyone loves this butterfinger dessert.
Gathering Ingredients for Your No Bake Butterfinger Pie
Okay, the best part about this whole recipe is that you don’t need to run to some specialty store for these components. Everything here is standard stuff you can grab on your regular grocery run. I love that I can decide at 3 PM that I need a dessert for a 7 PM party, and I have everything I need right now. It feels like cheating, but I promise, nobody needs to compare notes on our supply run!
When you look at the list, remember that the quality of your peanut butter is key to that super creamy texture we are aiming for, which is why I always stick to the classic creamy kind. If you want to know more about why we keep our recipes simple and focused on real food, you can check out the story behind YumDrizzle right here: our philosophy.
Ingredients for the Chocolate Cookie Crust Pie
This crust is non-negotiable, folks! It’s the perfect chocolatey counterpart to all that creamy peanut butter goodness.
- 1 (14.3 ounce) package chocolate sandwich cookies (like Oreos—and yes, you use the whole cookie!)
- 6 tablespoons unsalted butter, melted
Ingredients for the Creamy Peanut Butter Pie Filling
Here’s where the richness comes from. Make sure your cream cheese is truly soft so everything blends up like silk for this incredible butterfinger pie.
- 1 (8 ounce) package cream cheese, softened
- 1 cup powdered sugar
- 1 cup creamy peanut butter
- 1 teaspoon vanilla extract
- 1 (12 ounce) container frozen whipped topping, thawed
- 1 cup Butterfinger candy bars, chopped
- 1/2 cup Butterfinger candy bars, crushed (this is for the topping later!)
Ingredient Notes and Substitutions for the Best Butterfinger Pie
Look, I know sometimes you get to the kitchen and realize you are missing *one* thing, and it throws the whole plan off! Don’t panic about this butterfinger pie. But—and this is important—a few small tweaks can make the difference between a great pie and the *best* pie.
First, let’s talk about the cream cheese. If you try to beat cold cream cheese, you end up with lumps, and lumps do not belong in a creamy peanut butter pie. Trust me on this one: leave that block out for at least 30 minutes before you start mixing. Those little air pockets that form make for silkier filling when you beat it.
Next, the peanut butter. You need the standard, shelf-stable, creamy kind—the kind that never separates. If you use a natural peanut butter where the oil separates on top, your filling will be oily, and that’s a disaster for a no-bake recipe. Skip the stirring if you want that dreamy texture.
What if you’re out of Oreos? Oops! You can swap in graham crackers for the chocolate cookie crust pie base, but you need to know this upfront: it changes the whole dynamic. The chocolate crust plays off the salty peanut butter really nicely, and you lose that punch when you go with graham. If you must substitute, use graham crackers, but maybe add a tablespoon of cocoa powder to the crumbs and melted butter to try and mimic that dark flavor!
Step-by-Step Instructions for Easy Butterfinger Pie
Alright, here’s where we pull it all together, and I promise you, we are cruising! We are going to knock out the prep work for this amazing butterfinger pie in right around 20 minutes. Seriously! Remember, this is a no-bake situation, which means we are relying on chilling time instead of oven time. That’s why technique matters for keeping things airy.
Preparing the Chocolate Cookie Crust Pie Base
First things first: we need those crumbs. Whether you use your food processor or you get some satisfying stress relief by crushing those chocolate sandwich cookies in a sturdy Ziploc bag with a rolling pin, get them fine! We want those little dark bits looking like sand.
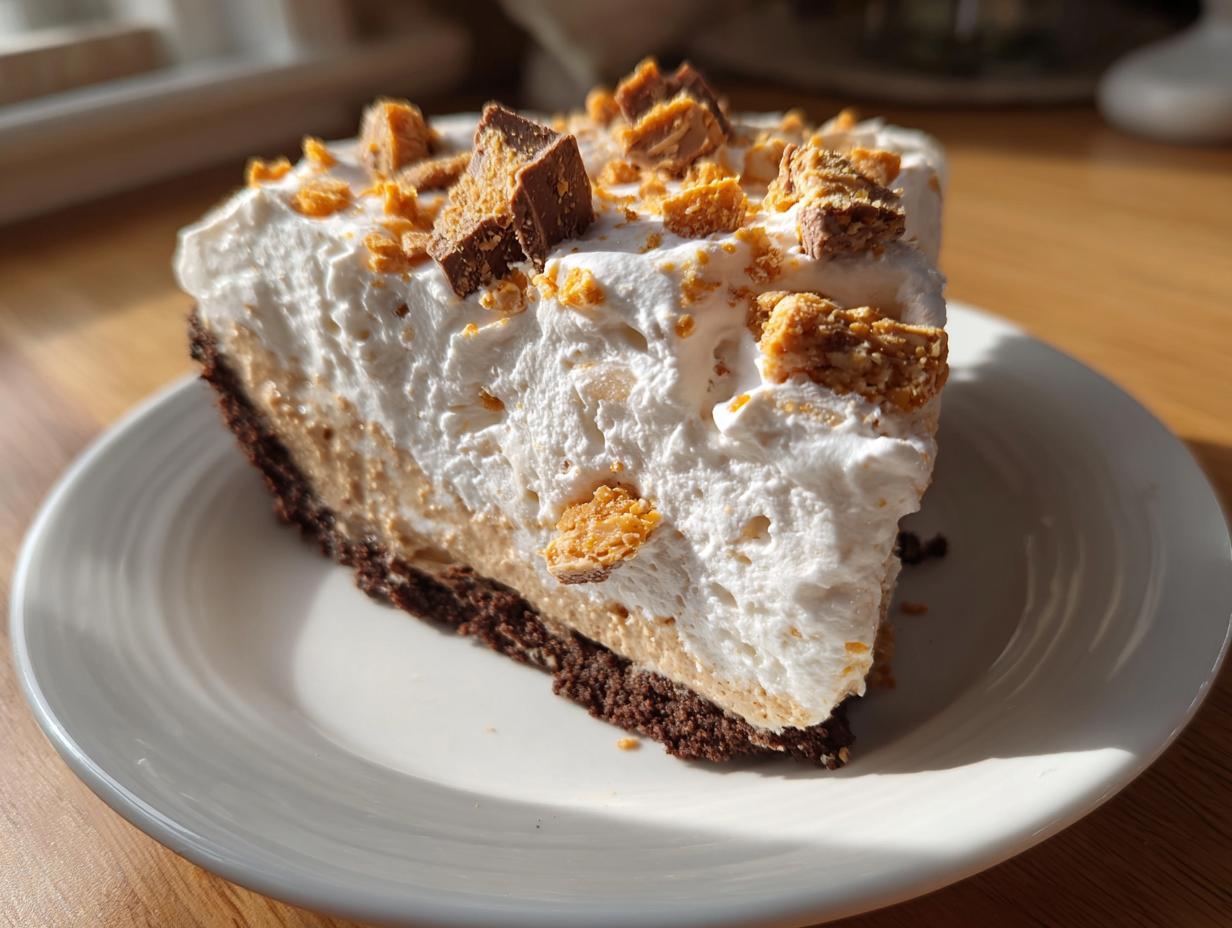
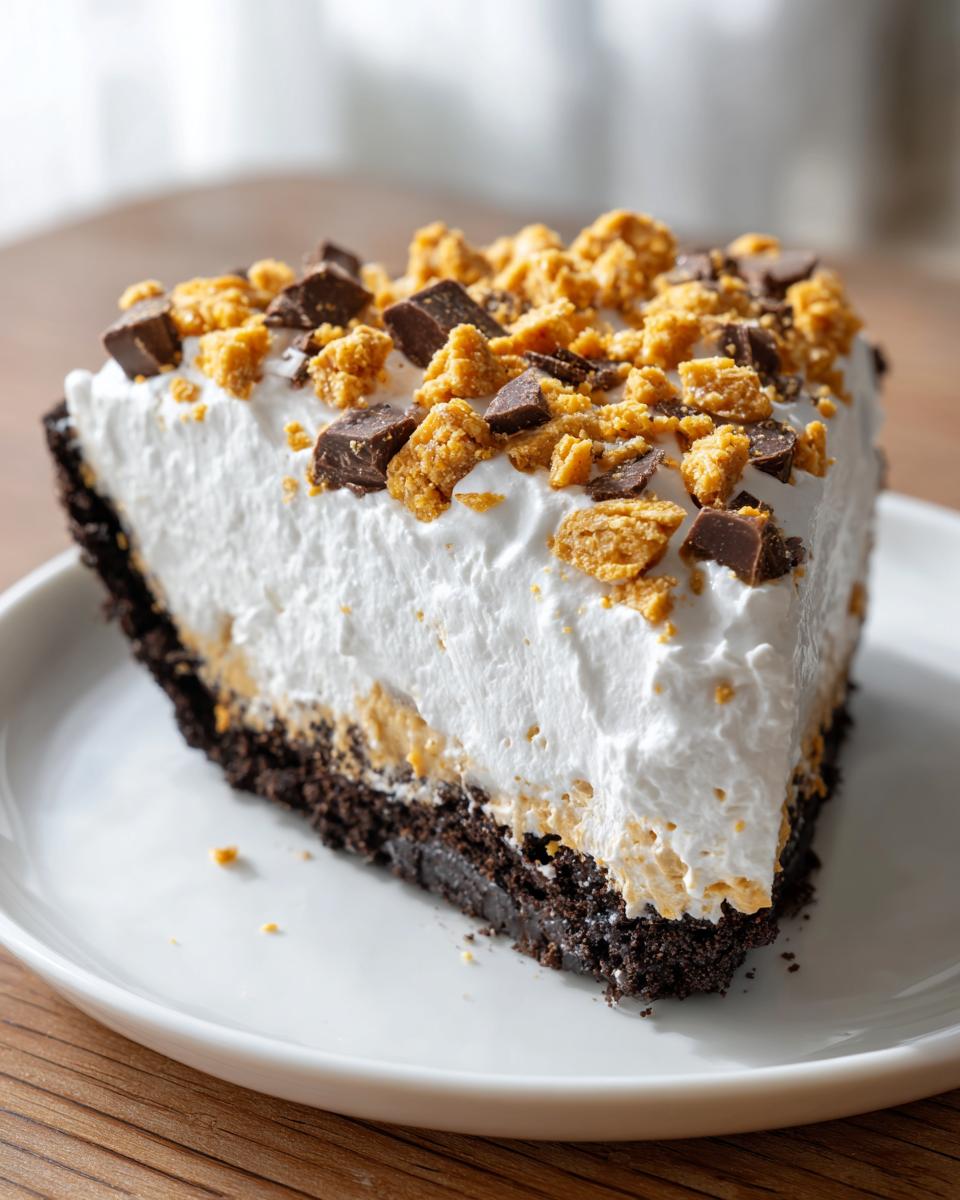
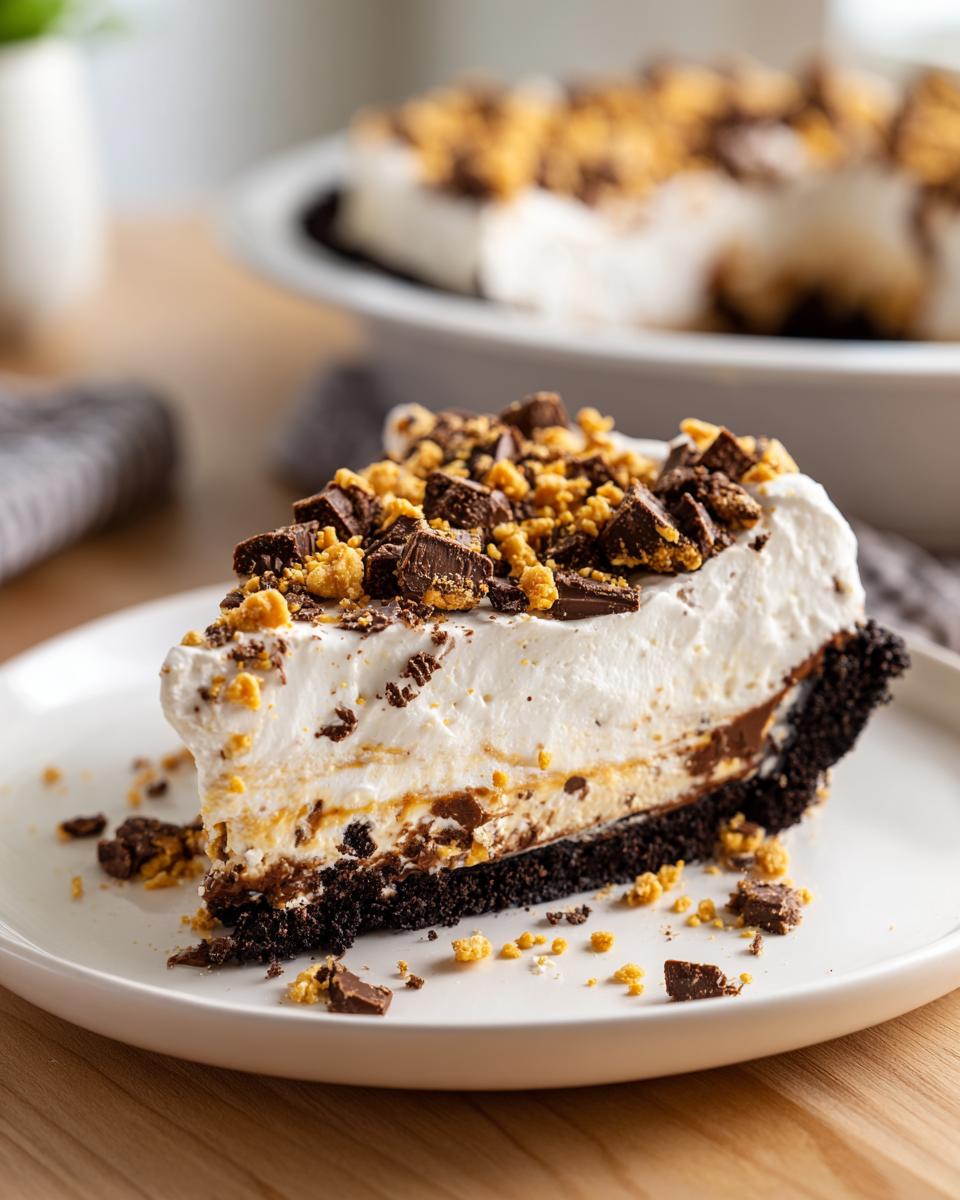
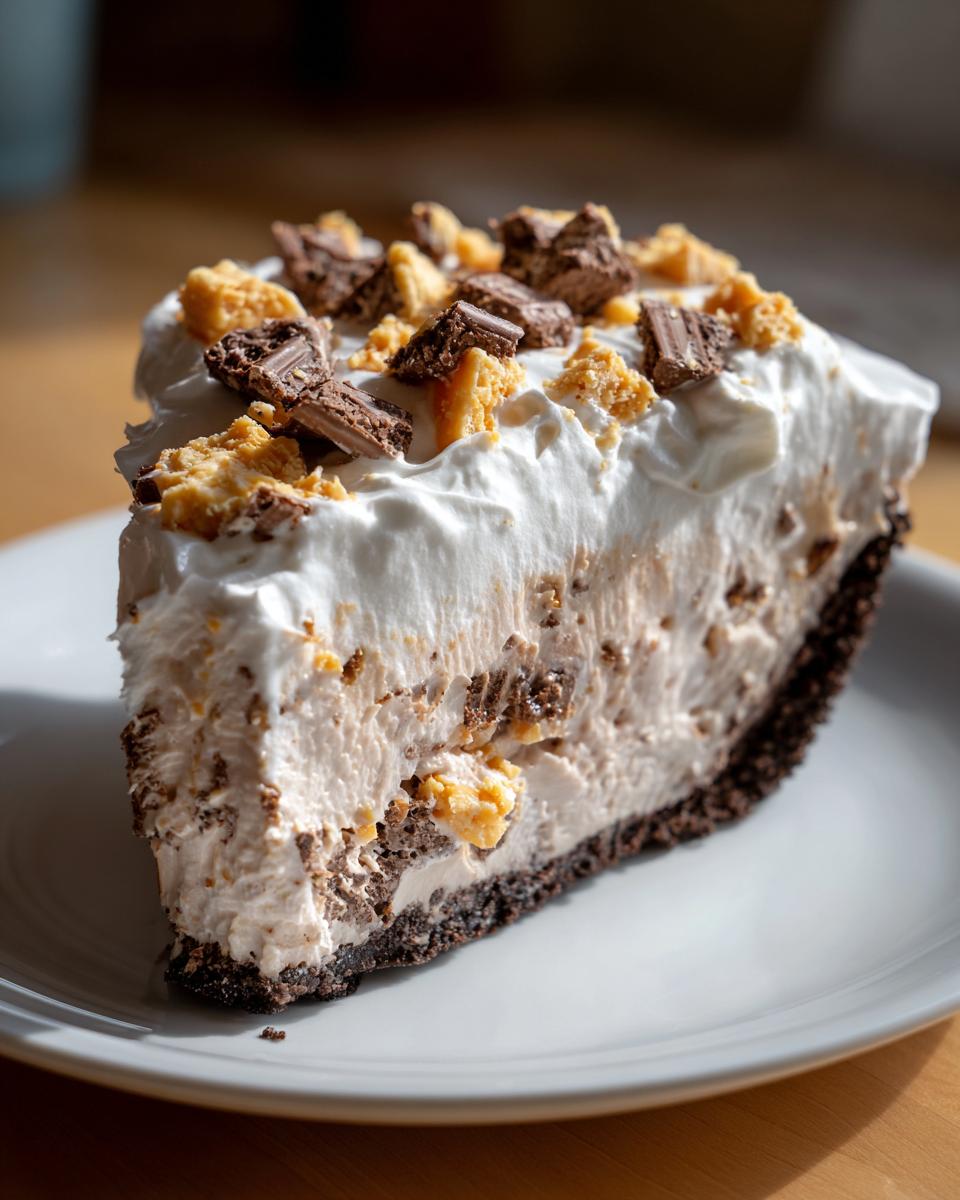
Next, drizzle in that melted butter and mix it around until everything is evenly damp. Look at that—it should clump nicely when you squeeze it between your fingers. Now, press this mixture right into your 9-inch pie plate. Use the bottom of a glass or measuring cup to really pack it down firmly on the bottom and up the sides. Once it’s tight, toss that crust into the freezer. It needs to chill while we make the filling, which brings us right to the next step!
Mixing the Dreamy Dessert Filling
Grab your biggest bowl! This is super important: beat that softened cream cheese by itself until it is totally smooth—no lumps allowed. Once it looks like soft icing, then you can slowly add in the powdered sugar and beat until that disappears too.
Now add the peanut butter and vanilla. Keep beating until the mixture is beautifully smooth, like a decadent spread. Here’s the make-or-break move for a light no bake butterfinger pie: Take your thawed whipped topping and gently, gently fold it in. I mean it—use a spatula and cut down the middle, sweep around the edge, and fold over. You are trying to keep all that air in there! If you mix it too hard, you lose the volume, and we end up with a dense brick instead of a creamy peanut butter pie. Once it’s just barely incorporated, fold in that first cup of chopped Butterfingers.
Assembling and Chilling Your Quick Candy Bar Pie
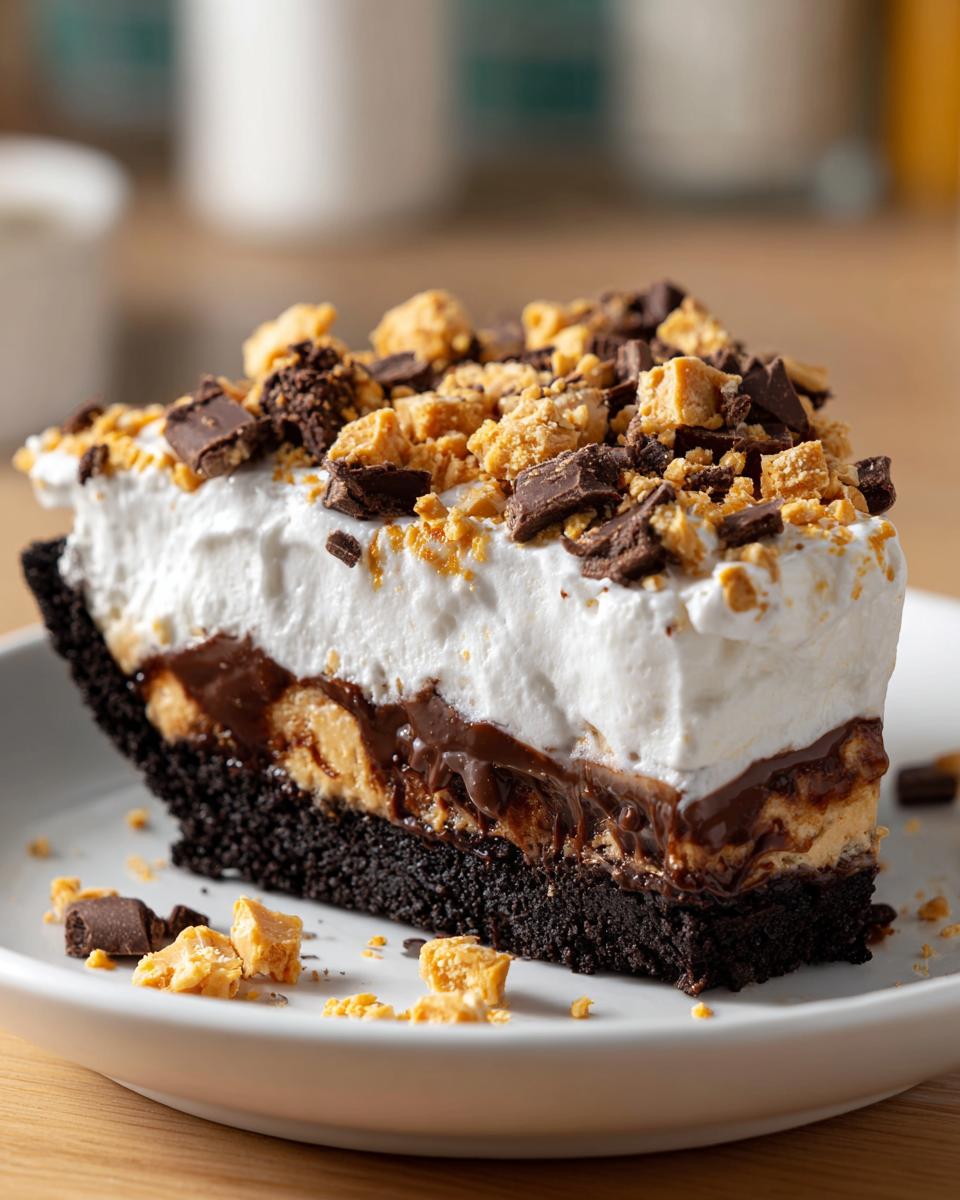
Time to layer! Spoon that wonderful, crunchy peanut butter filling straight into your chilled chocolate cookie crust. Smooth the top out nice and even. Then, take the rest of your whipped topping and spread it carefully over the filling layer. Make some pretty swirls if you’re feeling fancy!
Finally, shower the top liberally with the reserved crushed Butterfingers. That’s the visual cue that tells everyone what they are about to devour! Now, this pie needs time to firm up. You must chill it in the refrigerator for at least four hours to set properly. If you are in a huge rush (I get it!), you can freeze it for an hour or two to speed things up, but the chilling process gives the best texture. For more inspiration on easy, crowd-pleasing recipes, check out this great no-bake option.
Tips for the Best Butterfinger Pie Success
Even though this is a no-bake recipe, there are little pitfalls you can fall into that will ruin that perfect creamy texture or leave you with a crumbly mess. We want perfection, right? I’ve learned these tricks from trial and error, usually when I’m trying to rush things before a potluck, so listen up—these are the secrets to keeping your butterfinger pie in the “best ever” territory.
First up, let’s talk about the crust pressing. You need that chocolate base rock solid so it doesn’t shatter the second someone digs into it. Sure, you can use the bottom of a glass, but I swear by using a pastry blender or a sturdy fork when I press the crumbs down, especially right in the corners. It gives you better leverage and keeps your fingers clean. Make sure it’s packed tight!
My second HUGE tip is related to the main candy star itself. Don’t chop those Butterfingers the night before. If you chop them too early, those candy bits start to absorb moisture from the air, or worse, they start to get gooey and sticky. You want that lovely, dry crunch folding into your filling, not a sticky mess. Chop them up literally right before you fold them into the peanut butter mixture—it’s worth those extra 30 seconds.
Speaking of the peanut butter, I mentioned it before, but it bears repeating because it’s *that* critical for a stable filling: stick with the shelf-stable, creamy brand. If you use a natural peanut butter, the oil will separate out when you mix it with the cream cheese and whipped topping, and honestly, we’ll end up with a greasy, soup-like texture instead of a sliceable icebox pie. Trust me, no one wants an oily dessert.
Lastly, when it comes time to chill, do not cut corners. You need that minimum four hours for the stabilizers (cream cheese and whipped topping) to do their job. A pie that hasn’t chilled long enough will look lovely when you pull it out, but the first slice will be a delicious puddle on the plate! If you need speed, freeze it for two hours, but let it sit on the counter for ten minutes before slicing. For more fantastic, easy dessert ideas, take a peek at what my buddies over at The Gracious Wife are baking up with this favorite no-bake pie recipe.
Serving Suggestions for Your Indulgent Dessert
This butterfinger pie is already so rich and satisfying all on its own, which is why it’s become my all-time favorite for potluck desserts. It’s the kind-of-pie that needs nothing extra, honestly. But if you want to dress it up just a touch for a big family gathering, go for simple flavors that echo the richness.
A light drizzle of good quality caramel sauce right before serving gives it an extra gooey factor that screams decadence. Or, since we used a chocolate crust, a tiny bit of whipped cream on the side or even some small chocolate shavings on top can look really nice. Honestly though, this creamy peanut butter dessert usually disappears before anyone even thinks to ask for a side topping!
Storage and Reheating Instructions for this Butterfinger Dessert
Since this pie is all about that creamy, cool texture, storage is actually really easy, but you have to treat it right! Remember, this is a frozen/chilled dream—an official icebox pie—so we definitely aren’t going to try to reheat it. Trying to warm up whipped topping and cream cheese sounds like a culinary disaster waiting to happen, trust me!
The best way to keep this butterfinger dessert fresh is wrapped tightly in plastic wrap or stored in an airtight container in the refrigerator. It holds up wonderfully! You can expect it to be delicious for about three to four days. Anytime after that, the crust starts to soften up a bit too much, and honestly, a pie this good never lasts that long in my house anyway!
Now, if you want to make it ahead of everyone, freezing is your friend! Wrapping the whole pie tightly (plastic wrap, then foil) and freezing it solid works perfectly. It’s a great way to prep for an upcoming holiday pie recipe. When you pull it out, though, give it a little time to soften up on the counter—maybe 20 to 30 minutes—before you try to slice it. If you slice it rock-hard, you’ll crush the bottom crust. It maintains that awesome flavor even when semi-frozen, making it a great alternative for a frozen pie recipe!
Frequently Asked Questions About No Bake Butterfinger Pie
I know you might still have questions bubbling up—it happens every time I try a new butterfinger dessert! That’s totally fine; that’s why I put this section here. We want you to feel 100% confident pulling this beautiful, easy pie out of the fridge. Ask away, and let’s clear up any doubts so you can get to the eating part!
Can I use a pre-made graham cracker crust instead of a chocolate cookie crust pie?
You absolutely can, especially if you are trying to go for a lightning-fast simple no bake achievement! If you use a pre-made graham cracker crust, you save yourself that first 5 minutes of crushing cookies, which is great. However, I have to be honest with you: this butterfinger pie really sings when it has that deep, slightly bitter chocolate crust flavor playing against the sweet peanut butter. So yes, you *can* use graham crackers, but you might find you miss that satisfying dark crunch!
How long does this creamy peanut butter pie need to chill?
This is the area where you cannot cheat, my friends! Because this is a no bake butterfinger pie filling stabilized with cream cheese and whipped topping, it needs time to firm up so you can actually slice it neatly. I always insist on a minimum of four hours in the refrigerator. That gives the filling enough time to get perfectly set—not too soft, not too hard. If you rush it, you’ll end up scooping a glorious, delicious mess onto your plate. If you need faster results, you can move it into the freezer for about two hours, but make sure you let it warm up just a touch before serving so it’s not rock hard.
Can I make this a frozen pie recipe?
Yes, you definitely can treat this like a true frozen pie recipe! After you assemble the whole thing—crust, filling, topping, and the final sprinkling of candy—just cover it tightly with plastic wrap and foil and pop it in the freezer until it’s solid. It freezes beautifully, which is fantastic news for making ahead of time for the holidays or big family gathering dessert planning.
When you are ready to serve it straight from the freezer, just plan on letting it sit on the counter for about 15 to 20 minutes before slicing. That little bit of softening time brings back just enough creaminess so it’s not quite ice block territory. If you want more fun ideas for candy treats that pack a punch, check out this great recipe roundup here. If you have more questions after you try it out, please feel free to get in touch with me through my contact form!
Estimated Nutritional Data for This Indulgent Dessert
Now, I know some of you are watching macros, though let’s be real—a decadent butterfinger pie usually isn’t the first thing we reach for when counting carbs! But just so you know what you’re getting into with this glorious dessert, here’s the nutritional breakdown based on the standard recipe above. Since we are using rich ingredients like peanut butter and chocolate cookies, it definitely counts as an indulgent dessert!
Remember, these numbers are estimates based on our ingredient measurements and one standard slice serving size. If you cut massive wedges (which, no judgment here!), your numbers will shift! Also, if you swap out the Oreos for something else or use a different kind of peanut butter, these figures will change slightly. But overall, this gives you a good picture of what you’re enjoying!
- Serving Size: 1 slice
- Calories: Approximately 450
- Sugar: Around 35g
- Fat: Roughly 28g
- Saturated Fat: About 10g
- Carbohydrates: Near 45g
- Protein: About 7g
See? Worth every delicious bite! If you’re ever worried about what goes into our recipes, you can always check out our full site policies for transparency. Enjoy this spectacular quick candy bar pie!
Share Your Experience with This Quick Candy Bar Pie
Whew, we made it to the end! I hope you’re already running to the kitchen to whip up this super simple, no bake butterfinger pie. I truly believe that these kinds of quick, satisfying desserts—the ones that rely on great candy bars and creamy fillings—are what home cooking is all about. They bring people together without any fussy steps!
Now that you’ve made this easy dessert, I really, really want to hear about it! Did you manage to stick to the 20-minute prep time? Did you use the standard chocolate crust, or did you try that graham cracker swap we talked about? I always love to see how everyone makes these recipes their own.
Please take a moment to drop a rating right below this section—even just five stars tells me you loved this creamy peanut butter pie! And if you snapped a picture of your finished masterpiece, share it with me! Tag me on social media or leave a comment sharing your favorite part. We read every single one, and your feedback helps me keep creating more accessible, fun recipes like this one.
If you need a refresher on using the site or want to check out the legal side of things, you can always review our Terms of Use. Now go enjoy that slice of heaven!
PrintEasiest No-Bake Butterfinger Pie (Ready in 20 Minutes!)

Make this quick, creamy, no-bake Butterfinger Pie using a chocolate cookie crust. It is a simple, indulgent dessert perfect for potlucks and family gatherings.
- Prep Time: 20 min
- Cook Time: 0 min
- Total Time: 4 hr 20 min
- Yield: 8 servings 1x
- Category: Dessert
- Method: No Bake
- Cuisine: American
- Diet: Vegetarian
Ingredients
- 1 (14.3 ounce) package chocolate sandwich cookies (like Oreos)
- 6 tablespoons unsalted butter, melted
- 1 (8 ounce) package cream cheese, softened
- 1 cup powdered sugar
- 1 cup creamy peanut butter
- 1 teaspoon vanilla extract
- 1 (12 ounce) container frozen whipped topping, thawed
- 1 cup Butterfinger candy bars, chopped
- 1/2 cup Butterfinger candy bars, crushed (for topping)
Instructions
- Crush the chocolate sandwich cookies until fine crumbs form. You can pulse them in a food processor or place them in a sealed bag and crush them with a rolling pin.
- Mix the cookie crumbs with the melted butter until fully combined. Press this mixture firmly into the bottom and up the sides of a 9-inch pie plate. Place the crust in the freezer while you prepare the filling.
- In a large bowl, beat the softened cream cheese until smooth. Add the powdered sugar and beat until combined.
- Add the peanut butter and vanilla extract to the cream cheese mixture. Beat until the filling is smooth and creamy.
- Gently fold half of the thawed whipped topping into the peanut butter mixture until just combined. Do not overmix.
- Fold in 1 cup of the chopped Butterfinger candy bars.
- Spoon the filling evenly into the chilled chocolate crust. Spread the remaining whipped topping over the filling.
- Sprinkle the remaining 1/2 cup of crushed Butterfinger bars over the top layer of whipped topping.
- Chill the pie in the refrigerator for at least 4 hours, or until firm. For a faster set, you can freeze it for 1 to 2 hours.
- Slice and serve this quick candy bar pie.
Notes
- If you do not have a food processor, place cookies in a zip-top bag and crush them using a rolling pin for the chocolate cookie crust.
- For the creamiest texture, let your cream cheese sit at room temperature for about 30 minutes before starting.
- This recipe works well as an icebox pie; it sets up nicely after chilling.
Nutrition
- Serving Size: 1 slice
- Calories: 450
- Sugar: 35g
- Sodium: 300mg
- Fat: 28g
- Saturated Fat: 10g
- Unsaturated Fat: 18g
- Trans Fat: 0.5g
- Carbohydrates: 45g
- Fiber: 1g
- Protein: 7g
- Cholesterol: 35mg