
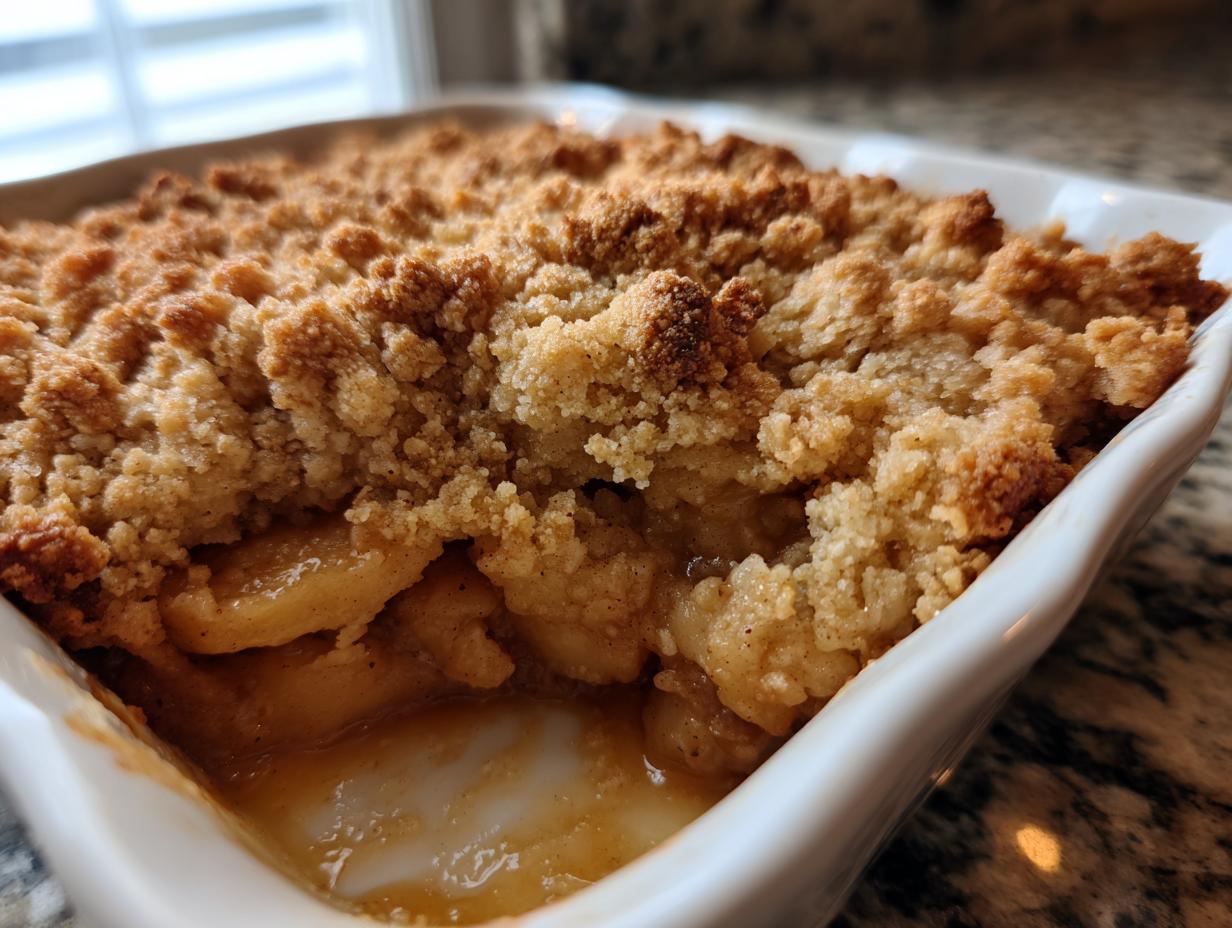
Listen, if there is one smell that instantly transports me back to crisp autumn evenings—maybe hiding backstage waiting for soundcheck, or maybe visiting my aunt’s house—it’s baking apples sprinkled with cinnamon. That rich, warm aroma is just pure nostalgia. Out here at YumDrizzle, we cut through the noise because making amazing food, like the absolute best apple crisp recipe, shouldn’t feel like homework. Forget those complicated dessert recipes you see clogging your feed! I’m giving you the one I use, the totally foolproof method for a truly classic apple crisp. It’s got that perfect balance of tender, spiced apples and the most incredible, buttery oat topping you’ve ever tasted. If you loved my recipe for the best classic apple pie recipe, you are going to fall head over heels for this one. Trust me, this one is a keeper for fall gatherings.
- Why This is the Best apple crisp recipe You Will Ever Make
- Ingredients for Your Classic apple crisp recipe
- How to Prepare This easy apple crisp
- Tips for the Perfect apple crisp recipe Every Time
- Serving Suggestions for this warm apple dessert
- Storage and Reheating Instructions for your homemade apple crisp
- Frequently Asked Questions about the apple crisp recipe
- Nutritional Estimates for This apple crisp recipe
- Share Your Apple Crisp Success
- Nutritional Estimates for This apple crisp recipe
- Share Your Apple Crisp Success
Why This is the Best apple crisp recipe You Will Ever Make
I know, I know, everyone says their recipe is the best. But honestly, after years of trying every version out there—on the road and sitting at home—this one nails what you actually want in a dessert. It’s the quintessential best apple crisp recipe. It just works, every single time you pull it out of the oven.
- The apples hit that sweet spot: tender, but they still have a little bite, perfectly balanced between tart and sweet.
- That topping? It’s pure gold. It comes out beautifully golden, buttery, and stays perfectly crunchy. No sad, soggy patches here!
- It’s quick! Seriously, we are talking about maybe 15 minutes of prep for this amazing comfort food dessert. If you loved my carrot cake recipe, you already know I value texture, and this crisp delivers that crispy heaven.
The Secret to a Foolproof apple crisp recipe
The absolute key to avoiding that frustrating soggy bottom is all in the topping technique. You have to cut in the butter while it’s still super cold. Don’t even think about using melted butter! You want those little pea and lentil-sized chunks of cold butter scattered throughout the oats. When those cold bits hit the hot oven, they steam the topping from the inside out, creating space and structure. That space is what keeps your topping crisp instead of just baking into a dense, sweet square.
Ingredients for Your Classic apple crisp recipe
Okay, let’s get straight to what you need. When Jaxson says ‘classic,’ he means using ingredients you already have in your pantry. We aren’t sourcing Peruvian mountain berries here; we’re making real, honest-to-goodness comfort food you can whip up tonight. Having everything measured out—this is what the pros do—keeps the process smooth. You’ll want to separate your ingredients into the apple base and that incredible, buttery oat topping recipe you’re dreaming about.
If you’re looking for another amazing fall flavor to try later, check out how to make easy slow-cooker spiced pear butter. But first, apples!
For the Apple Filling
This part is simple: we want apples that hold their shape but still get tender. I always grab a mix of tart and sweet. Granny Smiths are my favorite because they provide that necessary sharpness to cut through the sweetness of the brown sugar in the topping. You need about 6 large apples, which should fill up your baking dish nicely.
- 6 large baking apples (I swear by Granny Smith or Honeycrisp), peeled, cored, and sliced
- 1/4 cup granulated sugar
- 1 tablespoon all-purpose flour
- 1 teaspoon ground cinnamon
- 1/4 teaspoon ground nutmeg
- 1 tablespoon lemon juice
For the Buttery oat topping recipe
This is where the magic happens! The key to that crispy apple topping that doesn’t turn into mush? Cold butter. Keep it fridge-cold and cut it into little cubes before you start mixing. This ensures those lovely pockets of fat stay separate until they melt in the oven.
- 1/2 cup all-purpose flour
- 1/2 cup packed light brown sugar
- 1/2 cup old-fashioned rolled oats
- 1/4 teaspoon ground cinnamon
- 1/4 teaspoon salt
- 1/2 cup (1 stick) cold unsalted butter, cut into small pieces
How to Prepare This easy apple crisp
You’re going to love how quick this goes together. When I was hitting the road all those years, needing a good meal fast was rule number one. This is exactly why this recipe works so well for busy weeknights or when you’re suddenly invited to a potluck. It’s truly an easy apple crisp that delivers huge flavor payoff for minimal input. Get your baking dish ready, and let’s get the apples mixing. In about an hour, your house is going to smell like the best autumn festival you can imagine! If you need another quick win for entertaining, check out my easy pizza sliders recipe for a totally different kind of crowd-pleaser.
Preparing the Apples and Dish
First things first: get that oven cranked up to 375°F (190°C). Don’t wait until the apples are cut! While the oven warms up, take a little butter or cooking spray and grease your 8×8 inch baking dish. Make sure you get the corners nice and slick.
Now for the wet part. Grab your big mixing bowl—the one you used for the apples in the previous section—and toss in all those beautiful coated apple slices. Make sure everything is spread out in a single, even layer in that greased dish. We want the heat circulating evenly, so don’t let one side get piled up too high.
Creating the Buttery oat crumble topping
Time to switch bowls for the topping! Combine all the dry elements: the flour, brown sugar, oats, cinnamon, and salt. Give those a quick whisk just to make sure the flavors are introduced to each other. Now comes the fun, messy part—the butter! Toss in those small cubes of super cold butter. You need a pastry blender, or you can use your hands. Honestly, using your fingertips is how I learned to cook, so don’t be shy!
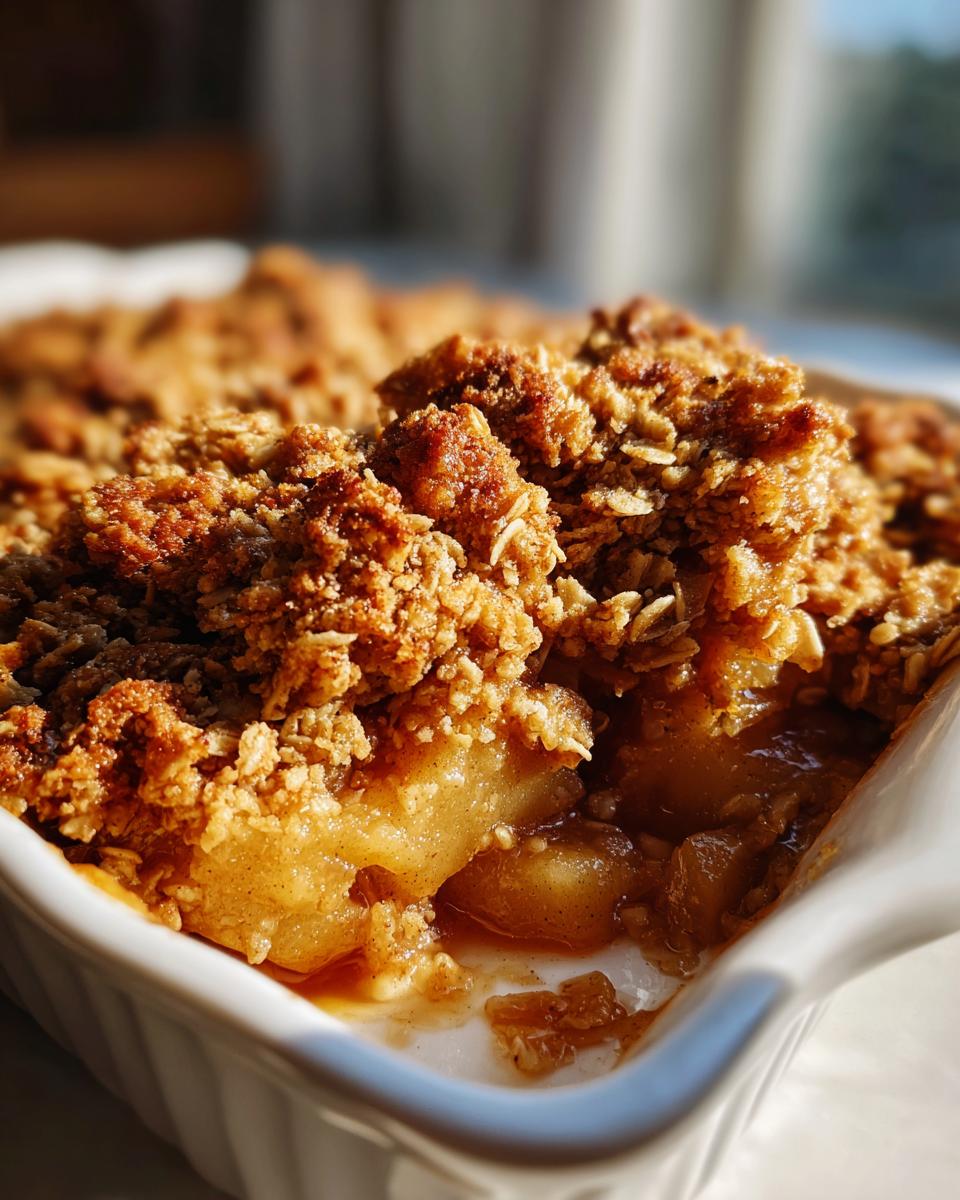
You are ‘cutting in’ the butter until the whole mixture looks like uneven crumbs. I mean it: look for some larger, pea-sized lumps of butter still floating around in there. Those little pockets of fat are your insurance policy against a soggy bottom. If you can’t see any distinct butter chunks, you’ve mixed too much. Once you have that coarse, crumbly texture, just sprinkle it evenly right over those apples. You can gently press it down a bit, but don’t pack it!
Baking and Resting the apple crisp recipe
Into the oven it goes! Bake this beauty for 40 to 45 minutes. You’re looking for two major signs of doneness: first, the topping should be gloriously golden brown all over. Second, you need to see the apple filling bubbling up thick and lush around the edges. If you gently poke a piece of apple with a fork or a knife tip, it should feel tender, not rock-hard.
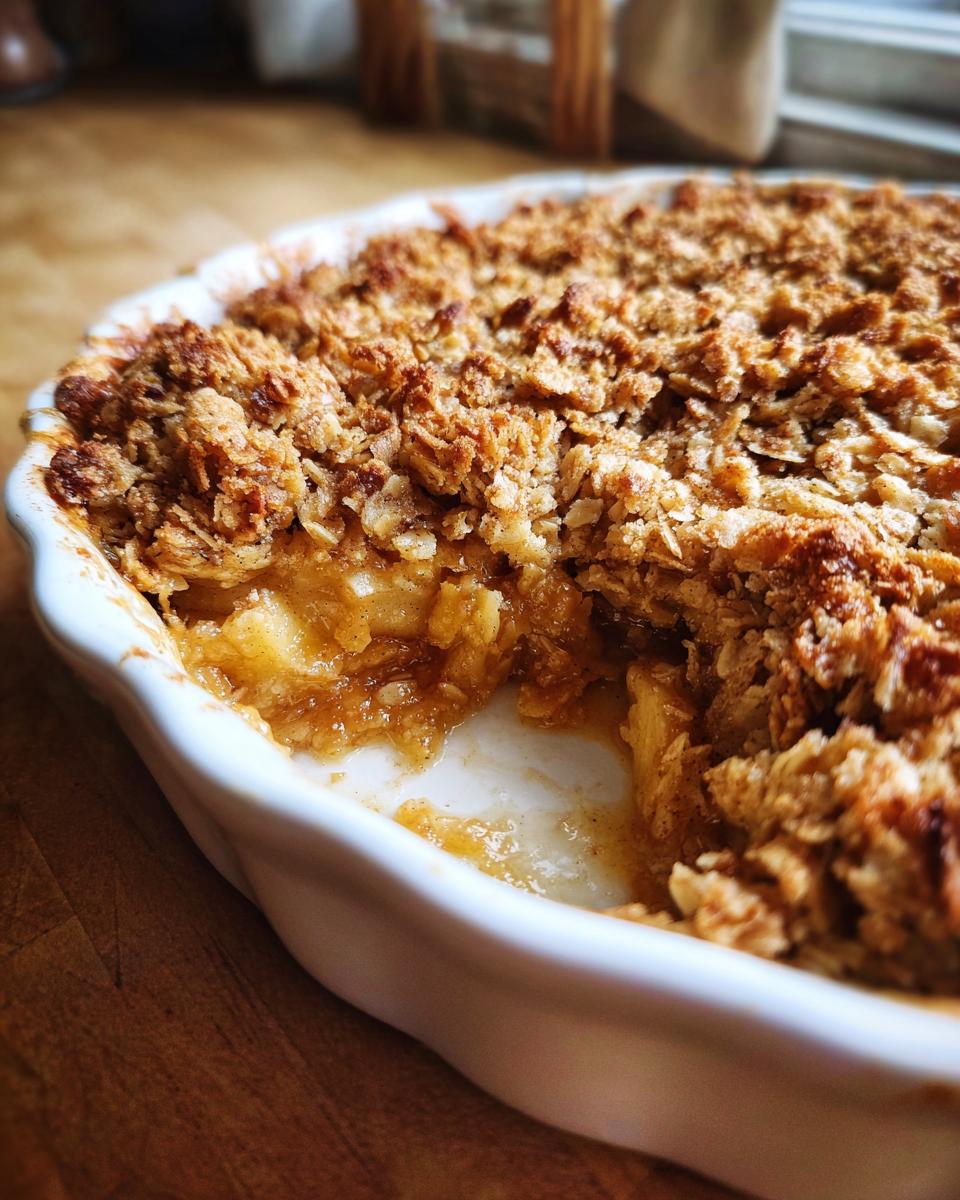
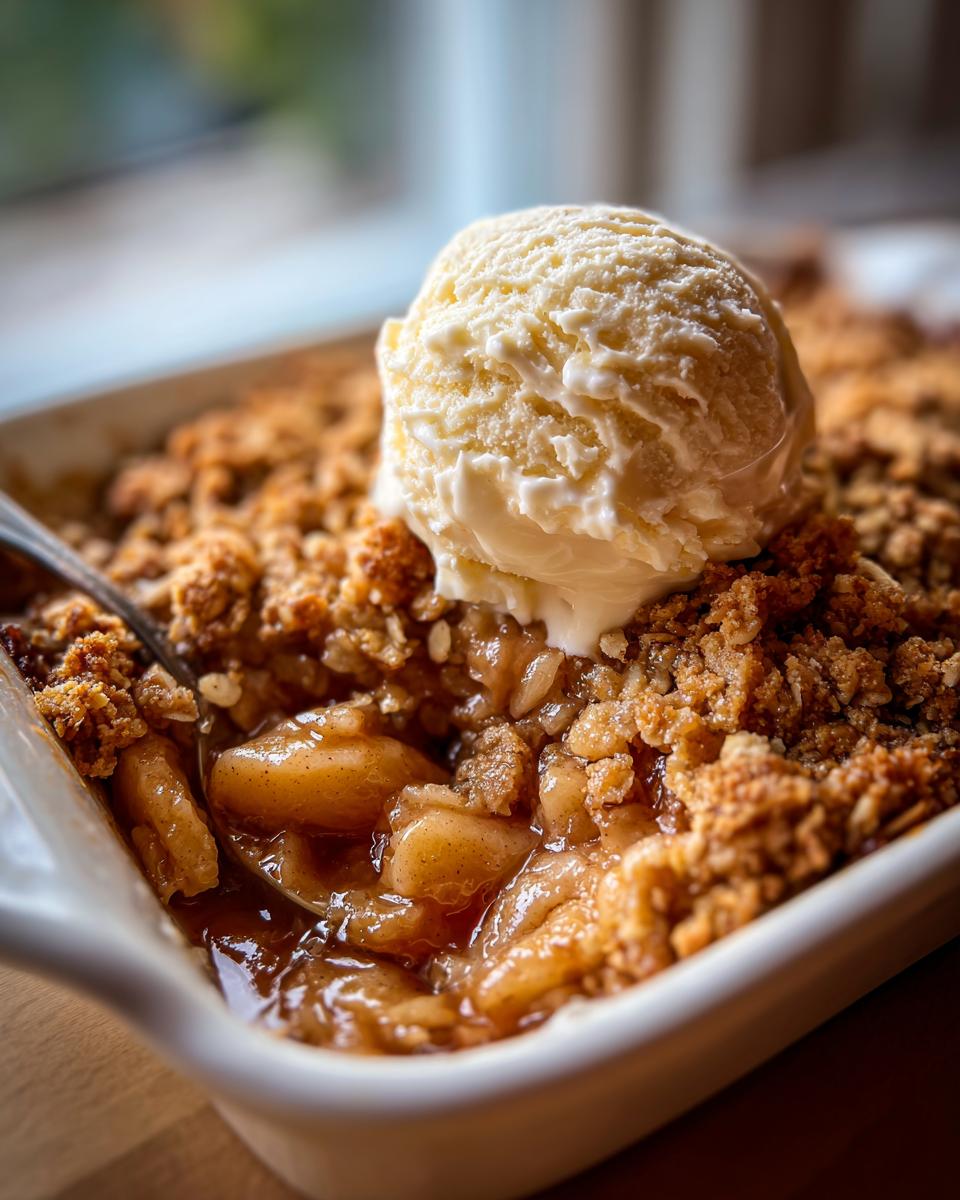
This next step is tough when you’re drooling over the smell, but it’s crucial for any good apple crisp recipe. Once it comes out, you absolutely must let it rest on a wire rack for a minimum of 15 minutes. If you serve it straight out of the oven, the filling will just run everywhere like soup. Resting lets those hot juices thicken up properly. Then, and only then, can you go grab that scoop of ice cream!
Tips for the Perfect apple crisp recipe Every Time
Even though I’ve promised you this is foolproof, sometimes the universe throws you a curveball, right? Since I spent so much time trying to perfect every component of this dessert while touring, I’ve learned exactly what to watch out for. Getting a flawless apple crisp recipe is really about respecting the structure of the topping versus the moisture of the filling. We want contrast! If you’ve ever made one only to have the topping disappear into sweet apple sauce, you know the heartbreak.
If you are whipping up my famous cinnamon apple crisp for a party, a little advanced prep can make things seamless. For more cookie inspiration after you master this crisp, check out my guide on making classic soft and chewy peanut butter cookies. Baking is all about adapting!
Apple Selection for Your cinnamon apple crisp
This is where people often miss the mark. If you use apples that are too soft—like McIntosh—they break down too quickly in the oven and turn into pure mush, which feeds moisture right up into your perfect oat topping. Bad move! You want something firm that can stand up to the heat. I always recommend Granny Smith because that tartness gives you a bright, beautiful flavor hit against all that rich brown sugar. Honeycrisp is a great sweeter option that still holds its shape well.
If you end up with slightly fewer apples than the recipe calls for, seriously, don’t panic. Just use an 8×10 pan instead of the 8×8, and know that you might need to shave five minutes off the baking time. It cooks faster because the apples are in a thinner layer. For more inspiration from bakers who really focus on the details, I always check out resources like Finger Licking Recipes.
Achieving Maximum Crispiness in the oat crumble topping
I warned you earlier, but this deserves its own moment. Cold butter, cold butter, cold butter! If your butter is soft, it just mixes right into the flour and sugar, creating a pastry dough rather than a crumble. That leads to a dense, heavy layer that steams the apples underneath, ending in sogginess.
When you are incorporating it, stop mixing the second you see that coarse, uneven texture. That means you have pea-sized chunks of butter that will sizzle and create pockets of air as they melt. If you handle the topping too much with warm hands or mix it until it looks uniform and sandy, you’re losing the fight before it even gets into the oven. Keep it cold, keep it crumbly, and your topping will stay crisp right through to the last spoonful!
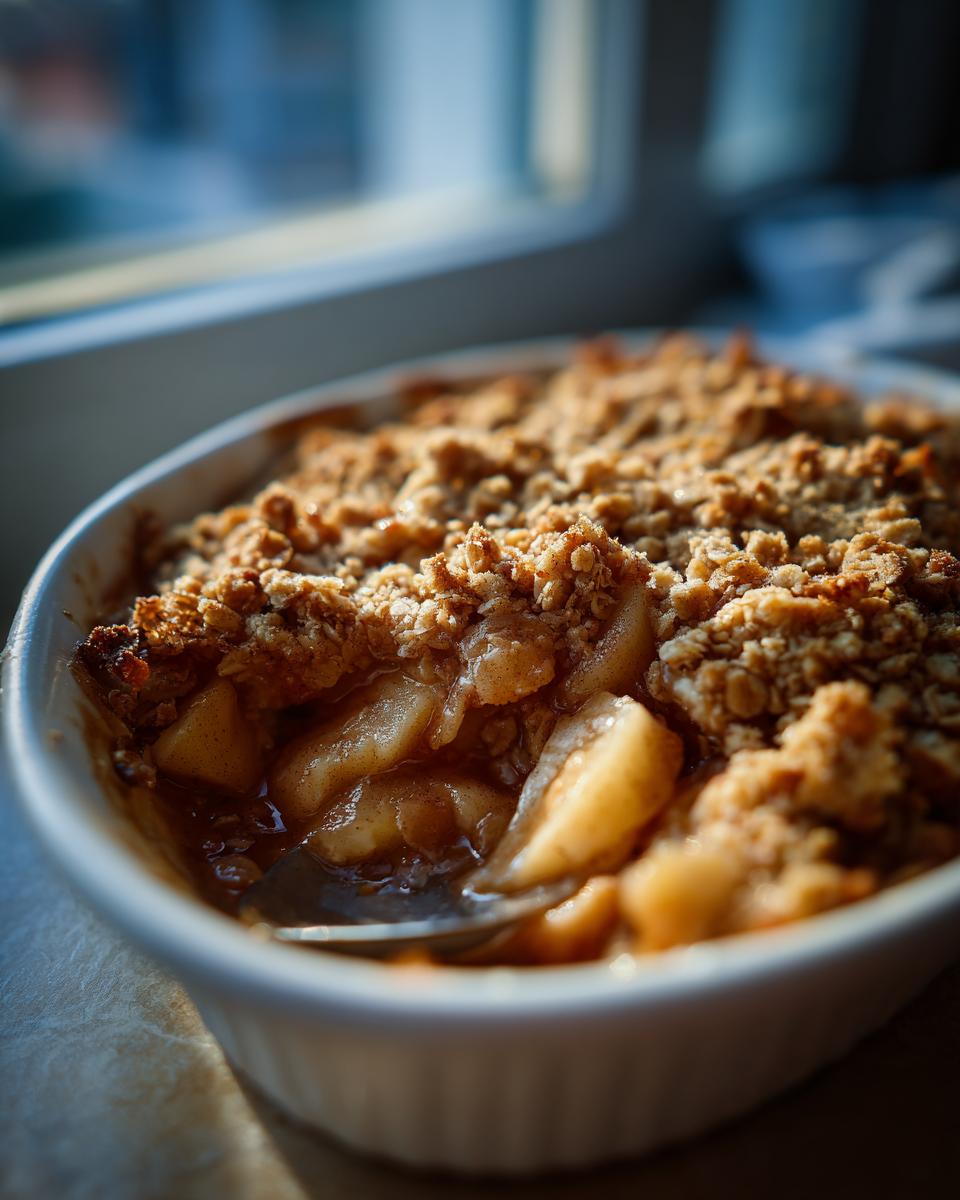
Serving Suggestions for this warm apple dessert
Alright, the hard part is over! You let it rest, and now it’s time to dig in. Nothing—and I mean nothing—beats a heaping scoop of really good, rich vanilla ice cream melting right into the hot, bubbling fruit. That contrast between the hot apple dessert and the cold, creamy topping is peak comfort food desserts experience. If you aren’t an ice cream fan, a drizzle of heavy cream or even some thick Greek yogurt works great too.
If you’re whipping this up for a big crew during the holidays, check out my recipe for Thanksgiving punch to go alongside it! For another great warm treat idea, I saw an incredible apple crisp with vanilla ice cream video over at Natasha’s Kitchen that definitely nails the aesthetics, too. See the video here!
Storage and Reheating Instructions for your homemade apple crisp
Look, sometimes you just can’t finish off an entire 8×8 pan of glorious baked apples and oat crumble in one sitting—though Lord knows I’ve tried! The great news about this homemade apple crisp is that it travels well to the next day, and it holds up better than a pie crust, frankly. When I was cooking on the road, knowing how to store leftovers properly meant we could enjoy them later without wasting any of that hard-won flavor.
Keep it covered! If you’re eating it within a day or two, storing the crisp right on the counter at room temperature is totally fine, especially if you have a cool kitchen. Just make absolutely sure it’s covered tightly with plastic wrap or foil so the delicious cinnamon aroma doesn’t take over your whole fridge space. For longer storage, definitely bring it into the fridge; it will last about four or five days that way.
Bringing Life Back to the Topping
Here’s the absolute crucial tip for leftovers: reheating can sometimes turn that beautiful oat crumble topping a little soft. We don’t want soft, we want crisp! So, forget the microwave for this, unless you only want hot apple mush. The best way to restore that crunch is by popping it back into a 350°F oven for about 10 to 15 minutes.
If you’re just reheating a small piece in a toaster oven, watch it closely so the topping doesn’t burn! If you feel like the topping is getting *too* brown while the filling heats up, just sneak a little piece of foil loosely over the top for the last five minutes. That gentle heat restores the texture without drying out the apples too much. It’s almost as good as fresh out of the oven, I promise. For more cheesy comfort right before or after a crisp binge, you have to try my recipe for easy beer cheese dip!
Frequently Asked Questions about the apple crisp recipe
I get emails all the time asking for quick clarification on a few things. It’s like when I was on the road, musicians always had rapid-fire questions before a show! Since I want this apple crisp recipe to be ridiculously easy for you, let’s tackle the most common queries right here, so you can get baking without any head-scratching delays. If you’ve got more questions after trying this, let me know in the comments below, or check out some great tips from others over at The Meal Journal.
Can I make this ahead of time?
Yes, you absolutely can! This is a game-changer for hosting. You can assemble the entire thing—apples mixed, topping sprinkled on top—in your baking dish, cover it tightly with plastic wrap, and pop it in the fridge for up to 24 hours. When you’re ready to bake, just pull it out while the oven preheats. You might need to add about 5 to 10 extra minutes to the baking time since the filling starts out cold. It’s perfect for getting a jump start on your fall dessert recipes!
What apples are best for this cinnamon apple crisp?
I’ve mentioned this before, but it bears repeating: firmness is key! You need apples that won’t dissolve into sludge. Stick to firm, tart varieties like Granny Smith or Honeycrisp. If you use something softer, the moisture will leach out too much, and you’ll end up with a soupy bottom layer. For the best flavor contrast in your cinnamon apple crisp, a mix of tart and slightly sweet apples always wins for me!
Can I freeze this crunchy apple topping on its own?
This is a great question if you want extras on hand! You can totally freeze the topping mixture separately. Prepare the **buttery oat topping recipe** mixture, then spread it out on a parchment-lined baking sheet. Freeze it solid, then transfer the frozen crumbles to a sealed freezer bag. It’ll last for a couple of months. When you want to use it, just sprinkle the frozen topping right over your prepared, unbaked apples and add about 10 minutes to the baking time. It’s a brilliant shortcut for a quick apple dessert!
Can I use quick oats instead of rolled oats?
You can, but I won’t pretend it’ll be the same! Quick oats are very finely milled, which means the resulting topping will be softer and less distinctively crunchy. For that satisfying “crisp” element we all crave—the one that makes this the *best* crisp—you really want the texture and chew of old-fashioned rolled oats. If you’re going to the trouble of making an apple crisp from scratch, use the rolled oats; they are worth it for the texture.
If you’re looking for other easy make-ahead meals when you’re short on time, my recipe for easy canned salmon salad for sandwiches is another one that comes together in a flash!
Nutritional Estimates for This apple crisp recipe
Look, this is a dessert, right? It’s made with real butter and brown sugar because when you’re craving comfort food desserts, you shouldn’t have to compromise on flavor! The following numbers are just estimates based on the ingredients listed above in an 8×8 dish divided into 6 servings. Don’t sweat the details too much—just enjoy!
- Serving Size: 1 serving
- Calories: 380
- Sugar: 32g
- Sodium: 110mg
- Fat: 20g
- Saturated Fat: 12g
- Carbohydrates: 50g
- Protein: 4g
Share Your Apple Crisp Success
I put my heart into making sure this classic apple dessert is easy, accessible, and delicious, and I truly hope it brings some cozy goodness into your kitchen. That’s what YumDrizzle is all about—making real food fun again! If you tried this recipe out, please do me a huge favor and leave a star rating right down below in the comments section. It lets me know what’s working, and it helps other home cooks find reliable recipes when they need a fantastic warm apple dessert.
Did you serve it with ice cream? Did you swap out any spices? I want to hear everything! We’re building a community here, and every piece of feedback helps us all get better in the kitchen. If you need anything else, don’t hesitate to reach out using my contact page. Happy baking!
Nutritional Estimates for This apple crisp recipe
Look, I know when you’re looking up an apple crisp recipe, you aren’t exactly expecting a salad, but I always like to give you the full picture. This recipe is made with real butter and brown sugar because when you’re craving comfort food desserts, you shouldn’t have to compromise on flavor! The following numbers are just estimates based on the ingredients listed above in an 8×8 dish divided into 6 servings. Don’t sweat the details too much—just enjoy that beautiful topping and load up on the vanilla ice cream on the side!
If you’re focused on lighter fare the next day, you can always check out my guide to healthy lunch recipes. But for now, savor this classic treat!
- Serving Size: 1 serving
- Calories: 380
- Sugar: 32g
- Sodium: 110mg
- Fat: 20g
- Saturated Fat: 12g
- Carbohydrates: 50g
- Protein: 4g
Share Your Apple Crisp Success
I put my heart into making sure this classic apple dessert is easy, accessible, and delicious, and I truly hope it brings some cozy goodness into your kitchen. That’s what YumDrizzle is all about—making real food fun again! If you tried this recipe out, please do me a huge favor and leave a star rating right down below in the comments section. It lets me know what’s working, and it helps other home cooks find reliable recipes when they need a fantastic warm apple dessert.
Did you serve it with ice cream? Did you swap out any spices? I want to hear everything! We’re building a community here, and every piece of feedback helps us all get better in the kitchen. If you need anything else, don’t hesitate to reach out using my contact page. Happy baking!
PrintThe Ultimate Classic Apple Crisp with Buttery Cinnamon Oat Topping

Make this easy apple crisp recipe for a warm, comforting dessert. Tender, spiced apples sit beneath a buttery, golden oat crumble topping. This is the best apple crisp for fall gatherings.
- Prep Time: 15 min
- Cook Time: 45 min
- Total Time: 60 min
- Yield: 6 servings 1x
- Category: Dessert
- Method: Baking
- Cuisine: American
- Diet: Vegetarian
Ingredients
- 6 large baking apples (like Granny Smith or Honeycrisp), peeled, cored, and sliced
- 1/4 cup granulated sugar
- 1 tablespoon all-purpose flour
- 1 teaspoon ground cinnamon
- 1/4 teaspoon ground nutmeg
- 1 tablespoon lemon juice
- 1/2 cup all-purpose flour (for topping)
- 1/2 cup packed light brown sugar (for topping)
- 1/2 cup old-fashioned rolled oats
- 1/4 teaspoon ground cinnamon (for topping)
- 1/4 teaspoon salt
- 1/2 cup (1 stick) cold unsalted butter, cut into small pieces
Instructions
- Preheat your oven to 375°F (190°C). Lightly grease an 8×8 inch baking dish.
- In a large bowl, combine the sliced apples, 1/4 cup granulated sugar, 1 tablespoon flour, 1 teaspoon cinnamon, nutmeg, and lemon juice. Toss gently until the apples are evenly coated.
- Spread the apple mixture evenly into the prepared baking dish.
- In a separate medium bowl, prepare the topping. Combine the 1/2 cup flour, brown sugar, rolled oats, 1/4 teaspoon cinnamon, and salt. Mix these dry ingredients together.
- Cut in the cold butter using a pastry blender or your fingertips until the mixture resembles coarse crumbs with some pea-sized pieces of butter remaining.
- Sprinkle the oat topping evenly over the apple layer in the baking dish. Press lightly.
- Bake for 40 to 45 minutes, or until the topping is golden brown and the apple filling is bubbly and tender when pierced with a fork.
- Let the apple crisp cool on a wire rack for at least 15 minutes before serving. Serve warm with a scoop of vanilla ice cream.
Notes
- For the best texture, use firm, slightly tart apples.
- You can substitute quick oats for rolled oats, but the topping texture will be less crunchy.
- This dessert is excellent served warm with vanilla ice cream.
Nutrition
- Serving Size: 1 serving
- Calories: 380
- Sugar: 32g
- Sodium: 110mg
- Fat: 20g
- Saturated Fat: 12g
- Unsaturated Fat: 8g
- Trans Fat: 0g
- Carbohydrates: 50g
- Fiber: 5g
- Protein: 4g
- Cholesterol: 48mg