
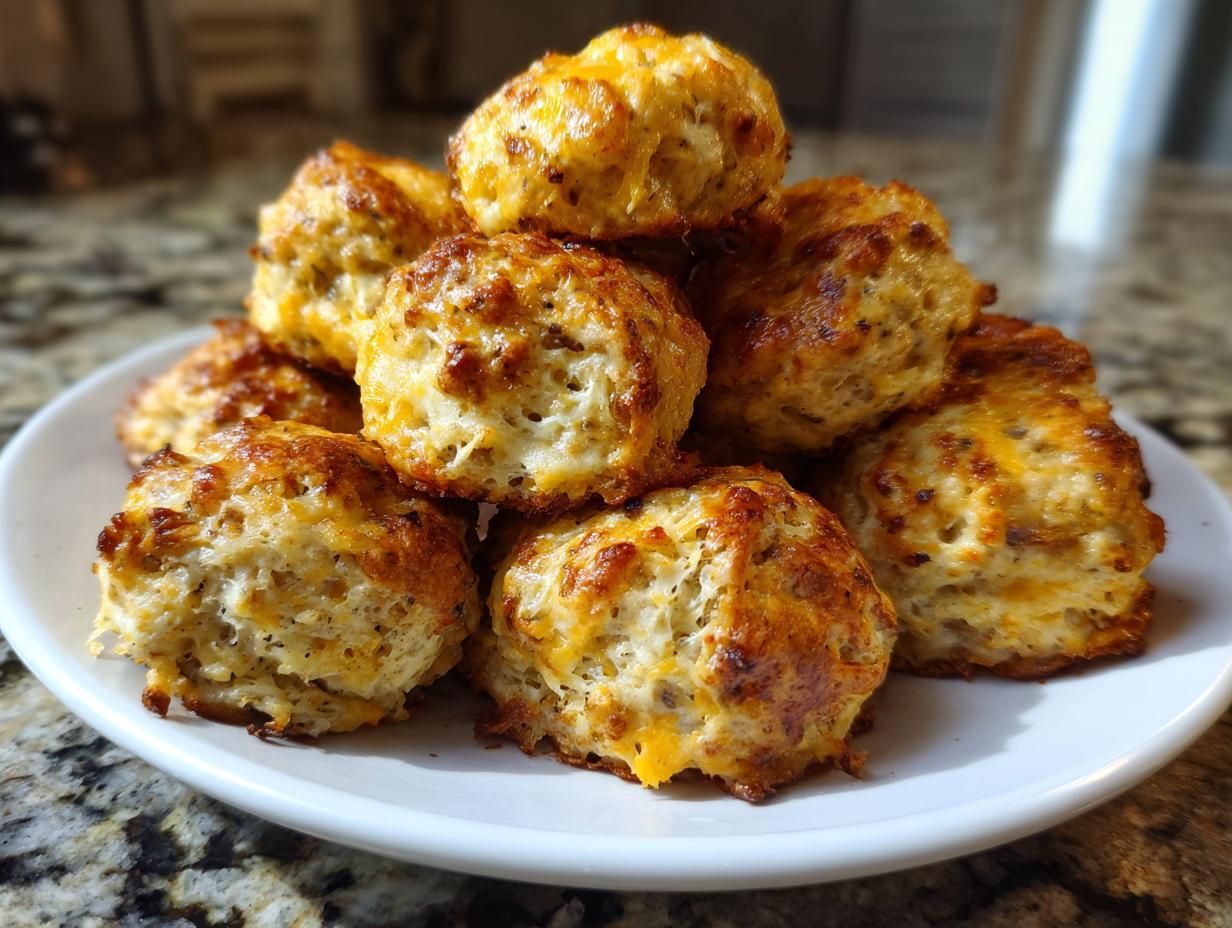
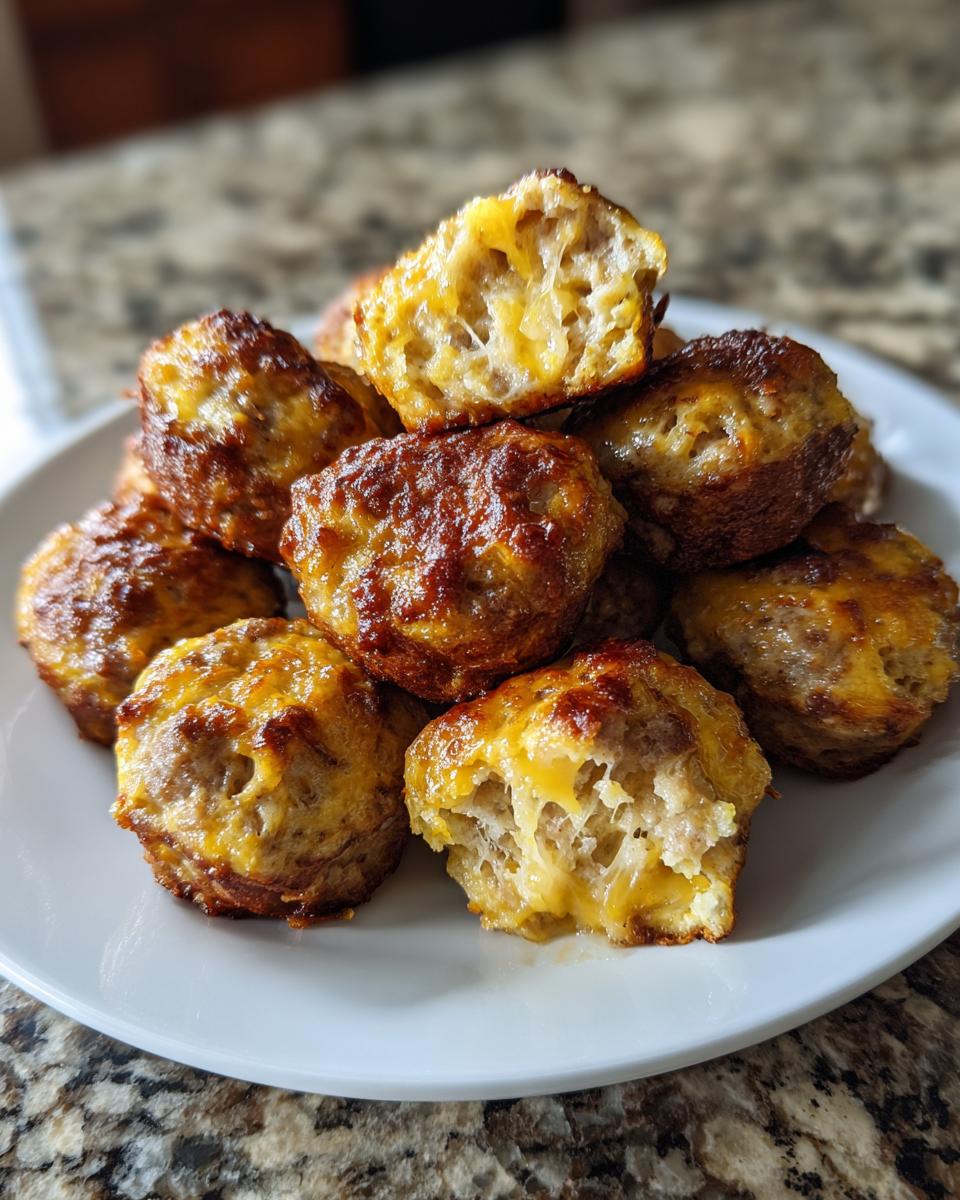
When you’re juggling travel schedules, big crowds, or just a serious craving for comfort food that doesn’t demand half your afternoon, you need a recipe you can trust blindly. These classic, three-ingredient bisquick sausage balls are the heroes that always swoop in to save the day for any gathering I throw together. Honestly, finding reliable, fast food was essential back when I was on the road with the band—you couldn’t rely on scouting fancy restaurants daily. That’s how I perfected this recipe; it’s savory, cheesy, and foolproof every single time. If you need a crowd-pleasing finger food whipped up in under 30 minutes, look no further. Want to see how easy these appetizers really are? You can check out some of my other favorites on my easy make-ahead breakfast recipes list, too!
- Why These bisquick sausage balls Are Your New Go-To Party Food Ideas
- Gathering Ingredients for Classic bisquick sausage balls
- Expert Tips for Perfect Cheesy Sausage Balls
- How to Prepare bisquick sausage balls: Step-by-Step Instructions
- Make Ahead Appetizers and Freezer Friendly bisquick sausage balls
- Serving Suggestions for Your bisquick sausage balls
- Storage and Reheating Instructions
- Frequently Asked Questions About bisquick sausage balls
- Nutritional Estimate for These Easy Sausage Balls Recipe
Why These bisquick sausage balls Are Your New Go-To Party Food Ideas
When people see these on a platter, they disappear instantly—trust me on that! That’s because these aren’t some fussy, newfangled creation. These are the original, classic version of bisquick sausage balls, and they deliver maximum flavor for almost zero effort. They fly off the plate because they hit that perfect spot: savory, salty, and wonderfully cheesy. They are the definition of a reliable, crowd pleasing finger food.
The Magic of a 3 Ingredient Appetizer
Seriously, the ingredient list is short enough that you can memorize it after one look. Sausage, Bisquick, and cheese—that’s it! This three-ingredient simplicity is why I see these popping up everywhere online with massive save counts. When you’re rushed, you don’t want to hunt down seven different things. These quick appetizer bites are ready to roll before most people have even finished chopping their veggies for a more complicated dish. It’s stress-free entertaining!
Versatility: From Game Day Snacks to Simple Brunch Idea
The best part is how these fit into virtually any meal plan. Set them out during the Super Bowl and they are perfect game day snacks. Need something impressive for your holiday buffet? Done. They even work fantastic as a grab-and-go simple brunch idea the next morning! If you love easy things that keep people happy, check out my easy pizza sliders recipe next; they share that same spirit.
Gathering Ingredients for Classic bisquick sausage balls
Okay, let’s talk ingredients because this is where the simplicity truly shines. We need three main players for this classic roundup. First up is the sausage—you need one full pound of ground pork sausage, and you get to choose: mild for easy eating, or spicy if you like a little kick! Next, grab a cup of sharp cheddar cheese, and make sure you shred it yourself; the pre-shredded stuff melts weirdly. Finally, you need a cup and a half of Bisquick Original Baking Mix. That’s your binder, your structure, and your pantry secret weapon! Seriously, that’s it. If you’re looking for another fantastic cheesy pairing, you should check out my recipe for the easy beer cheese dip.
Expert Tips for Perfect Cheesy Sausage Balls
I’ve made so many batches of these things that I know exactly what separates the good ones from the truly perfect, melt-in-your-mouth bites. Building trust here means knowing the little tricks the pros use. The biggest thing I learned is temperature control. Don’t use freezing cold sausage or cheese straight from the fridge! Let them sit out for maybe ten minutes before you mix. This helps everything incorporate smoothly.
And listen to me: DO NOT OVERMIX. This is key to keeping these from turning into little hockey pucks. Once you see the flour streaks disappear, you stop. That’s when the magic happens, and you end up with tender, crumbly texture instead of something dense. If you want to see another fantastic use for a savory dough, check out my easy sausage pinwheels recipe!
Ingredient Notes and Substitutions for bisquick sausage balls
For the best flavor in your bisquick sausage balls, you absolutely should aim for sharp cheddar cheese. It has a tang that cuts through the richness of the pork perfectly. If you’re feeling bold, swap out that mild sausage for the spicy kind—it adds a fantastic warmth!
Now, about that cream cheese note I mentioned earlier: if you want these to be extra moist and rich, swap about half a cup of the Bisquick for 4 ounces of softened cream cheese. It completely changes the mouthfeel! You can read more about how other folks approach mixing the base ingredients over at Flavors Made if you’re curious about variations.
How to Prepare bisquick sausage balls: Step-by-Step Instructions
Getting these delicious bisquick sausage balls ready is honestly quicker than ordering takeout. First things first, get that oven preheated to 350 degrees Fahrenheit. I always line my baking sheet with parchment paper because cleaning up grease from sausage is nobody’s idea of fun! That preparation step takes you maybe two minutes max.
Next, we bring the power team—sausage, cheese, and Bisquick—into one big bowl. Don’t just use a fork; you really need to get your hands in there for the best results. You want to mix everything until it’s *just* uniform. I mean it—as soon as you stop seeing big white streaks of the mix, you pull your hands out! If you’re interested in other quick meals that don’t rely on a lot of stirring, check out my guide for easy canned salmon salad for sandwiches, which uses a similar no-fuss approach.
Mixing and Shaping Your Quick Appetizer Bites
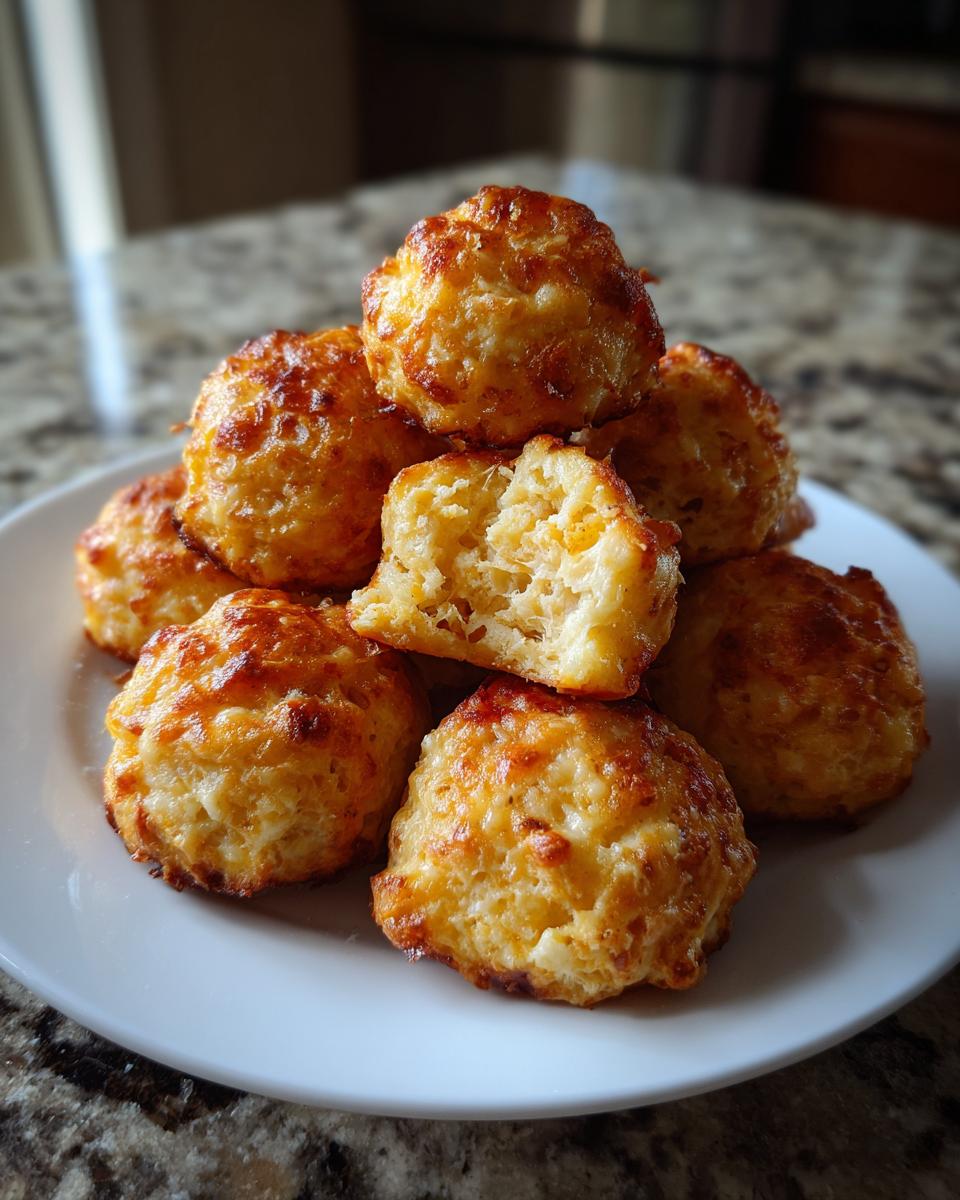
This is where you have to be gentle! When you think you’ve mixed enough, scrape the sides down one last time and stop. Overmixing develops the gluten in the Bisquick and you lose that light, crumbly texture we want. Once mixed, grab a piece of the dough—I use a small scoop or just my teaspoon—and roll it between your palms to form small balls. They should be about 1 inch across. Keep them snug on the baking sheet, but give them a little breathing room, maybe an inch between each one, so they bake evenly.
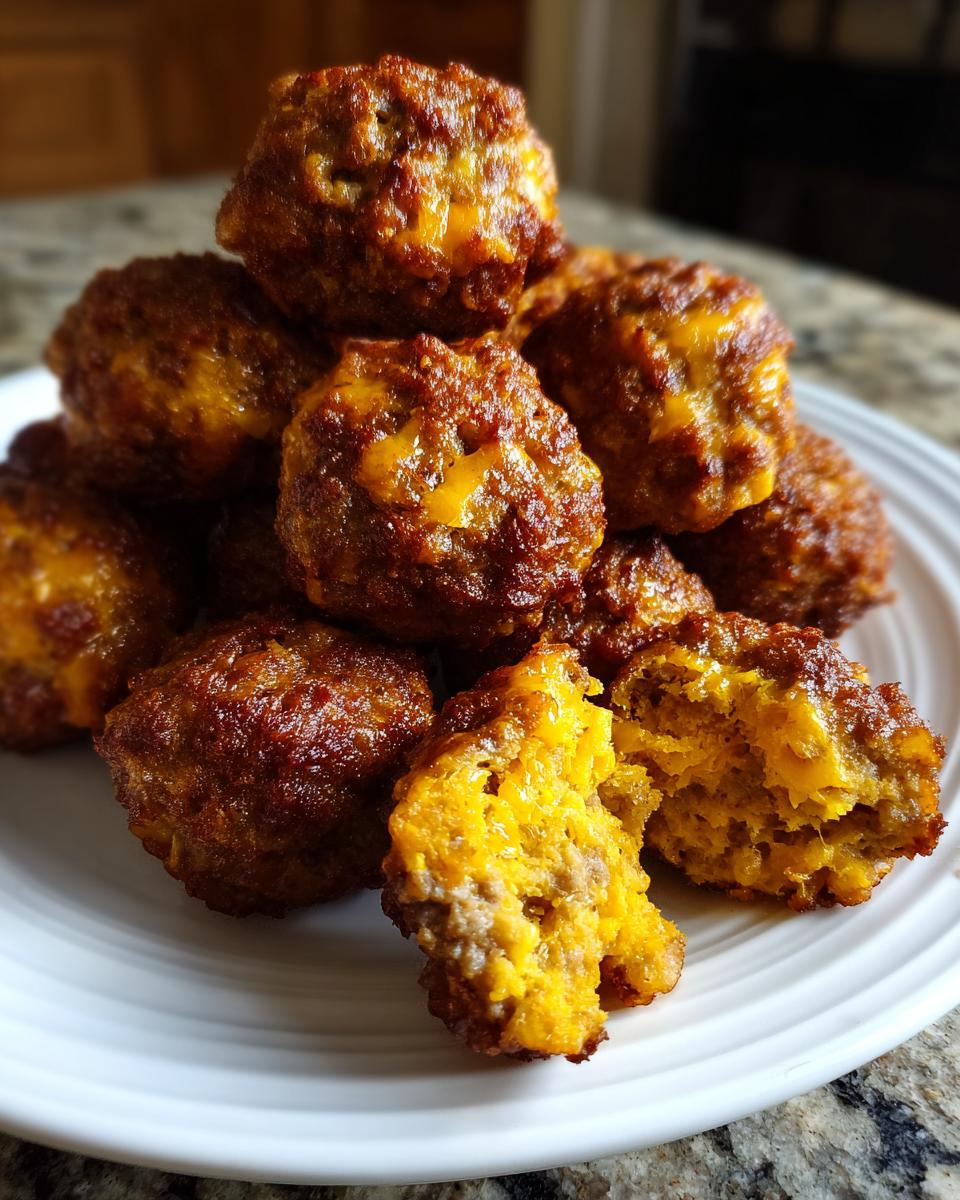
Baking Time and Doneness for Southern Style Sausage Balls
Into the oven they go for 15 to 18 minutes. That’s it! You are looking for them to be nicely rounded and golden brown on top. When they look cooked through and the cheese is bubbly, pull them out. They will firm up just a bit more as they cool down on the pan, so don’t wait until they look rock hard before taking them out!
Make Ahead Appetizers and Freezer Friendly bisquick sausage balls
This is probably my favorite feature of these little guys: they are champions of advance prep! If you’re hosting a big potluck or just want to have some perfect make ahead appetizers ready for game day next week, you are in luck. You can totally roll the dough raw, place those little balls onto a cookie sheet, and pop the whole tray into the fridge for a full 24 hours. When you are ready to bake, just slide that tray right into the oven; you might need to add a few extra minutes to the clock.
But wait, there’s more! If you’ve got extra time, freeze them raw! Lay them out on a tray, freeze until solid, then transfer them to a heavy-duty freezer bag. They last up to three months! That makes them the most reliable freezer friendly appetizer you’ll ever meet. Having these on hand means you can whip up a hot snack in minutes, even if you haven’t planned ahead. Need something sweet to balance all this savory goodness? I’ve got a recipe for easy slow cooker spiced pear butter that would be amazing served alongside these!
It’s this convenience that makes them a true classic down South, too. You can find more neat tips on keeping them fresh over at Traveler’s Wizard.
Serving Suggestions for Your bisquick sausage balls
Now that you’ve got these perfect little savory bites hot out of the oven, the real fun begins: deciding what to dip them in! While they are absolutely fantastic all on their own—seriously, they don’t need anything—a little something extra makes them next-level party food. Don’t knock it until you try it: a small bowl of warm maple syrup is the absolute best pairing.
That sweet and savory contrast is just heavenly! If syrup isn’t your thing, classic ranch dressing is always a home run, or maybe a spicy honey mustard if you want to kick the heat up a touch. These bites are so reliable, they honestly go great with almost anything, even something hearty like my easy chicken taco soup recipe works as a side!
Storage and Reheating Instructions
Let’s face it, sometimes you make a double batch because, well, why not? If you happen to have any bisquick sausage balls left over (which I doubt, but we can dream!), knowing how to store and reheat them properly is key to keeping that fresh-from-the-oven flavor. They are best eaten the day you make them, of course, but they hold up really well for a few days in the fridge. Just pop them into an airtight container or a sealable bag. They should stay good for three to four days sitting in the cold section of your fridge.
Reheating is simple, but you can’t use the microwave if you actually want them to stay good! Microwaving makes them hard and dense, and we are shooting for that slightly crispy outside and tender middle. I always go back to the oven. Set your oven to about 325 degrees Fahrenheit—not too hot, we aren’t cooking, just warming! Place the leftover balls on a baking sheet and heat them up for about 8 to 10 minutes. They come out perfectly warm and taste almost like they were freshly baked.
Need another reliable recipe for next-level leftovers? My sourdough sandwich bread recipe makes amazing toast the next day, so you get that same fresh texture!
Frequently Asked Questions About bisquick sausage balls
Anytime I post these, I get a ton of questions because everyone loves how easy they are! Here are the most common things folks ask me about making their own batches of these fantastic appetizers. If you’re looking for more bite-sized wonders, my recipe for easy Irish potato farls is another freezer winner.
What type of sausage works best for these bisquick sausage balls?
You should use regular ground pork sausage, mild or spicy—it’s really your preference! If you use the “bulk” sausage that isn’t in a tube, it tends to have a little more fat, which keeps them incredibly moist. If you only have sausage patties, take them out of the casing first, of course. I usually use Jimmy Dean, mild or spicy, because it’s so easy to find everywhere I go.
Can I make this recipe without Bisquick?
Honestly, I wouldn’t stray too far from the Bisquick here. That mix has baking soda and salt already in it, which is super important for the texture. If you absolutely had to substitute, you would need to mix 1 1/2 cups of all-purpose flour with 1 1/2 teaspoons of baking powder and 1/2 a teaspoon of salt. But trust me, using the actual mix is the whole point—it’s our shortcut! You can see more tips on getting the best results over at Jennifer Cooks’ site if you’re curious!
Can I bake these sausage balls directly from frozen?
Yes, you totally can! That’s part of why they are one of my favorite freezer-friendly treats. If you freeze them raw like I told you about before, just slide the frozen balls onto your baking sheet and add about 5 to 8 extra minutes to the baking time. They might need closer to 20 or 25 minutes total, depending on your oven. They’ll still come out golden and delicious!
Nutritional Estimate for These Easy Sausage Balls Recipe
Since we are sticking to that magic three-ingredient lineup—sausage, cheese, and Bisquick—it’s fun to see what we are actually eating when these disappear so fast! Now, I have to be clear: exact numbers can change based on whether you use spicy sausage or mild, or if you sneak in that cream cheese trick I love. These figures are just an estimate based on the basic, core recipe that I outlined for you.
I always try to keep things simple when looking at the nutrition breakdown. When you divide this recipe by about 30 balls (that’s a good yield!), you get something pretty reasonable for a savory bite. You’re looking at about 110 calories jumping into your system per ball. That’s not bad for a satisfying snack when you are watching the game!
Here’s the quick rundown on what’s serving as the fuel:
- Calories: About 110
- Fat: Around 8 grams
- Protein: A solid six grams! That helps keep everyone full.
- Carbohydrates: Roughly 5 grams
See? It’s mostly protein and savory fat, which is exactly what you want in a filling appetizer. If you serve these up with something lighter, like my crowd-pleasing Thanksgiving punch recipe, you’ve got a perfectly balanced snack table ready to go!
PrintClassic 3-Ingredient Bisquick Sausage Balls

Make these incredibly easy, cheesy sausage balls using just three staple ingredients. They are the perfect crowd-pleasing appetizer for game day, parties, or a quick breakfast bite.
- Prep Time: 10 min
- Cook Time: 18 min
- Total Time: 28 min
- Yield: About 30 balls 1x
- Category: Appetizer
- Method: Baking
- Cuisine: American
- Diet: Vegetarian
Ingredients
- 1 pound ground pork sausage (mild or spicy)
- 1 cup sharp cheddar cheese, shredded
- 1 1/2 cups Bisquick Original Baking Mix
Instructions
- Preheat your oven to 350 degrees Fahrenheit. Lightly grease a baking sheet or line it with parchment paper.
- In a large bowl, combine the ground sausage, shredded cheddar cheese, and Bisquick baking mix.
- Mix the ingredients thoroughly with your hands until everything is just combined. Do not overmix the dough.
- Roll the mixture into small balls, about 1 inch in diameter. Place the balls onto the prepared baking sheet, leaving about 1 inch between them.
- Bake for 15 to 18 minutes, or until the sausage balls are golden brown and cooked through.
- Remove from the oven and let them cool slightly on the pan before serving.
Notes
- For a richer flavor, substitute 1/2 cup of the Bisquick with 4 ounces of softened cream cheese. Mix this in with the other ingredients.
- You can make these ahead. Store unbaked balls on a tray in the refrigerator for up to 24 hours, or freeze them raw for up to 3 months. Bake frozen balls for a few extra minutes.
- These are excellent served with a side of maple syrup or your favorite dipping sauce.
Nutrition
- Serving Size: 1 ball
- Calories: 110
- Sugar: 1
- Sodium: 350
- Fat: 8
- Saturated Fat: 3
- Unsaturated Fat: 5
- Trans Fat: 0
- Carbohydrates: 5
- Fiber: 0
- Protein: 6
- Cholesterol: 25