
You know that feeling when the holidays roll around, and you just need that sweet spot between comforting nostalgia and a dessert that screams, “Look at me!”? That’s exactly what inspired this ultimate holiday mashup: the Christmas Tree Cheesecake. We’re taking those dearly loved Little Debbie Tree Cakes—you know the ones with the perfect little dollop of vanilla frosting—and folding that magic into a rich, creamy cheesecake base. Here at YumDrizzle, Jaxson Riley built this whole operation on making incredible food accessible for your real-life holiday gatherings. This isn’t stuffy baking; this is fun, flavorful, and guaranteed to be the star of your Christmas party food spread without needing pastry school credentials!
- Why This Christmas Tree Cheesecake is Your Must-Make Festive Holiday Dessert
- Essential Ingredients for Your Christmas Tree Cheesecake Recipe
- Step-by-Step Instructions for the Showstopper Holiday Cheesecake
- Decorating Your Christmas Tree Cheesecake Like a Pro
- Tips for Success with Your Christmas Tree Cheesecake
- Storage and Reheating Instructions for This Christmas Cheesecake Recipe
- Frequently Asked Questions About This Tree Cake Dessert
- Serving Suggestions for Your Unique Holiday Baking Creation
- Share Your Festive Christmas Tree Cheesecake Experience
Why This Christmas Tree Cheesecake is Your Must-Make Festive Holiday Dessert
Look, if you’re going to bake during the holidays, it needs to count, right? This isn’t just any Christmas cheesecake recipe; it’s an event. It ticks all the boxes for me.
- It’s a total showstopper holiday cheesecake that looks amazing when you bring it out.
- It’s perfectly sweet and impossibly creamy—the definition of a creamy holiday cheesecake.
- It brings you right back to your childhood in the best way possible!
Nostalgia Meets Decadence: The Little Debbie Inspired Dessert Factor
Why mess with perfection? Those little Tree Cakes have that distinct, slightly chewy cake texture and that sweet vanilla/almond coating. When you fold them into a rich cheesecake filling, they soften up just enough. They create these gorgeous little pockets of flavor and texture that you just don’t get from plain cake pieces. Trust me, it elevates this from a good festive holiday dessert to a total must-have.
Essential Ingredients for Your Christmas Tree Cheesecake Recipe
Alright, let’s talk about what you need to pull off this Christmas Tree Cheesecake magic. The core ingredients are pretty standard for a decadent cheesecake, but those Tree Cakes are the non-negotiable stars! You’ll need 675g of cream cheese, and please make sure it’s softened—we are not trying to wrestle cold bricks in the mixer, oops! You need the eggs, the sugar, and a cup of sour cream to keep things tangy and rich.
The show stealers, of course, are the Little Debbie Cakes. Get one standard package—that’s usually about 12 cakes. Take them and just roughly chop them up; you want good texture, not mush. I also linked to a great visual reference here if you want to see how others handle the chop, but remember, we want chunks! Don’t forget your graham cracker crumbs and melted butter for our sturdy base. If you want to dive deeper into how the base ingredients work together, check out some other insights on festive cheesecake builds right here.
Ingredient Notes and Substitution Options
Now, I know some of you are thinking about skipping the oven! If you want that No bake Christmas dessert version, you need to swap out the eggs and sour cream. For the no-bake approach, you’ll use about a cup of heavy whipping cream, whipped to stiff peaks, and fold that in gently at the end instead. That gives you that light, incredibly velvety cheesecake for Christmas feel without turning on the oven. Also, make sure your vanilla extract is pure—it makes a difference in filling flavor!
Step-by-Step Instructions for the Showstopper Holiday Cheesecake
Okay, let’s get down to the serious stuff: making this dessert shine! We need patience here, especially during the cooling, because nobody wants a cracked top on their Christmas Tree Cheesecake. Remember, this is about creating a unique holiday baking artifact that tastes as good as it looks. If you’re new to cheesecake, don’t sweat it; just follow these steps, and you’ll be fine. For anyone who wants to compare techniques with other creamy bakes, I have a great guide on triple-layer magic over here, chocolate cheesecake decadent triple layer magic.
Preparing the Crust and Filling for Your Christmas Tree Cheesecake
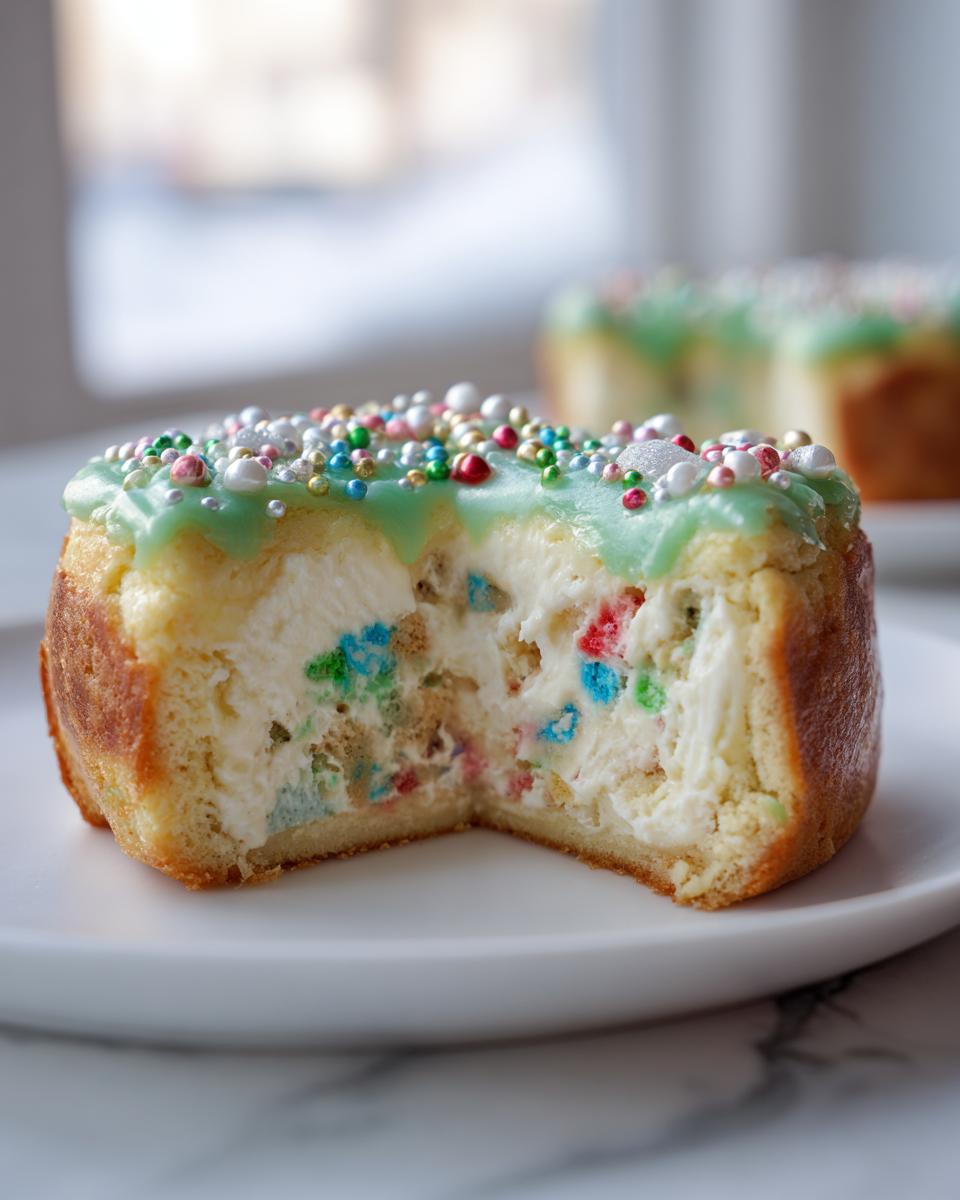
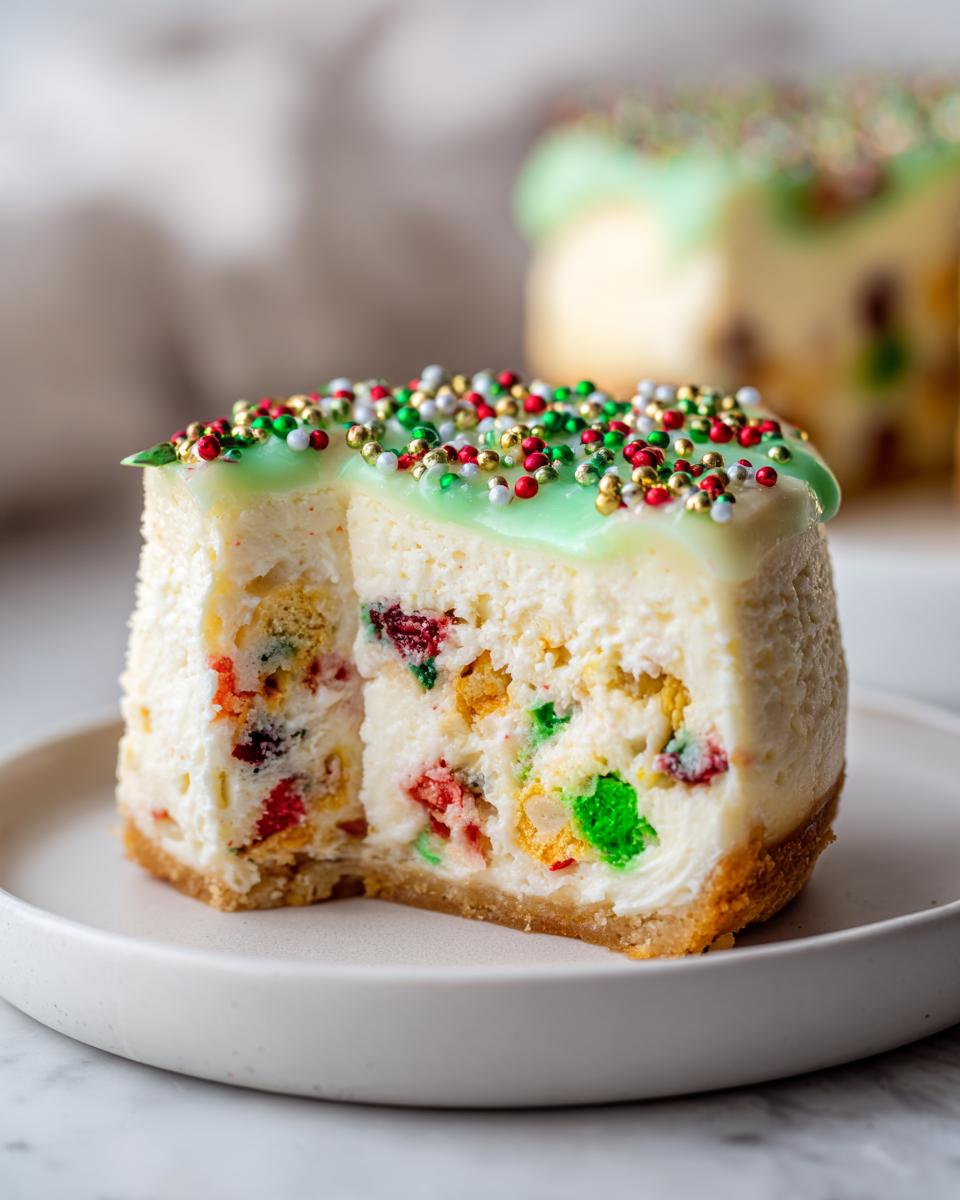
First up, get that oven preheated to 325°F (160°C) and grease that 9-inch springform pan—use whatever you love to keep things from sticking! Mix your graham cracker crumbs and melted butter, then press it down tight into the bottom. Bake that crust for just 10 minutes, then let it chill out a bit while you tackle the filling. For the filling, you beat that softened cream cheese until it’s looking super smooth. Add the sugar slowly, then the vanilla. Now, here’s the crucial part for that perfect texture: add your eggs one at a time, mixing just enough after each one. Seriously, don’t overmix! Stir in the sour cream until it’s incorporated, and then *gently* fold in those chopped Little Debbie cakes, saving a handful for later.
Baking and Cooling Protocol for a Creamy Holiday Cheesecake
Pour that glorious filling over your crust and pop it in. You’re looking at 50 to 60 minutes. You want the edges set, but don’t freak out if the center still has just a tiny bit of wobble. That jiggle means it’s going to be that perfect, creamy holiday cheesecake texture! Now for the real secret to avoiding cracks—this is what the pros do. Once the time is up, turn the oven *off*. Crack the door open just a tiny bit, and just let the cheesecake sit in that residual heat for a full hour. After that hour, pull it out, let it cool on the rack completely, and then cover it up and stick it in the fridge for at least 6 hours. Honestly? Overnight is always better for the flavor to truly pop.
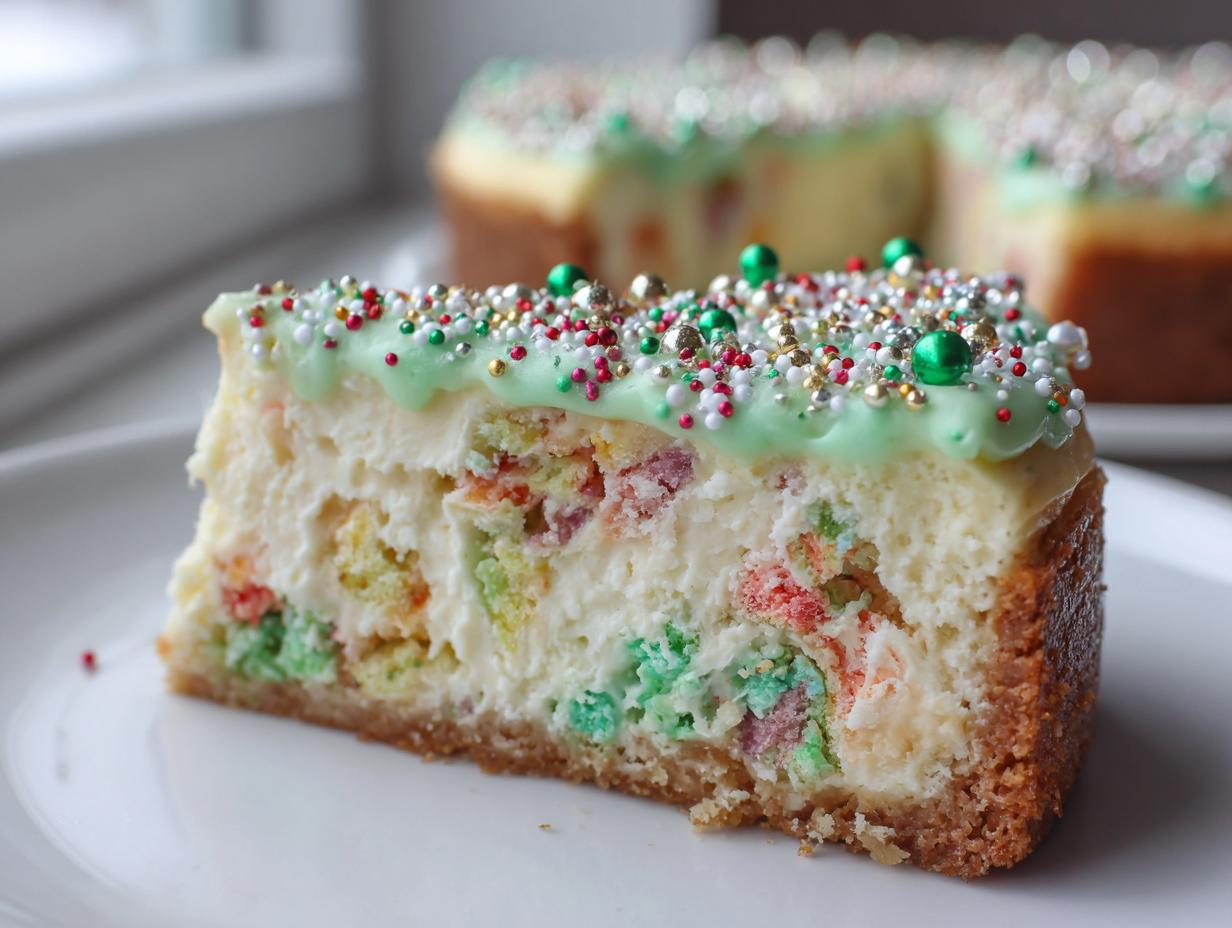
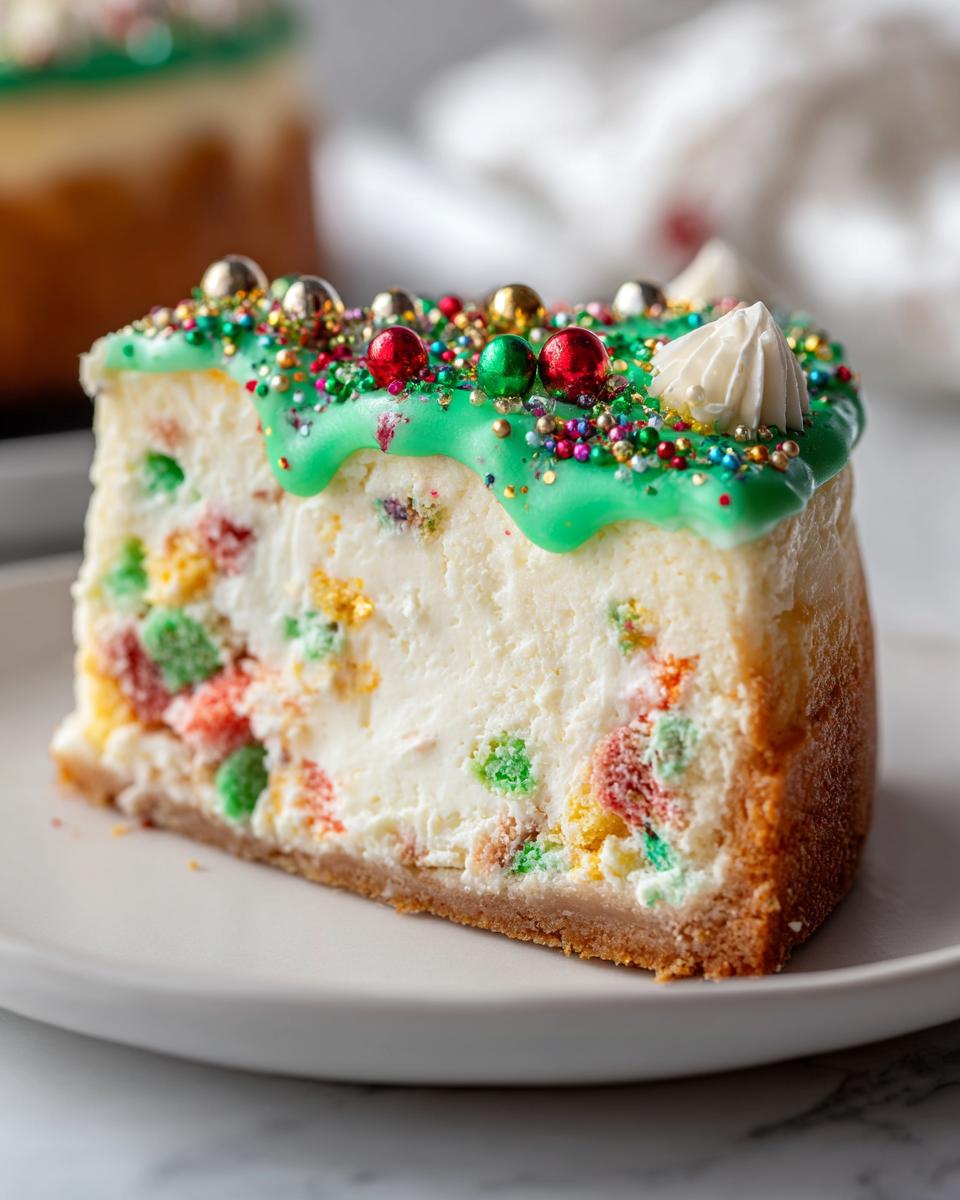
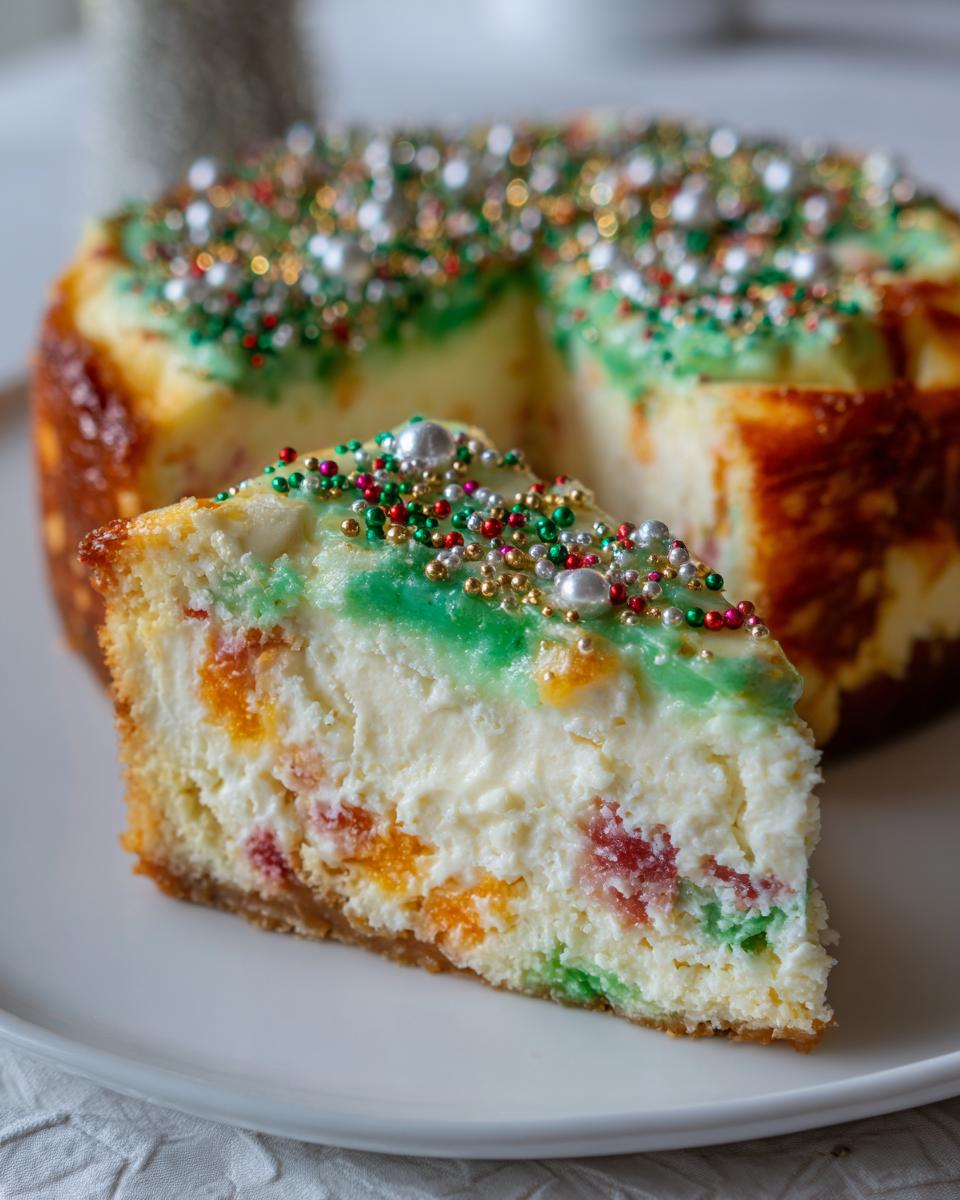
Decorating Your Christmas Tree Cheesecake Like a Pro
Okay, you’ve done the hard work, and now it’s time for the fun part: making this a real Decorated Christmas Tree Dessert! Once that cheesecake is completely chilled—and I mean rock solid cold—it’s time to play decorator. First, take your white chocolate ganache. I mix in just a couple of drops of green food coloring until I get a lovely, slightly muted, holiday green shade. We aren’t making lime Jell-O here; we want that soft, festive tone.
Spread that green ganache gently over the top. You don’t need perfection; think of it like a base coat for your tree. Then, grab those reserved chopped Little Debbie pieces and scatter them strategically. I often place a few bigger chunks where I want the ‘star’ cake layers to be. Then, use your assorted holiday sprinkles and candies to fill in the gaps like little ornaments. It truly becomes a masterpiece that doesn’t require any fancy piping skills, which is my favorite kind of baking! If you ever need to attach delicate things like that post-bake, you know a simple royal icing recipe is your best friend, even though for this cheesecake, the ganache usually does the sticking just fine. You can see some seriously gorgeous inspiration for the finale right here.
Tips for Success with Your Christmas Tree Cheesecake
I want your Christmas Tree Cheesecake to be perfect—that means crack-free and ultra-creamy! So here are a few things I always stick to, even when I’m rushing to get ready for Christmas party food.
First, if you want that extra-decadent, almost unbelievably rich texture, you absolutely have to try using a water bath when you bake it. It helps keep the heat gentle and even, making it the most velvety cheesecake for Christmas you’ve ever made. Just wrap your springform pan tightly in foil first so no water sneaks in!
Second, remember that note about soaking the raisins? Even though we aren’t using raisins here, the principle matters: don’t add anything that could steal moisture from your batter. The Little Debbie pieces should be folded in right at the end, just enough to mix. Finally, if you’re choosing the no-bake path, make sure your heavy cream is ice cold before whipping—that’s the only way to guarantee stiff peaks for structure.
Storage and Reheating Instructions for This Christmas Cheesecake Recipe
Because this is such a rich, decadent dairy dessert, you absolutely have to treat it right in the fridge. Make sure your Christmas cheesecake recipe is cooled down completely before you cover it loosely with plastic wrap and pop it in the refrigerator. It needs that chill to firm up and let those snack cake flavors really settle into the cheese base.
Here’s the thing about reheating cheesecake: generally, we don’t! It’s meant to be served cold or maybe just slightly chilled. Don’t even think about microwaving it! The chilling time isn’t just for food safety; it’s essential for the best texture and flavor. It tastes even better the next day, trust me!
Frequently Asked Questions About This Tree Cake Dessert
I get so many questions once people see photos of this Christmas Tree Cheesecake! It’s a unique bake, so some clarification is always helpful, especially if you’re looking for Easy Christmas sweets that you can prep ahead of the big day.
For starters, people always ask if they can skip the eggs for something simpler. Yes! If you want the full No bake Christmas dessert experience, just whip up that heavy cream instead of using eggs and sour cream, as I mentioned briefly before. We have a whole guide on making other no-bake favorites if you want more ideas for easy holiday treats!
Can I make the Christmas Tree Cheesecake ahead of time?
You absolutely can! And I highly recommend it if you’re hosting. I find that this cheesecake tastes even better after a full day chilling in the fridge. You can bake, cool, and chill the entire cheesecake for up to 24 hours before you decorate it. Keep it covered tightly in the fridge. Decorate it the morning of your party so the ganache looks fresh and the sprinkles are perfectly placed. You can check out how one baker preps theirs for a make-ahead event over here!
Another quick one: Can I use store-bought frosting instead of making the ganache? Sure, you can mimic the look by piping some green canned frosting around the edges, but man, you lose that creamy lusciousness that the white chocolate ganache brings. Stick to the recipe for the best showstopper holiday cheesecake result!
Serving Suggestions for Your Unique Holiday Baking Creation
This Christmas Tree Cheesecake is so rich and satisfying; it doesn’t need much fuss, but pairing it right makes it an instant hit at any gathering. Because it’s so decadent, I usually keep the beverages simple. A strong, dark roast coffee is always my top pick; the slight bitterness cuts through the sweetness beautifully.
For a festive, non-alcoholic option, you can’t beat a hot mug of spiced apple cider. It really leans into that cozy holiday vibe. If you’re looking for something a little more fun for your Christmas party food spread, try making a batch of my Apple Cider Moscow Mules—the ginger and apple are surprisingly great beside the vanilla flavor of the Tree Cakes! You can find the recipe for those mules right here, and they make the whole table feel extra special.
Share Your Festive Christmas Tree Cheesecake Experience
Now that you’ve made this incredible Christmas Tree Cheesecake, I really want to see how it turned out! Did you go for the baked version or did you whip up the no-bake? Drop a star rating below so others know what you thought, and tell me in the comments if you added any fun twists or adaptations. Seriously, sharing your photos makes my day and helps us all learn new tricks for serving up the best Christmas party food!
PrintShowstopper Little Debbie Christmas Tree Cheesecake
Create a festive, creamy holiday centerpiece by transforming nostalgic Little Debbie Christmas Tree Cakes into a decadent baked cheesecake. This recipe delivers rich flavor perfect for your next holiday gathering.
- Prep Time: 25 min
- Cook Time: 60 min
- Total Time: 7 hours 25 min
- Yield: 12 servings 1x
- Category: Dessert
- Method: Baking
- Cuisine: American
- Diet: Vegetarian
Ingredients
- 180 g graham cracker crumbs
- 85 g unsalted butter, melted
- 675 g cream cheese, softened
- 100 g granulated sugar
- 1 teaspoon vanilla extract
- 2 large eggs
- 1 cup sour cream
- 1 package (12 count) Little Debbie Christmas Tree Cakes, roughly chopped
- 1/2 cup white chocolate ganache, for topping
- Green food coloring
- Assorted holiday sprinkles and small candies, for decoration
Instructions
- Preheat your oven to 325°F (160°C). Lightly grease a 9-inch springform pan.
- Prepare the crust: Mix the graham cracker crumbs and melted butter until combined. Press the mixture firmly into the bottom of the prepared springform pan. Bake for 10 minutes. Let the crust cool slightly.
- Prepare the filling: In a large bowl, beat the softened cream cheese until smooth. Gradually add the granulated sugar and beat until fully incorporated. Mix in the vanilla extract.
- Beat in the eggs one at a time, mixing just until blended after each addition. Stir in the sour cream until the batter is smooth. Do not overmix.
- Gently fold in most of the chopped Little Debbie Christmas Tree Cakes, reserving some for topping later. Pour the filling over the cooled crust.
- Bake for 50 to 60 minutes, or until the edges are set but the center still has a slight jiggle.
- Turn off the oven, crack the door open slightly, and let the cheesecake cool inside the oven for 1 hour. This prevents cracking.
- Remove the cheesecake from the oven and cool completely on a wire rack. Once cool, cover and chill in the refrigerator for at least 6 hours, or preferably overnight.
- Decorate before serving: Mix a few drops of green food coloring into the white chocolate ganache. Spread the green ganache over the top of the chilled cheesecake to resemble tree branches or a base layer.
- Arrange the reserved chopped Little Debbie cakes and holiday sprinkles/candies on top to look like a decorated Christmas tree.
- Slice and serve this unique holiday baking creation.
Notes
- For a no-bake version, substitute the eggs and sour cream with 1 cup heavy whipping cream whipped to stiff peaks, folding it in gently at the end. Chill for 8 hours before decorating.
- If you want a stronger snack cake flavor, you can layer some chopped cakes between the crust and the filling as well.
- Use a water bath during baking if you prefer an extra-creamy, velvety cheesecake texture, though it is not required for this recipe.
Nutrition
- Serving Size: 1 slice
- Calories: 450
- Sugar: 35
- Sodium: 320
- Fat: 30
- Saturated Fat: 18
- Unsaturated Fat: 12
- Trans Fat: 0.5
- Carbohydrates: 40
- Fiber: 1
- Protein: 7
- Cholesterol: 95