
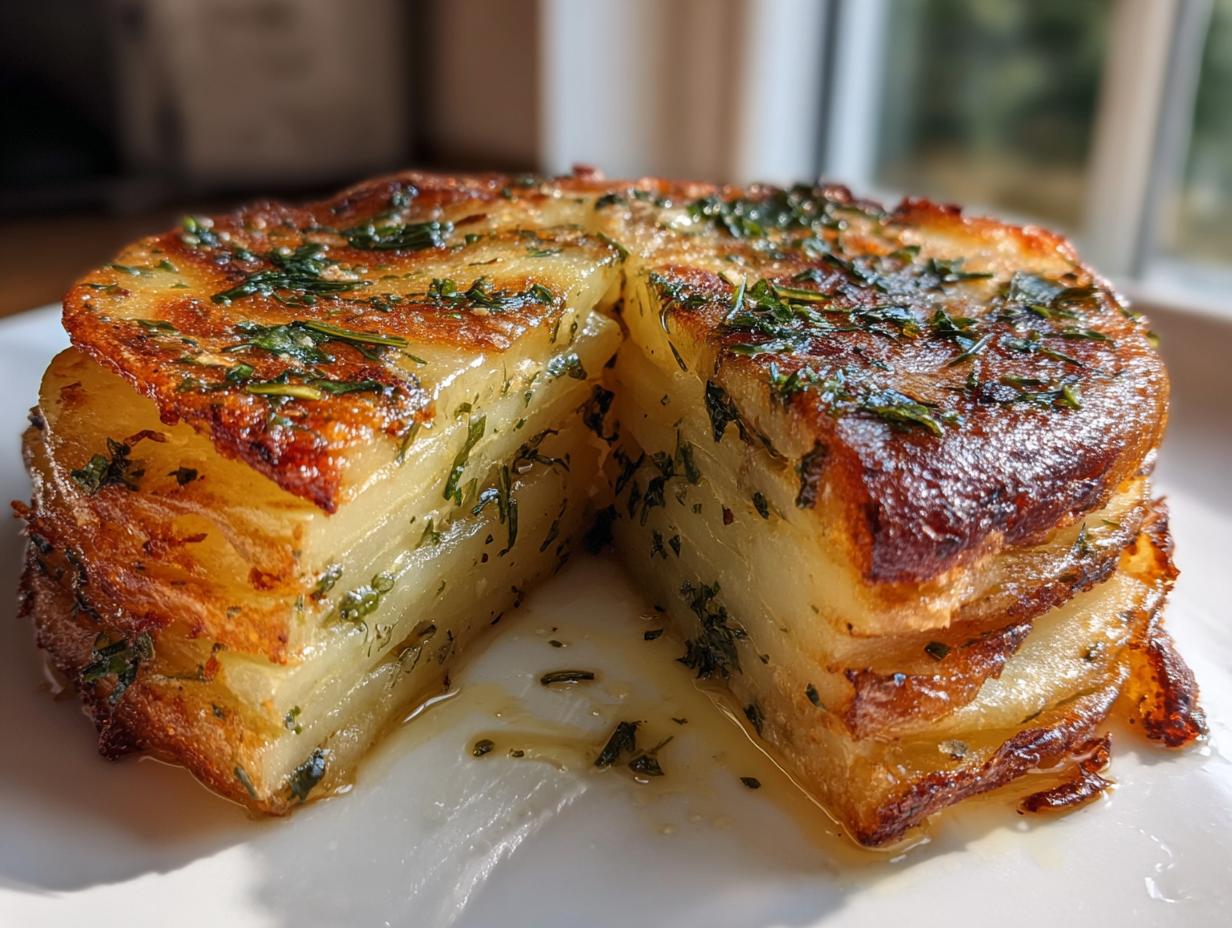
When it comes to holiday entertaining, you need sides that look like you spent hours fussing, but honestly, you didn’t! That’s the secret sauce, right? These elegant, crispy potato stacks baked right in a muffin tin are showstoppers. They are perfectly seasoned with my killer garlic herb butter. I’ve learned that the best flavors come from simple things done right—that’s what I picked up back when I was running sound on the road and finding the most amazing local diners. Trust me, these potato stacks with garlic herb butter pack a massive flavor punch with almost no stress. They are surprisingly easy, and everyone will ask for the recipe! I promise. You can read more about my philosophy on accessible flavor over at the YumDrizzle Story page, because that’s exactly what this recipe offers.
- Why This Recipe for Potato Stacks with Garlic Herb Butter is Your New Holiday Favorite
- Gathering Ingredients for Potato Stacks with Garlic Herb Butter
- Preparing the Garlic Herb Butter Potatoes: Step-by-Step Instructions
- Baking and Finishing Roasted Potato Stacks
- Make-Ahead and Holding Tips for Party Side Dish Success
- Variations for Your Potato Stacks with Garlic Herb Butter
- Serving Suggestions for Holiday Side Dishes
- Frequently Asked Questions About Muffin Tin Potatoes
- Estimated Nutritional Data for Potato Stacks
- Share Your Experience with These Potato Stacks with Garlic Herb Butter
Why This Recipe for Potato Stacks with Garlic Herb Butter is Your New Holiday Favorite
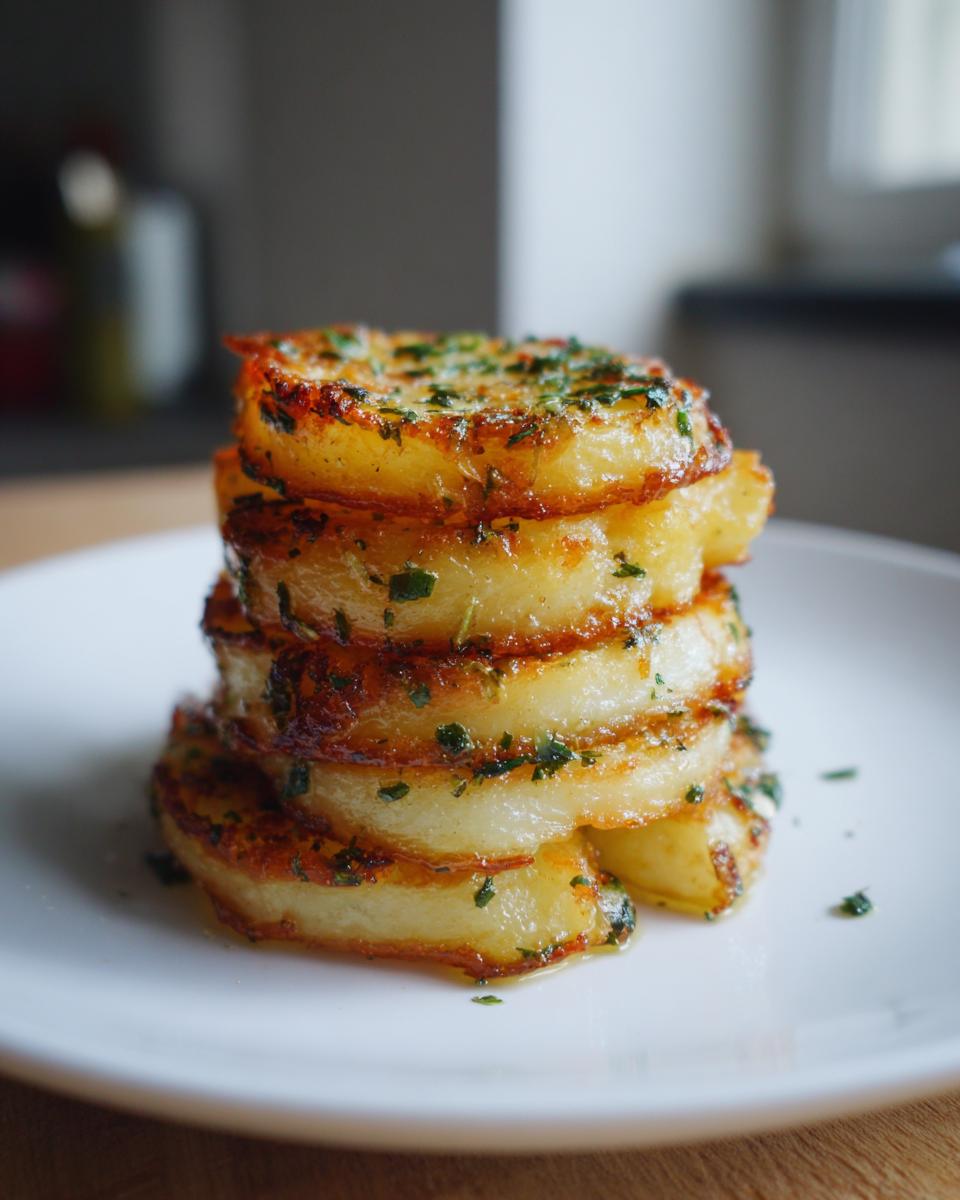
If you’re like me, you want your holiday side dishes to look fancy but behave nicely under pressure. That’s totally this recipe! These potato stacks deliver that stunning, layered look without the fuss of a giant gratin dish. They become the undisputed star of your serving platter.
- They look incredibly sophisticated, like something pulled from a Michelin-starred restaurant, but they’re just muffin tin potatoes!
- The edges get unbelievably crisp when baked—that’s the magic!
- Clean up is a breeze because the tin contains everything.
- You can seriously make them ahead, which is a lifesaver when the oven is slammed with the main course.
Achieving Perfect Crispy Potato Side Texture
Listen, the crispiness is everything here. We aren’t messing around with mushy potatoes! The key starts with slicing them super thin—we need those layers to fan out and catch the butter. Forget trying to do this freehand with a knife; your results will be all over the place. I swear by my mandoline slicer for this job. It’s the one tool I insist you use because uniform thickness means every single slice cooks at the exact same speed. That’s how we guarantee maximum surface area for the garlic herb butter to crisp up!
Gathering Ingredients for Potato Stacks with Garlic Herb Butter
Okay, let’s talk about what you grab first. Since these potato stacks with garlic herb butter are so simple, the quality of what you put in really matters! Don’t skimp here, and remember to keep everything measured out before you start slicing. I find lining everything up makes the whole process so much calmer.
Here is what you need to pull together the flavor base and the potatoes themselves for twelve beautiful stacks:
- Three large Russet potatoes—don’t even think about peeling these!
- Four tablespoons of good, unsalted butter—it must be completely softened so it mixes right.
- Two plump cloves of garlic, minced super fine.
- One teaspoon of fresh rosemary—chopped up small.
- One teaspoon of fresh thyme leaves.
- Half a teaspoon of salt, and a good pinch of black pepper.
- And, if you want that extra golden top, a quarter cup of grated Parmesan cheese—this part is totally optional!
Ingredient Spotlight: The Importance of Russet Potatoes
You might be tempted to grab those smooth, waxy potatoes, like the red ones, but please resist! For these muffin tin potatoes to stand up tall and get that fluffy interior while the edges go crackly outside, we absolutely need starch. Russets are the kings of starch. They break down slightly during baking, which lets them meld together perfectly inside the cup. Waxy potatoes hold too much water, and honestly, they just steam instead of getting that beautiful roasted texture we are aiming for here. Stick to Russets, trust me on this one!
Preparing the Garlic Herb Butter Potatoes: Step-by-Step Instructions
Alright, let’s get into the fun part where we turn simple potatoes into something amazing! Before we touch a single potato, remember what I always say: prep saves your sanity. First things first, get that oven roaring to 400 degrees Fahrenheit. While it heats up, grab your standard 12-cup muffin tin, and give every single cup a good light greasing. We need these things ready to release their treasure later!
Next, mix up that glorious seasoning. Just combine your softened butter, that pungent minced garlic, the fresh rosemary and thyme, salt, and pepper in a bowl. Stir it around until it’s one happy, fragrant, herby mess. This garlic herb butter is going to coat every single one of these potato stacks.
Expert Tip for Slicing Your Potato Stacks
The secret weapon for perfect, elegant potato stacks is consistency, and that means thinness—and I mean *thin*. You are aiming for paper-thin slices, ideally between 1/16th and 1/8th of an inch. Truly, if you try to do this by hand, your stacks will lean and crumble. Seriously, pull out that mandoline slicer! It’s going to give you razor-thin slices that cook evenly. Uniform slices are what guarantee you the maximum crispy edges we talked about. Don’t be scared of the mandoline; it’s your best friend for this recipe!
Building and Buttering Your Muffin Tin Potatoes
Now we build! Take a few slices and start layering them in the bottom of one of your prepared muffin cups. You want to overlap them in a circle, making sure the edges peek up a little bit over the rim of the tin—that’s where the crispy gold happens. Brush those initial layers generously with that garlic herb butter. Don’t be shy, and make sure you use about half of your butter mixture right here on these first few stacks.
Keep layering and brushing. You might fit six or maybe eight slices per cup, depending on how thin you sliced them. Once the cup is full, give that top layer a final, loving brush with whatever butter is left. We want these muffin tin potatoes saturated with flavor before they ever see the heat!

Baking and Finishing Roasted Potato Stacks
Okay, the hard, fun part is done—the potatoes are layered, buttered, and sitting perfectly in their little muffin molds. Now we send them off to get golden and glorious! Make absolutely sure your oven is preheated to 400 degrees Fahrenheit before you slide that tray in. We need that initial high heat to start searing those buttered edges right away.
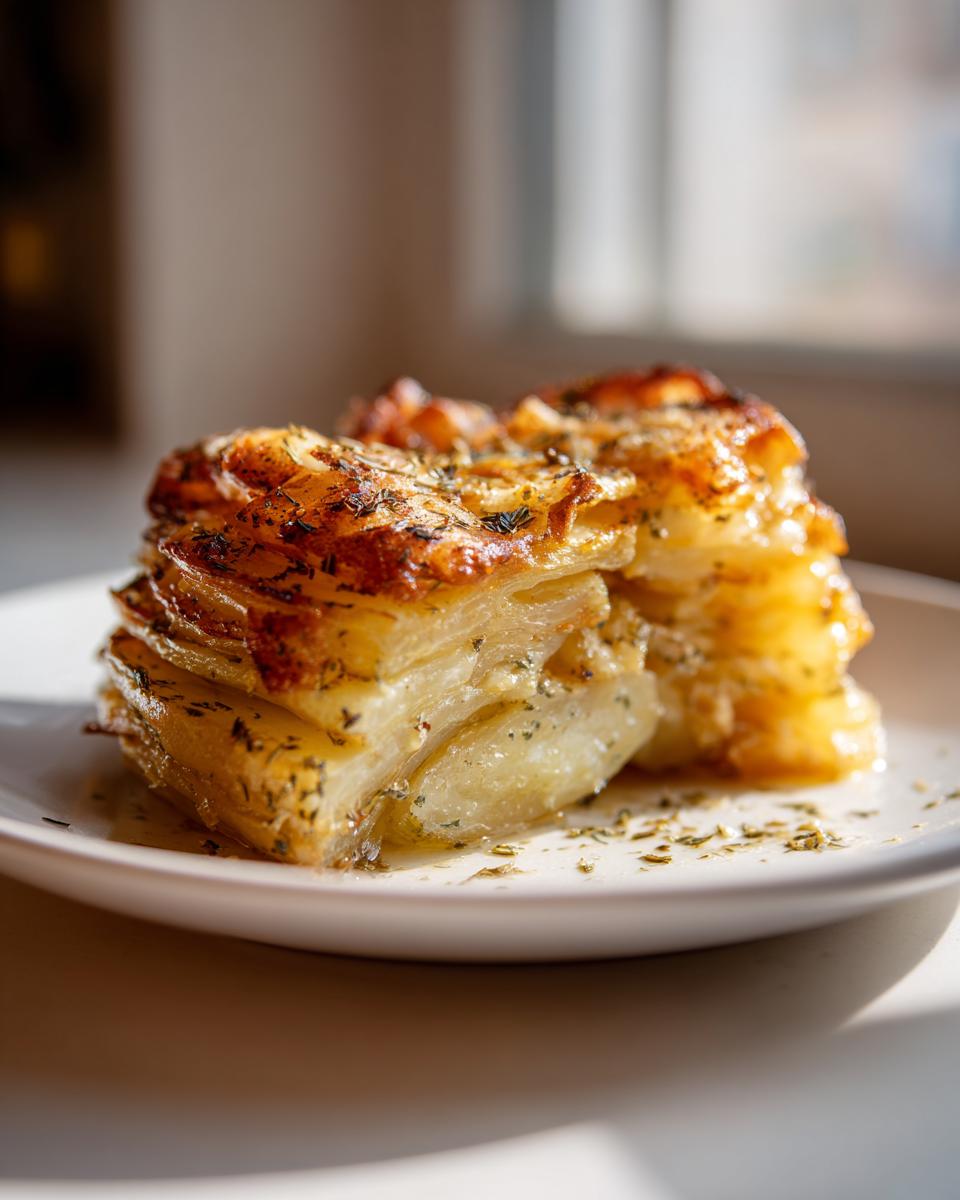
Don’t walk away; keep your eyes peeled! These roasted potato stacks usually take between 35 to 45 minutes. How do you know when they are ready? You look for two things: first, the edges should be a deep, beautiful golden brown—even darker around the very rim. Second, you need to test for tenderness. Grab a fork and gently pierce the center of a stack. If it slides in easily without much resistance, they are done! Remember, they are packed tight, so they need that time all the way through to get fork-tender.
Here’s a super important step that I learned the hard way: don’t rush to yank them out! Let those beautiful crispy potato sides rest right there in the tin for five full minutes after they come out of the oven. They firm up a little during this rest, and it makes them much easier to handle when you go to plate them up. You’ll thank me later when they hold their shape!
How to Easily Remove Your Crispy Potato Stacks
Sometimes, even with good greasing, these starchy towers like to stick just a tiny bit, especially if you used that optional Parmesan cheese on top. Don’t panic and don’t shove a fork in there to pry them out! That’s the fastest way to wreck the beautiful stack shape.
Instead, take a very thin, flexible knife—like an offset spatula or even a small paring knife—and gently run it all the way around the inside edge of the muffin cup. Just wiggle it slightly as you go down to the base. You are just loosening the bond between the potato edge and the tin. Once you feel that little bit of give all the way around, you can carefully slide that knife underneath and gently lift the entire stack out. Plop it right onto your serving platter. They should slide out looking perfectly intact and ready to impress!
Make-Ahead and Holding Tips for Party Side Dish Success
If you’re anything like me, holiday baking means juggling oven space like a mad scientist. The great news about these potato stacks is they are built for planning ahead, which means less stress on the big day! You can actually assemble these whole things—layering the potatoes, brushing them with the garlic herb butter, sprinkling the cheese—up to a full 12 hours before you plan to bake them. Just cover that muffin tin tightly with plastic wrap, pop it in the fridge, and breathe a sigh of relief!
Now, the only hitch to assembling ahead is that they come out of the fridge cold. And cold things take longer to cook, obviously! So, if you’re baking them straight from the refrigerator, just plan on adding about 5 to 10 minutes onto that original baking time. You still need to check for that deep golden color and tenderness, but give them a little extra grace period in the oven.
What about after they’re baked? This is where these become the ultimate party side dish. The biggest enemy of a crispy potato is steam! If you cover baked ones, they get soggy instantly. So, here is my best trick for keeping them warm without losing that crunch. Once they come out of the oven, transfer the finished stacks to a regular baking sheet.
Then, turn your oven OFF. Seriously, turn it off completely. Leave the door just slightly ajar, maybe cracked open an inch or so. Place the baking sheet inside this warm, residual heat environment. They will stay piping hot and beautifully crisp for a solid 30 minutes without steaming. It’s simple magic, and it keeps your main oven free for that turkey or roast—perfect for any big dinner!
Variations for Your Potato Stacks with Garlic Herb Butter
I know you’re going to nail this recipe first time, but once you master the basics of these potato stacks with garlic herb butter, you have to start experimenting! This recipe is so flexible, which is what I love about good food.
For a fresh burst of flavor that screams spring, swap out some of the thyme for freshly snipped chives in your herb mix. They add a lovely, mild oniony note that plays well with the garlic!
If you absolutely have an extra cheese craving and want those delicious cheesy potato stacks, don’t just stop at the top. Try sprinkling just a tiny amount of grated Gruyère or sharp white cheddar between every two or three potato layers as you build them up. A little bit inside goes a long way toward moisture and richness!

Serving Suggestions for Holiday Side Dishes
Now that you have these beautiful, perfectly crisped garlic herb butter potatoes ready to go, you need to think about what they are sitting next to on the plate! These aren’t your average Tuesday night mashed potatoes; they deserve a main dish that matches their elegance. They are sturdy enough to stand up to anything, packed with flavor, and honestly, they photograph beautifully next to whatever star you cook up!
When I think about ideal pairings for these holiday side dishes, I always lean toward roasts. The richness of these potato stacks works wonders alongside simple, savory meats. If you are doing a big Christmas or Thanksgiving dinner, they are heavenly next to a prime rib—the herbaceous butter cuts right through the richness of the beef so nicely.
But don’t feel like you need a huge feast! These are equally amazing next to a perfectly slow-roasted chicken. Seriously, just season a whole chicken simply, let it roast slow, and these roasted potato stacks dripping with garlic flavor will steal the show for most guests. If you are sticking to something vegetarian, these pair wonderfully with a flavorful stuffed butternut squash or maybe even a mushroom Wellington. They soak up all those lovely pan juices, whichever direction you decide to go!
Frequently Asked Questions About Muffin Tin Potatoes
It happens every time I share this recipe—people have great questions about making sure these muffin tin potatoes turn out perfectly for their big dinner! Don’t worry if you’re working with a different setup or need to make a slight swap. We can figure it out; that’s what makes a home recipe great—it bends a little for your needs.
Can I use sweet potatoes instead of Russets for these potato stacks?
I know sweet potatoes are popular, and they taste amazing, but I really advise sticking to the Russets here for one crucial reason: structure! Russets are starchy, which means as they bake stacked up, they hold that gorgeous shape and get that fluffy interior. Sweet potatoes are waxy; they have too much water and not enough starch to really hold up to the stacking and pressing. If you use them, you’re most likely going to end up with a very soft, steamy mess instead of proper potato stacks.
How do I make cheesy potato stacks without burning the cheese?
Ah, yes, the call of cheesy potato stacks! If you load that Parmesan on at the beginning, it will brown way too fast and get dry before your potatoes are even cooked through. My trick is to treat the cheese like a finishing glaze. Sprinkle whatever cheese you are using—Parmesan or even a nice Gruyère—only during the last 10 minutes of baking. That gives the cheese just enough time to melt, get bubbly, and slightly golden without turning bitter or burning to a crisp.
If you want the cheese mixed in—which is delicious—just blend a little bit of a good melting cheese, like shredded Havarti, between every few layers as you build the stacks. Since the cheese melts right onto the potato, it won’t sit on the hot surface and scorch. It keeps the inside creamy, too!
What if I forgot to soften the butter? Don’t panic! Just cut the butter into tiny cubes and pulse it a few times in a food processor with the herbs and garlic until it forms a coarse paste. It won’t cream up exactly the same, but it will coat the potatoes well enough for baking.
Estimated Nutritional Data for Potato Stacks
Okay, so here’s the reality check! We are loading these delicious potato stacks up with butter and Parmesan (if you choose to use it), so they pack a punch of flavor, but they definitely bring some calories too. I always tell people upfront: this isn’t a diet snack, this is a celebration side dish, and it’s worth every glorious bite!
The numbers below are based on serving one stack, assuming you made the full 12 servings and included that optional Parmesan cheese for the full experience. But hey, remember that this is just an estimate! What brand of potato you use, how much butter you *really* used on those layers—it all changes things a bit. This is just a general guide for budgeting your plate, so take it with a grain of salt (and maybe a little extra salt on your next stack!).
- Calories: 145 per stack
- Total Fat: 9g
- Carbohydrates: 14g
- Protein: 2g
See? Not too bad for something that looks this elegant! If you skip the Parmesan—which I rarely do when I make these garlic herb butter potatoes—your fat content will dip slightly, too. The main thing is that you enjoy them! We aren’t tracking macros when we’re serving up the best holiday side dishes!
Share Your Experience with These Potato Stacks with Garlic Herb Butter
Whew! We made it through the slicing, the buttering, and the glorious baking process. Now that you’ve pulled these show-stopping potato stacks with garlic herb butter out of the oven, I desperately want to hear what you thought!
This is such a fun recipe to customize, and I thrive on seeing how you all make it your own. Did you stick strictly to the rosemary and thyme, or did you try sneaking in some smoked paprika for a little something different? Maybe you served them alongside a gorgeous beef tenderloin, or perhaps you used them as the ultimate party side dish for a casual weeknight meal.
Please don’t be shy! Leave a rating right here on the site—I want to know how crisp those edges got for you. And if you have a minute, drop a comment below telling me your favorite part of the process or what main dish you paired these muffin tin potatoes with. Knowing how these recipes work in *your* kitchen, with *your* family traditions, is honestly the best part of sharing everything I learned on the road and in mine!
PrintCrispy Potato Stacks with Garlic Herb Butter
Make elegant, crispy potato stacks baked in a muffin tin, flavored with a rich garlic herb butter. This recipe is perfect for holiday dinners or parties.
- Prep Time: 20 min
- Cook Time: 45 min
- Total Time: 65 min
- Yield: 12 stacks 1x
- Category: Side Dish
- Method: Baking
- Cuisine: American
- Diet: Vegetarian
Ingredients
- 3 large Russet potatoes
- 4 tablespoons unsalted butter, softened
- 2 cloves garlic, minced
- 1 teaspoon fresh rosemary, chopped
- 1 teaspoon fresh thyme leaves
- 1/2 teaspoon salt
- 1/4 teaspoon black pepper
- 1/4 cup grated Parmesan cheese (optional)
Instructions
- Preheat your oven to 400 degrees Fahrenheit (200 degrees Celsius). Lightly grease a standard 12-cup muffin tin.
- Prepare the garlic herb butter: In a small bowl, combine the softened butter, minced garlic, rosemary, thyme, salt, and pepper. Mix until fully combined.
- Wash and dry the potatoes. Do not peel them.
- Slice the potatoes very thinly, aiming for about 1/16 to 1/8 inch thickness. A mandoline slicer works best for uniform thickness.
- Take a few potato slices and layer them in a circular, overlapping pattern inside each muffin cup. You want the edges of the slices to stick up slightly over the rim of the cup to create a crisp edge.
- Brush the layers of potatoes generously with the garlic herb butter mixture as you stack them. Use about half the butter mixture on the first layer of stacks.
- Continue layering and brushing with butter until the muffin cups are full, usually holding 6 to 8 slices per stack. Brush the tops generously with the remaining butter.
- If using, sprinkle the tops of the potato stacks with Parmesan cheese.
- Bake for 35 to 45 minutes, or until the edges are deeply golden brown and crispy, and the potatoes are tender when pierced with a fork.
- Let the stacks cool in the tin for 5 minutes before carefully running a thin knife around the edge of each stack and lifting them out.
Notes
- For make-ahead preparation, you can assemble the unbaked stacks in the muffin tin up to 12 hours ahead. Cover them tightly with plastic wrap and refrigerate. Add 5 to 10 minutes to the baking time if baking directly from the refrigerator.
- To keep the potato stacks warm for serving, place the baked stacks on a baking sheet and keep them in a turned-off oven with the door slightly ajar for up to 30 minutes.
- If you do not have a muffin tin, you can arrange the buttered, layered potatoes on a parchment-lined baking sheet and roast them until crisp.
Nutrition
- Serving Size: 1 stack
- Calories: 145
- Sugar: 1
- Sodium: 210
- Fat: 9
- Saturated Fat: 5
- Unsaturated Fat: 4
- Trans Fat: 0
- Carbohydrates: 14
- Fiber: 1
- Protein: 2
- Cholesterol: 20